Tài iệu Photoshop cs5 by Dayley part 74 pot
Bạn đang xem bản rút gọn của tài liệu. Xem và tải ngay bản đầy đủ của tài liệu tại đây (467.49 KB, 8 trang )
Chapter 16: Painting and Brushes
519
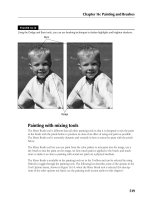
FIGURE 16.13
Using the Dodge and Burn tools, you can use brushing techniques to darken highlights and brighten shadows.
Burn
Dodge
Painting with mixing tools
The Mixer Brush tool is different than all other painting tools in that it is designed to mix the paint
in the brush with the pixels below to produce as close of an effect of using real paint as possible.
The Mixer Brush tool is extremely dynamic and versatile in how it mixes the paint with the pixels
below.
The Mixer Brush tool lets you use paint from the color palette to mix paint into the image, use a
dry brush to mix the paint on the image, set how much paint is applied to the brush, and much
more to make it as close to painting with actual wet paint on a physical medium.
The Mixer Brush is available in the painting tools set in the Toolbox and can be selected by using
Shift+B to toggle through the painting tools. The following list describes some of the options in the
Tool Options menu, shown in Figure 16.14, when the Mixer Brush tool is selected (for descrip-
tions of the other options not listed, see the painting tools section earlier in this chapter):
24_584743-ch16.indd 51924_584743-ch16.indd 519 5/3/10 10:37 AM5/3/10 10:37 AM
Part V: Painting, Paths, Shapes, and Text
520
FIGURE 16.14
Tool options for the mixer brush allow you to set the color and control the paint mix, color, and cleaning
of the brush.
Presets
Brush panel
Load Brush After Stroke
Brush mode
Brush
presets
Color
Clean Brush After Stroke
Load Control
l
Color: This displays the current paint that’s loaded in the brush. This feature is critical
when you are painting with wet paint so you can see what colors of paint will be applied
with the brush strokes. The area in the center is the area of the brush at the tips that most
affects the pixels. The area to the outside corresponds to the area of the bristles farthest
from the tips and does not affect the pixels as much.
When the brush is clean, this displays a transparent pattern. When the brush is full of a
single color, this displays a solid color. When the brush is mixed, it displays the mix of
colors as shown in Figure 16.15. When the outside area is transparent, only the tip of the
brush is wet. When you click the Color option, it launches a color chooser that allows you
to set the color of paint that is applied using the brush strokes.
FIGURE 16.15
The Color option displays the paint that is currently loaded in the brush. An empty
brush is transparent, and a mixed brush shows all mixed colors.
Empty Single color Mixed
l
Load Control: This allows you to quickly load or clean the brush. You also have the
option of setting the Load Solid Colors only. This loads the brush with a solid color only.
If you use this option with the Clean Brush After Stroke option, the brush is loaded with a
single color only.
l
Load Brush After Stroke: When you use this option, the brush is reloaded with the fore-
ground color after each stroke. This is a great way to paint a large area, but it can result in
more paint added to the canvas than you may think, because the paint in the brush is con-
stantly being replenished.
24_584743-ch16.indd 52024_584743-ch16.indd 520 5/3/10 10:37 AM5/3/10 10:37 AM
Chapter 16: Painting and Brushes
521
l
Clean Brush After Stroke: When you use this option, the brush is cleaned after each
stroke. If you use this option with the Load Brush After Stroke option, the brush is always
loaded with the foreground color only.
l
Brush Mode: This allows you to quickly set the wetness, load, and mix of the brush
stroke to preset values. Essentially, it’s the same thing as defining how thin the paint is
and the heaviness of the mixture of paints as the stroke is applied to the canvas. You can
specify wetness levels between dry and very wet, where dry means a solid stroke and very
wet means the paint is very thinly applied to the pixels. You can specify mixture levels of
light or heavy. You also have the option of selecting custom and setting specific values.
Figure 16.16 shows an example of some of these settings.
FIGURE 16.16
Using different wetness, load, and mixture levels changes the way that paint is applied
to the pixels below.
Dry, light load
Dry, heavy load
Wet, light mix
Wet, heavy mix
l
Wet: This specifies the exact percentage to use for the wetness of the paint on the brush.
The wetter the paint, the thinner the amount of paint applied.
l
Load: This allows you to specify the percentage of paint to place into the brush each time
the brush is loaded.
l
Mix: This specifies the percentage of mixing that occurs between the paint in the brush
and the pixels below when the brush stroke is applied to the image.
l
Sample All Layers: When this option is selected, the Mixer Brush tool samples all the lay-
ers in the document when applying paint. Keep in mind that the resulting painting effect
is applied only to the selected layer.
Tip
Using the Sample All Layers options, you can create a blank layer to paint on that makes the painting effect
non-destructive. You can even paint on multiple new layers, so you can try different techniques until you find
one you like. n
24_584743-ch16.indd 52124_584743-ch16.indd 521 5/3/10 10:37 AM5/3/10 10:37 AM
Part V: Painting, Paths, Shapes, and Text
522
Using the Brush Panel
The Brush panel is by far the most complex and capable tool in defining how painting strokes are
applied to an image. The Brush panel has two purposes: to select the type of brush and to define
the behavior of the brush when applying brush strokes.
Using the options available in the Brush panel, you can define the shape, bristle length, stiffness,
texture, and many more features of the brush used to apply the painting effects to the image. At
any time, you can reset the settings used in a brush by selecting Reset Brush Controls from the
Brush panel menu.
The Brush panel can be opened by pressing F5 on the keyboard, selecting the Brush panel option
from one of the painting tools, or selecting Window ➪ Brush from the main menu. The following
sections discuss the aspects you can control when setting up brushes.
Selecting the brush tip shape
The shape of the brush tip controls the actual pixels that are changed during each movement of the
brush stroke. Different brush shapes can result in very different effects. You may need to play
around with a few of the shapes until you get the hang of the effect that different shapes have.
The brush tips are displayed and selected when the Brush Tip Shape option is selected, as shown
in Figure 16.17. The brush tips available are based on the currently selected set from the Brush
Presets panel, which is discussed later in this chapter. To change the set of bushes displayed in the
Brush Tip Shape list, click the Brush Presets button and select a different list from the panel.
You can select from two types of brush tips: flat and bristle. Flat brush shapes are the traditional
shapes that Photoshop has had for years. Flat brushes define a set of pixels that get affected. Bristle
brushes are simple shapes with bristling behavior that provide an experience much closer to using
a physical brush. The following sections describe these brush tips in more detail.
Note
You can save the settings for a brush that you have configured in the Brush panel by selecting New Brush
Preset from the Brush panel menu or by clicking the Create New Brush icon at the bottom of the Brush panel.
You then name the brush, and it is available in the brush list. n
Selecting flat brush shapes
Flat brush shapes are based on rasterized shapes, as you can see in Figure 16.17. The solid pixels
in the shape are used to sample and apply the painting effect during each movement of the mouse.
Many different tip shapes can be applied to your images, and the more you play with them, the
better you understand how they can be applied.
In addition to selecting the brush tip shape, you also can configure some additional properties of
the brush tip shape:
24_584743-ch16.indd 52224_584743-ch16.indd 522 5/3/10 10:37 AM5/3/10 10:37 AM
Chapter 16: Painting and Brushes
523
FIGURE 16.17
Setting the shape of a flat brush
Note
As you change any of the brush settings that apply to how the stroke will look, the display at the bottom is
altered to reflect the new look. This allows you to understand better what effect that setting changes have on
the actual brush stroke. n
l
Shape: This allows you to select one of the brush shapes from the current list selected in
the Brush Presets panel.
l
Size: This adjusts the size of the brush.
l
Flip X/Flip Y: This flips the brush tip shape along the X or Y axis. This allows you to cre-
ate mirror images of the brush either vertically or horizontally. Using mirrored brush tech-
niques can help if you are using very large brush strokes to create symbols or characters.
l
Angle: This sets the angle of the brush from 0 to 360 degrees. Tilting the angle of the
brush has an effect on how the stroke looks, especially at the beginning and end.
l
Roundness: This sets how round the brush is. Round brushes paint much more evenly
than thin brushes. However, thin brushes can paint into corners and generate angled
effects that round brushes cannot.
l
Hardness: This sets the hardness of the brush. Hard brushes are much more dramatic in
the painting effect than soft brushes. When working with wet paint, high hardness can
result in the skipping effect where the bristles skip instead of smoothly flowing.
l
Spacing: This specifies the spacing of the brush stroke from 1 percent to 1000 percent.
Using a spacing of 1 percent makes the stroke flow smoothly. Using a high spacing value
results in the stroke being applied at intervals. Typically, you want this to be set very low
unless you are trying to scatter the effect of the brush stroke.
24_584743-ch16.indd 52324_584743-ch16.indd 523 5/3/10 10:37 AM5/3/10 10:37 AM
Part V: Painting, Paths, Shapes, and Text
524
Selecting bristle brush shapes
Bristle brush shapes are based on computer algorithms that calculate how to apply the paint based
on a set of digital bristles. Using the Brush Tip Shape settings shown in Figure 16.18, you define
the shape and nature of the bristles. When you use the bristle brush to apply the painting strokes,
Photoshop uses the bristle brush settings to determine how the painting effect is calculated during
each movement of the mouse.
FIGURE 16.18
Setting the shape of a bristle brush
Bristle Brush preview
The available bristle brush shapes are shown at the top of the list in Figure 16.18. In addition to
selecting the brush tip shape, you can configure some the following settings to define the nature of
the bristle brush:
l
Shape: This specifies the shape of the bristle brush tip. You can select Blunt, Curve,
Angle, Fan, or Point. You also can select round or flat versions of these brush tips.
l
Bristles: This specifies the amount of bristles present in the brush tip. More bristles give
you a smoother effect, and fewer bristles give you more textured strokes.
l
Length: This specifies the length of the bristles from 1 percent to 500 percent. The longer
the bristles, the more paint the brush holds and the more sweeping the strokes are.
l
Thickness: This specifies the thickness of the bristles. A bigger thickness value results in a
more textured effect because the bristles show up better, whereas thinner bristles result in
smoother effects.
24_584743-ch16.indd 52424_584743-ch16.indd 524 5/3/10 10:37 AM5/3/10 10:37 AM
Chapter 16: Painting and Brushes
525
l
Stiffness: This specifies how flexible each bristle is. More flexible bristles allow for more
sweeping strokes, a softer look, and more sensitive effects. Stiffer bristles provide more
dramatic effects and a greater amount of texture to the stroke.
l
Angle: This allows you to set the angle of the brush as you apply the stroke. Adjusting the
angle changes the shape of the brush stroke, especially at the end.
Photoshop provides a Bristle Brush preview that allows you to see the shape of the bristle brushes.
The Bristle Brush preview can be toggled on and off by using the button on the bottom of the
Brush panel (refer to Figure 16.18). Figure 16.19 shows some of the sizes and shapes available
using different settings for the bristle brush.
Note
Enable OpenGL Drawing must be enabled in the Performance tab of the Preferences panel for the Bristle Brush
preview to be enabled. To open the Preferences panel press Ctrl(Ô)+K. n
FIGURE 16.19
Photoshop provides a Bristle Brush preview window that allows you to see the shape of the bristle brush
based on the settings you apply in the Brush panel.
24_584743-ch16.indd 52524_584743-ch16.indd 525 5/3/10 10:37 AM5/3/10 10:37 AM
Part V: Painting, Paths, Shapes, and Text
526
One of the most useful features of the Bristle Brush preview is that it provides you with the ability
to see the behavior of the painting stroke through a simple animation. As you paint, the brush
comes down to the bottom of the preview window. The dashed line close to the bottom represents
the paper, and you can see the bristles bending as the brush stroke is applied. This feature is most
useful if you are using a stylus pen, because it also shows you the pressure and angle of the brush,
as shown in Figure 16.20.
FIGURE 16.20
The Bristle Brush preview window animates the movement of the brush and bristles when you are applying
paint stokes. You can see the curvature of the bristles caused by the pressure and angle of the stylus pen.
Light pressure Hard pressure Angled pen
Top Side
Cursor
Cursor Cursor
Top Side Top Side
Note
The preview window shows two different views of the brush: the top and side views. To toggle between the
two views, click the preview window. n
Setting the brush behavior
In addition to setting the brush shape and attributes, Photoshop provides many additional options
that define the behavior of the brush as you apply painting strokes. These options are available by
selecting them in the Settings menu below the Brush Tip Shape setting. These settings can be tog-
gled on and off by selecting or deselecting the check box next to them.
The settings also can be locked and unlocked by clicking the lock icon next to the name. Locking
the setting keeps the values static, even as you toggle between other brushes and change other set-
tings. Settings that are not locked can be reset to the default values by selecting Reset All Locked
settings from the Brush panel options menu. This feature is great if you need to reset the behavior
of the brush and start over.
The following is a list of the simple behavior settings in the Brush panel that do not have additional
dialog box options:
l
Noise: This adds noise along with the paint as the stroke is applied. This has the effect of
adding extra texture to the paint stroke and minimizing harsh changes made by editing
paint tools.
24_584743-ch16.indd 52624_584743-ch16.indd 526 5/3/10 10:37 AM5/3/10 10:37 AM
