Tài iệu Photoshop cs5 by Dayley part 75 ppt
Bạn đang xem bản rút gọn của tài liệu. Xem và tải ngay bản đầy đủ của tài liệu tại đây (364.96 KB, 9 trang )
Part V: Painting, Paths, Shapes, and Text
526
One of the most useful features of the Bristle Brush preview is that it provides you with the ability
to see the behavior of the painting stroke through a simple animation. As you paint, the brush
comes down to the bottom of the preview window. The dashed line close to the bottom represents
the paper, and you can see the bristles bending as the brush stroke is applied. This feature is most
useful if you are using a stylus pen, because it also shows you the pressure and angle of the brush,
as shown in Figure 16.20.
FIGURE 16.20
The Bristle Brush preview window animates the movement of the brush and bristles when you are applying
paint stokes. You can see the curvature of the bristles caused by the pressure and angle of the stylus pen.
Light pressure Hard pressure Angled pen
Top Side
Cursor
Cursor Cursor
Top Side Top Side
Note
The preview window shows two different views of the brush: the top and side views. To toggle between the
two views, click the preview window. n
Setting the brush behavior
In addition to setting the brush shape and attributes, Photoshop provides many additional options
that define the behavior of the brush as you apply painting strokes. These options are available by
selecting them in the Settings menu below the Brush Tip Shape setting. These settings can be tog-
gled on and off by selecting or deselecting the check box next to them.
The settings also can be locked and unlocked by clicking the lock icon next to the name. Locking
the setting keeps the values static, even as you toggle between other brushes and change other set-
tings. Settings that are not locked can be reset to the default values by selecting Reset All Locked
settings from the Brush panel options menu. This feature is great if you need to reset the behavior
of the brush and start over.
The following is a list of the simple behavior settings in the Brush panel that do not have additional
dialog box options:
l
Noise: This adds noise along with the paint as the stroke is applied. This has the effect of
adding extra texture to the paint stroke and minimizing harsh changes made by editing
paint tools.
24_584743-ch16.indd 52624_584743-ch16.indd 526 5/3/10 10:37 AM5/3/10 10:37 AM
Chapter 16: Painting and Brushes
527
l
Wet Edges: This tries to add an element of wetness of the painting effect in the edges of
the stroke. This can help soften the edges of paint strokes. This option is not needed or
available when you are using the Mixer Brush tool.
l
Airbrush: When this option is selected, the stroke is applied in gradual tones to the
image. This is a great way to soften the effect made by editing paint tools.
l
Smoothing: When this option is selected, the brush stroke produces smoother curves.
This option is most effective when you are using quick paint strokes with a stylus. This is
a nice option, but it may produce a slight lag time when rendering the stroke.
l
Protect Texture: When this option is selected, the same pattern and scale are applied to
all brush presets that have a texture to help simulate a consistent canvas texture when
painting with multiple, textured brush tips.
The following sections cover the more advanced behavior settings in the Brush panel that contain
extra dialog box options.
Shape Dynamics
The Shape Dynamics settings, shown in Figure 16.21, are designed to help you control the size,
angle, and shape of the brush during the actual painting stroke.
FIGURE 16.21
Setting the shape dynamics of the brush tip
24_584743-ch16.indd 52724_584743-ch16.indd 527 5/3/10 10:37 AM5/3/10 10:37 AM
Part V: Painting, Paths, Shapes, and Text
528
Here are the settings you can configure to control the Shape Dynamic effect:
l
Control: The Control setting defines what input is used in determining the variance
applied by the jitter settings. Setting the Control to Fade allows you to specify how many
steps the jitter adjustment is applied over. The other settings allow you to use the pen
pressure, tilt, and stylus wheel values to control the variance that’s applied. The Size Jitter,
Angle Jitter, and Roundness Jitter settings all have Control settings that allow you to define
how the value of each is controlled.
l
Size Jitter: The Size Jitter settings control the variation in the brush tip’s size as the stroke
is being created by dragging the cursor. A Size Jitter setting of 0 percent means that the
brush tip size doesn’t change at all during the stroke. The higher the percentage, the more
the size dynamically changes as the stroke is being made. The Minimum Diameter setting
specifies the minimum size that the jitter can reduce the brush as the stroke is being
applied.
Using the Pen Tilt setting to control the size jitter gives you the most control. If you are
using the Pen Tilt option in the Control setting, the Tilt Scale option can be used to define
the amount of variance in the Size Jitter. The larger the Tilt Scale setting, the more vari-
ance you see in the size of the brush.
l
Angle Jitter: The Angle Jitter setting allows you to vary the angle of the brush based on
different Control options. In addition to the regular Control options, if you have a stylus
tablet that Photoshop recognizes attached to your system, you have the option to use the
following:
l
Rotation: This varies the angle of the brush based on the rotation of the stylus pen.
l
Initial Direction: This varies the angle based on the initial direction of the brush
stroke. This is similar to holding the brush at a specific angle throughout the stroke
and is a great option if you are using the brush to add calligraphic text.
l
Direction: This varies the angle based on the current direction of the brush stroke.
This reduces the impact that flat brushes have when changing angles.
l
Roundness Jitter: The Roundness Jitter setting allows you to vary the roundness of the
brush as the stroke is being created. The more round the brush, the more consistent the
brush stroke is. Reducing the roundness allows for more dramatic brush strokes to appear
in the image. You can specify a Minimum Roundness value that keeps the brush from
varying too much.
l
Flip X Jitter/Flip Y Jitter: The Flip X Jitter option flips the jitter across the X axis of the
painting stroke. The Flip Y Jitter option transposes the jitter across the Y axis of the paint-
ing stroke.
Scattering
The Scattering settings, shown in Figure 16.22, are designed to help you apply a scattering effect as
you apply the brush stroke. The Scattering option creates the effect of scattering the brush tip in a
random displacement along the path of the stroke, as shown in Figure 16.23.
24_584743-ch16.indd 52824_584743-ch16.indd 528 5/3/10 10:37 AM5/3/10 10:37 AM
Chapter 16: Painting and Brushes
529
FIGURE 16.22
Setting the Scattering options of the brush tip
FIGURE 16.23
This shows the effect of using the scattering option. One of the lines is drawn without scattering, the other
with scattering.
Without scatter
With scatter
Here are the settings that you can configure to control the Scattering effect:
l
Control: The Control setting defines what input is used in determining the variance
applied by the scattering settings. Setting the Control to Fade allows you to specify how
many steps the scattering adjustment is applied over. The other settings allow you to use
the pen pressure, tilt, rotation, or stylus wheel values to control the variance that is
applied.
24_584743-ch16.indd 52924_584743-ch16.indd 529 5/3/10 10:37 AM5/3/10 10:37 AM
Part V: Painting, Paths, Shapes, and Text
530
l
Scatter: The Scatter settings control the variation in the scattering of the brush as the
stroke is applied. The variance of the scattering is controlled by the method specified in
the Control setting.
l
Both Axes: When this option is selected, the brush tip is scattered both horizontally and
vertically. When this option is not selected, the brush tip is scattered only horizontally or
vertically in a direction perpendicular to the movement of the stroke.
l
Count: This specifies the amount of brush tips to include in the scattering.
l
Count Jitter: This specifies the amount to vary the scattering and how to control the vari-
ance of the count based on the Control setting.
Texture
The Texture settings, shown in Figure 16.24, are designed to help you apply a texture effect to the
brush strokes. Using the texture effect, you can simulate textures such as an oil paint canvas or
wall that show up in the brush strokes.
FIGURE 16.24
Setting the texture options of the brush tip
Here are the settings that you can configure to control the Texture effect:
l
Texture: This allows you to select the texture from the patterns list that is currently selected
in the Presets Manager. Clicking the Texture option displays the list, and you can click the
triangle button to display a list of preset lists and options to load and save presets.
l
Invert: This inverts the pattern used to apply a texture to the brush stroke.
24_584743-ch16.indd 53024_584743-ch16.indd 530 5/3/10 10:37 AM5/3/10 10:37 AM
Chapter 16: Painting and Brushes
531
l
Scale: This sets the size of the pattern applied to the brush stroke. Setting this value too
high makes the pattern very apparent in the brush strokes. Setting this value too low elim-
inates the result of applying the pattern.
l
Texture Each Tip: When this option is selected, the texture is applied individually to
each brush mark in the brush stroke rather than to the entire stroke when it is finished.
Enabling this option is very CPU-intensive, but this option is required for the depth vari-
ance option to have an effect.
l
Mode: This specifies the blending mode to use when applying the texture pattern to the
brush stroke (before it is applied to the pixels below). This setting does not override the
blend mode setting in the Brush tool options.
l
Depth: This specifies how deeply the paint penetrates into the texture. A value of 0 per-
cent means that no pattern shows through.
l
Minimum Depth: This specifies the minimum penetration depth that is applied to a
stroke, even if the variance control reduces penetration below that level.
l
Depth Jitter: The Depth Jitter setting allows you to vary the depth that is applied to the
texture as the brush stroke is being created. Increasing this value can give the texture a
much more dramatic appearance.
l
Control: The Control setting defines what input is used in determining the variance
applied by the depth texture setting. Setting the Control to Fade allows you to specify how
many steps the depth texture variance is applied over. The other settings allow you to use
the pen pressure, tilt, rotation, or stylus wheel values to control the depth variance that is
applied.
Dual Brush
The Dual Brush option allows you to use two brushes at the same time to apply each stroke.
Using the Dual Brush option can add a whole new level of dynamics to your brushing tech-
niques. When the Dual Brush option is selected, the Brush panel dialog box changes to allow
you to select the second brush. You also can select the blending mode used to combine the two
brush strokes before they are applied together to the image. Additionally, you can set the size,
spacing, scatter, and count to use in the second brush.
Color Dynamics
The Color Dynamics option, shown in Figure 16.25, provides a dynamic coloring effect by chang-
ing the brush stroke from the foreground to the background color as you apply the brush stroke.
Using the Color Dynamics option allows you to essentially paint with two colors at the same time.
The Foreground/Background Jitter setting controls the jitter between the foreground and back-
ground color. A value of 0 percent applies only the foreground color. A larger value means more
jitter between the two colors.
The variance between the foreground and background colors is adjusted using the Control setting.
The Control setting defines what input is used in determining the variance between the foreground
24_584743-ch16.indd 53124_584743-ch16.indd 531 5/3/10 10:37 AM5/3/10 10:37 AM
Part V: Painting, Paths, Shapes, and Text
532
and background colors. Setting the Control to Fade allows you to specify how many steps the color
variance is applied over. The other settings allow you to use the pen pressure, tilt, rotation, or sty-
lus wheel values to control the color variance that is applied.
You also can vary the hue, saturation, brightness, and purity in the colors by adjusting the sliders
in Figure 16.25.
FIGURE 16.25
Setting the color dynamics options of the brush tip
Transfer
The Transfer option, shown in Figure 16.26, gives you an additional level of control over how the
brush stroke is applied to the pixels below by varying settings such as wetness, flow, and opacity.
The Transfer option really has two modes: one for painting/editing brushes and one for the Mixer
Brush tool.
When you have a painting or editing brush selected, you can use the Transfer option to set an
amount of Opacity Jitter and Flow Jitter that occurs when applying the brush strokes. Increasing
the Opacity Jitter and Flow Jitter varies the intensity of the brush stroke and thus varies the effect
of the painting tool in a dynamic way.
The variance in all the Transfer controls is adjusted using the Control setting. The Control setting
defines what input is used in determining the variance in each transfer setting. Setting the Control
to Fade allows you to specify how many steps the variance is applied over. The other settings allow
you to use the pen pressure, tilt, rotation, or stylus wheel values to control how the variance is
applied.
24_584743-ch16.indd 53224_584743-ch16.indd 532 5/3/10 10:37 AM5/3/10 10:37 AM
Chapter 16: Painting and Brushes
533
FIGURE 16.26
Setting the transfer options of the brush tip
Brush Presets panel
As you can see from the previous section, the options in configuring the shape and behavior of
brushes are limitless. This makes the ability to save brush settings a critical part of using the paint-
ing features in Photoshop.
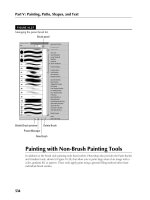
The Brush Presets panel, shown in Figure 16.27, displays a list of the preset brushes with their cor-
responding brush stroke preview. The Brush panel menu also allows you to set the preview mode
to text only; small, medium, or large thumbnails; and small or large thumbnail lists. You also can
select one of the many sets of preset brush lists from the panel menu. Brush presets can be added,
renamed, and removed from the current list using the buttons at the bottom of the panel menu.
The panel menu provides the following options to manage the brushes that are applied to the pre-
sets list:
l
Reset Brushes: This resets the preview list to the Photoshop default.
l
Load Brushes: This launches a dialog box to load a saved set of brushes from a file. The
new set is added to the existing set.
l
Save Brushes: This launches a dialog box to save the current set of brushes as a new pre-
set file. This is the best way to permanently organize the brushes you are using.
l
Replace Brushes: This launches a dialog box to load a saved set of brushes from a file.
The new set replaces the existing set.
24_584743-ch16.indd 53324_584743-ch16.indd 533 5/3/10 10:37 AM5/3/10 10:37 AM
Part V: Painting, Paths, Shapes, and Text
534
FIGURE 16.27
Managing the preset brush list
Brush panel
Bristle Brush preview
Preset Manager
New Brush
Delete Brush
Painting with Non-Brush Painting Tools
In addition to the brush style painting tools listed earlier, Photoshop also provides the Paint Bucket
and Gradient tools, shown in Figure 16.28, that allow you to paint large areas of an image with a
color, gradient fill, or pattern. These tools apply paint using a general filling method rather than
individual brush strokes.
24_584743-ch16.indd 53424_584743-ch16.indd 534 5/3/10 10:37 AM5/3/10 10:37 AM
