Ebook Photoshop Easy-Hard part 11 potx
Bạn đang xem bản rút gọn của tài liệu. Xem và tải ngay bản đầy đủ của tài liệu tại đây (127.45 KB, 7 trang )
Create a new layer.
Change the blending mode to "color"
(This is just a matter of personal choice for this project, you could use
any mode you liked, depending on the result you are looking for.)
Here is the big secret to these shapes: Select the polygon lasso tool.
This tool draws straight lines between your clicks.
The trick is to hold the shift key. This will constrain
the angles to multiples of 45 deg. Click and klikc and
click and
Finally when you get back to your point of origin, you
will see a little circle, indicating that you are at the
start point. Click and the entire shape will become a
selection.
Now select your foreground color. I chose a flesh tone.
(Open the color picker by clicking on the swatch at the bottom of the
toolbar)
Fill the shape with the forground color. Alt/Option+delete
Do not deselect yet!
Create a new layer by clicking on the new layer icon.
Now for an outline. Edit>stroke and enter the settings.
Thats it! Use this technique for your designs and interfaces.
I hope you are enjoyinh it so far.
Next week we will wrap up the super tutorial with tiny text.
Technical Support Forum :
BACKING UP PHOTOSHOP
by Colin Smith
We are all used to backing up our files in case of the unexpected. But what about
Photoshop? The first thing we do when trouble shooting is reset the preferences
file. This fixes a multitude of problems. The downside is when you reset the prefs
you also lose all your custom settings including Patterns, styles, shapes, gradients
and color swatches. I am going to show you how to back these up, so when and not
if you reset your prefs all your hard work is all snug and safe on your hard-drive.
(You could also make a backup to a cd)
Before I show you the backup method, let me tell you a little known way to reset
your prefs. I don't like fishing through all my files trying to find the prefs file and
deleting it. When you launch Photoshop, press the Alt+Ctrl+Shift keys/ Mac:
Option+Cmd+shift. You will be shown a dialog box offering to replace the
preference file, click ok.
Now lets look at the backup process:
Tip: Before you do this, create a new action and record it so that in future you can
do backups in seconds. Also don't forget to save the action, or you will lose this too
on a prefs reset!
Starting with the styles, click on the little arrow at the top right. When you see the
drop down box, select "save styles"
The default location will come up in the styles folder. Create a new file with your
custom name, I chose "Colin" Click ok and your Styles are backed up.
Now do the same with your color swatches
Give it the custom name
Select the gradient tool and in the top toolbar click the gradient to launch the
gradient picker.
Click the arrow in the gradient picker and "save gradients"
Once again, give your custom name to the gradients and press ok.
Now lets back up our patterns. This is a little bit trickier, but I will help make it
simple for you.
Press Shift+delete to launch the fill dialog box.
Change to pattern. Click the arrow to the right of the thumbnail display and the
patterns will be displayed.
Press the little arrow and select "save patterns"
Give it a name again and save
Now do the shapes. Select the custom shapes tool and in the top toolbar find, "save
shapes"
Save under the custom name as before.
Lastly save the brushes, you know the procedure now J
Congratulations you have now backed up Photoshop. Press the Stop button to stop
recording the action. To restore, just do the same steps but select "load" instead of
"save" Record an action for that too and call it Photoshop restore.
Now when you have to reset the prefs, you will be back up and in business in just a
minute or so. The only thing you can't back up is the settings in the preferences
file. So make a note of any custom settings you have made there. Tip: Screen
captures work really well.
Technical Support Forum :
LÀM MIẾNG BĂNG DÍNH
1.) Mở 1 bức ảnh bất kỳ
2.) Đây là ảnh đã qua xử lý với kĩ thuật " ẢNH 2 TÔNG MÀU"
3.) Mở 1 file mới , kích thước phải lớn hơn bức ảnh cô gái này
4.) lôi bức ảnh cô gái qua file mà bạn vừa tạo
5.) Tạo 1 layer mới , đặt tên là Băng Dính
6.) Chọn công cụ Polygonal Lasso Tool :
7.) Vẽ 1 đường như hình
8.) Chọn màu trắng , sau đó nhấn Alt+BackSpace để tô màu trắng cho nó
9.) Tiếp tục dùng công cụ Polygonal Lasso Tool n sau đó vẽ hình răng cưa cho 2
đầu của băng dính , xem film minh họa :
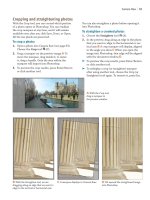
10.) Sau khi vẽ xong nhấn Delete , bạn sẽ có :
11.) vào Layer > Layer Style > outer glow, thông số như hình :
12.) Sau đó giảm Opacity xuống còn 50%
13.) Kích chuột phải vào layer Băng dính và chọn Duplicate để nhân đôi layer này
, bạn hãy nhân bản nó lên 3 cái , sau đó dùng công cụ move để di chuyển chúng
đến 3 góc còn lại , nhấn Ctrl+T để xoay chiểu cho chúng .
Kết quả đây
Technical Support Forum :
Băng keo
-
Digital Sticking
-
plaster
Gửi bởi: Final Fantasy
Một cách đơn giản để có được một miếng băng dính kỹ thuật số!
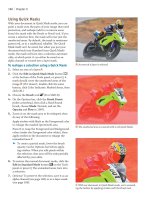
1. Mở một file ảnh. Tôi dùng cô nàng đỏng đảnh nhưng xinh đẹp là Jenifer Lopez.
N
ếu nàng này là thần tượng của ai thì cho tui xin lỗi trước nha. Nếu bạn thích thì
Down cô nàng về mà thao tác.
2. Sau khi mở ra bạn nhấn Ctrl-A và sau đó là Ctrl-T để vào Transformation. Bạn
có thể xoay thế nào tuỳ thích, nhưng miễn sao trông nó điệu điệu một chút và chừa
một khoảng để còn "dán băng keo". Của tôi như thế này.
3. Tạo một layer mới đặt tên là Băng Keo.
4. Dùng công cụ Polygon Lasso Tool và vẽ hình băng keo như bạn muốn. Nhấn D
để trả lại màu mặc định nền trước nền sau cho PTS.
5. Tô nó với màu trắng (Ctrl-Backspace). Bỏ chọn (Ctrl-D)
6. Vào Layer Style > Outer Glow và thiết lập thông số như hình này
7. Sau đó thì bạn Lại dùng công cụ Polygon Lasso để tạo những đường cắt mép.
Bạn tạo sao cho nó thật thật một chút, có nghĩa là càng nham nhở càng thật! tôi
làm như thế này! (Bạn có thể Zoom in để thao tác dễ hơn)
8. Sau đó thì nhấn phím Delete khi bạn đã có một vùng lựa chọn.
9. Lập lại từ bước 4 đến bước 8 để có hai miếng băng keo ở hai góc của tấm hình.
10. Sau khi bạn làm xong hai bên băng keo, bạn đổi chế độ hoà trộn thành Overlay
và hạ mức Opacity xuông còn khoảng 25%.
Đây là kết quả của tôi.
© www.bantayden.com - Dịch và minh hoạ bởi Bá Tước Monte Cristo