Character Animation with Direct3D- P5 potx
Bạn đang xem bản rút gọn của tài liệu. Xem và tải ngay bản đầy đủ của tài liệu tại đây (581.98 KB, 20 trang )
// set up bone transforms
int numBones = boneMesh->pSkinInfo->GetNumBones();
for(int i=0;i < numBones;i++)
{
D3DXMatrixMultiply(&boneMesh->currentBoneMatrices[i],
&boneMesh->boneOffsetMatrices[i],
boneMesh->boneMatrixPtrs[i]);
}
//Set HW Matrix Palette
D3DXMATRIX view, proj;
pEffect->SetMatrixArray(
"MatrixPalette",
boneMesh->currentBoneMatrices,
boneMesh->pSkinInfo->GetNumBones());
//Render the mesh
for(int i=0;i < boneMesh->NumAttributeGroups;i++)
{
int mtrl = boneMesh->attributeTable[i].AttribId;
pEffect->SetTexture("texDiffuse",
boneMesh->textures[mtrl]);
D3DXHANDLE hTech = pEffect->GetTechniqueByName("Skinning");
pEffect->SetTechnique(hTech);
pEffect->Begin(NULL, NULL);
pEffect->BeginPass(0);
boneMesh->MeshData.pMesh->DrawSubset(mtrl);
pEffect->EndPass();
pEffect->End();
}
}
}
if(bone->pFrameSibling != NULL)
Render((Bone*)bone->pFrameSibling);
if(bone->pFrameFirstChild != NULL)
Render((Bone*)bone->pFrameFirstChild);
}
66 Character Animation with Direct3D
Please purchase PDF Split-Merge on www.verypdf.com to remove this watermark.
Not much has changed in this function compared to the software skinning
example. Most notable, of course, is the use of the shader and uploading the Matrix
Palette to it. Otherwise, you loop through the different attribute groups of the mesh
and render it using the shader.
RENDERING STATIC MESHES IN BONE HIERARCHIES
Sometimes you might not want the character skinned. Making animated machinery
is a prime example. Machinery rarely has “soft” parts; thus you don’t really need to
skin a mesh to make mechanical creations in your games. Nonetheless, you might
want to have a bone hierarchy controlling the different parts of the “machine.” Take
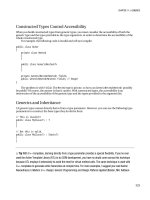
the example of a robot arm, as shown in Figure 3.7.
Chapter 3 Skinned Meshes 67
EXAMPLE 3.3
Check out Example 3.3 on the accompanying CD-ROM. Onscreen, you
won’t see much difference compared to the previous example, but behind
the scenes many things are indeed completely different. As always, study the code
and don’t move forward until you understand it completely.
Please purchase PDF Split-Merge on www.verypdf.com to remove this watermark.
Another case where you need rigid/solid objects is when they are combined
with skinned meshes. In the previous examples of the skinned soldier, you may
have noticed that he was missing both helmet and rifle. That’s because these two
objects have been rigid objects containing no skinning information. One way to
include these objects would be to assign all vertices in them to one bone (the head
bone, for example, in the case of the helmet). However, that would be a serious
waste of CPU/GPU power.
In this section, you’ll learn how to load and render both skinned meshes and
static meshes from the same .x. file—although, to be frank, you have already covered
the loading. Loading the meshes in the
CreateMeshContainer() function is actually
already done. So here’s another high-level look at this function:
HRESULT BoneHierarchyLoader::CreateMeshContainer( )
{
//Create new Bone Mesh
//Get mesh data here
//Copy materials and load textures (like with a static mesh)
68 Character Animation with Direct3D
FIGURE 3.7
As you can see, each part of the robot arm is rigid and therefore does not
require skinning.
Please purchase PDF Split-Merge on www.verypdf.com to remove this watermark.
if(pSkinInfo != NULL)
{
//Store Skin Info and convert mesh to Index Blended Mesh
}
//Set ppNewMeshContainer to newly created boneMesh container
}
As you can see, you only convert the mesh to an Index Blended Mesh if the
pSkinInfo parameter to this function is not NULL. But in the case of the helmet and the
rifle for the soldier, the
pSkinInfo parameter will of course be NULL, and as a result the
mesh doesn’t get converted. However, mesh data and the belonging materials and
textures have still been copied. So all you really need to do is render them! And to do
that you need only to add the case of rendering static meshes to the
SkinnedMesh::Render() function.
void SkinnedMesh::Render(Bone *bone)
{
if(bone == NULL)bone = (Bone*)m_pRootBone;
//If there is a mesh to render
if(bone->pMeshContainer != NULL)
{
BoneMesh *boneMesh = (BoneMesh*)bone->pMeshContainer;
if(boneMesh->pSkinInfo != NULL)
{
//Here’s where the skinned mesh is rendered
//only if the pSkinInfo variable isn’t NULL
}
else
{
//Normal Static Mesh
pEffect->SetMatrix("matW",
&bone->CombinedTransformationMatrix);
D3DXHANDLE hTech;
hTech = pEffect->GetTechniqueByName("Lighting");
pEffect->SetTechnique(hTech);
Chapter 3 Skinned Meshes 69
Please purchase PDF Split-Merge on www.verypdf.com to remove this watermark.
//Render the static mesh
for(int i=0;i < boneMesh->materials.size();i++)
{
pEffect->SetTexture("texDiffuse",
boneMesh->textures[i]);
pEffect->Begin(NULL, NULL);
pEffect->BeginPass(0);
boneMesh->OriginalMesh->DrawSubset(i);
pEffect->EndPass();
pEffect->End();
}
}
}
if(bone->pFrameSibling != NULL)
Render((Bone*)bone->pFrameSibling);
if(bone->pFrameFirstChild != NULL)
Render((Bone*)bone->pFrameFirstChild);
}
The static mesh is still locked to the bone hierarchy. As you can see, you use
the combined transformation matrix of the bone to which the mesh is linked when
you set the world matrix of the static mesh. So when you animate the neck bone
of the character, the helmet will follow automatically. You can now use this code
to render a robot character that has no skinned parts at all or a hybrid character
like the soldier that has both skinned and static meshes.
70
Character Animation with Direct3D
Please purchase PDF Split-Merge on www.verypdf.com to remove this watermark.
CONCLUSIONS
Congratulations! If you’re still reading, you’ve covered the meatiest chapter of the
entire book. Hopefully you’ve managed to learn something along the way. It is a
long process to attach a few vertices to a skeleton, isn’t it?
At the end of this chapter you don’t have much more to show for your work than
you had in Chapter 2. Well, to be honest, it is in the next chapter that you will really
experience the payoff—when you animate the skeleton (and with it the character).
Take time to look at each of the examples again; most likely, you’ll learn a lot
from playing with the code.
Chapter 3 Skinned Meshes 71
EXAMPLE 3.4
Example 3.4 contains the code just covered. The soldier finally looks like he
did when the soldier.x file was rendered as a static mesh in Chapter 2.
However, the major difference now is that the character has the underlying bone
hierarchy and the mesh is connected to it. In this example, pay extra attention to the
SkinnedMesh class and especially its rendering function.
Please purchase PDF Split-Merge on www.verypdf.com to remove this watermark.
CHAPTER 3 EXERCISES
Implement your own Skinned Mesh class, and support both hardware and
software skinning with it.
Check out the implementation of the character shadow in the software skinning
examples. Implement it also for the hardware-skinned character.
If you have access to 3D modeling software, create a skinned character, export
it to the .x file format, and read it into your application.
Access the Matrix Palette and multiply a small transformation (rotation/scale)
to the neck bone’s transformation matrix. Try to make the character turn his
head.
Study the RenderSkeleton() function in the SkinnedMesh class. Try also to visu-
alize which bone has a
BoneMesh attached to it.
Implement your own version of the Bone, BoneMesh, and BoneHierarchyLoader
classes. Add new members to these classes that you initialize in your own
CreateMeshContainer() function.
FURTHER READING
[Ditchburn06] Ditchburn, Keith, “X File Hierarchy Loading.” Available online at
o/Games/html/load_x_hierarchy.html, 2006.
[Germishuys] Germishuys, Pieter, “HLSL Tutorials.” Available online at
/>[Jurecka04] Jurecka, Jason, “Working with the DirectX .X File Format and Animation
in DirectX 9.0.” Available online at />article2079.asp, 2004.
[Luna04] Luna, Frank, “Skinned Mesh Character Animation with Direct3D 9.0c.”
Available online at />2004.
[Taylor03], Taylor, Phil, “Modular D3D SkinnedMesh.” Available online at
2003.
72
Character Animation with Direct3D
Please purchase PDF Split-Merge on www.verypdf.com to remove this watermark.
73
Skeletal Animation4
The previous chapter covered the basics of skinned meshes, as well as how to load
them from an .x file. Apart from the added bone hierarchy, these meshes were still
not animated and therefore not much more interesting to look at than a regular sta-
tic mesh. That will change in this chapter, and you’ll learn how to load animation
data and apply it to a skinned mesh. This chapter covers the following:
Keyframe animation basics
Loading animation data
The ID3DXAnimationController
Having multiple controllers affecting the same mesh
Please purchase PDF Split-Merge on www.verypdf.com to remove this watermark.
KEYFRAME ANIMATION
As you might know, a movie is made up of several still images running quickly and
therefore creating the illusion of a moving picture. These still images are known as
frames. Each frame has a certain place in time as well as a picture of how the
“world” looks at this specific time step.
Keyframe animation has been around for quite some time. In fact, it was used in
the very first TV cartoons, for example. The way it worked was that the senior
animator would draw two images containing the poses of a cartoon character at two
different time steps (these frames are the so-called keyframes). The senior animator
would then give these keyframes to a junior animator and have him fill out the rest of
the frames in between, a process also known as tweening (from “in-between-ing”).
In many cases the keyframes are drawn by one artist in company A, and then the
rest of the frames are drawn by another artist in company B (which might even be
located in a completely different country). Each Simpson’s episode, for example, is
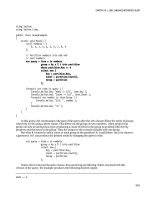
drawn mostly in India. What makes keyframing so powerful is that it can be applied
to almost anything (see Figure 4.1).
74
Character Animation with Direct3D
FIGURE 4.1
Several examples using the keyframing technique.
Please purchase PDF Split-Merge on www.verypdf.com to remove this watermark.
In Figure 4.1 the two keyframes are highlighted with gray background. Now
take a minute and try to imagine what the little square would look like if all the
transformations were applied at the same time across these two keyframes. In
computer animation this technique is very powerful. Even if the time step varies
in length and regularity (as the frame rate often does in games), this technique can
still be used to calculate the current frame based on two keyframes.
DirectX uses these two structures to describe keyframes. The
D3DXKEY_VECTOR3
structure can describe translation and scale keyframes. Rotation, on the other hand,
is described by the
D3DXKEY_QUATERNION structure, since using Euler angles can result
in a Gimbal lock. A Gimbal lock occurs when an object is rotated along one axis in
such a way that it aligns two of the x, y, and z axes. As soon as this happens, one
degree of freedom is lost and the condition can’t be reversed no matter what rotation
operation is performed on the object. Quaternions are a much safer option than
Euler angles (although somewhat harder to comprehend). Anyhow, here are the two
DirectX keyframe structures:
struct D3DXKEY_VECTOR3
{
FLOAT Time;
D3DXVECTOR3 Value;
};
struct D3DXKEY_QUATERNION
{
FLOAT Time;
D3DXQUATERNION Value;
};
As you can see, they both contain a timestamp as well as a value describing the
translation, scale, or rotation of the object at that time. If you’re not familiar with
quaternions at the moment, don’t worry; these will be looked into in more depth
when you reach Chapter 6. The time of these key structures is in animation ticks,
not in seconds. The amount of ticks an animation uses is equivalent to the time
resolution used by the animation. Next, check out how to combine lots of these
keyframes into an animation!
Chapter 4 Skeletal Animation 75
Please purchase PDF Split-Merge on www.verypdf.com to remove this watermark.
ANIMATION SETS
Animation sets are simply collections of animations, where an animation is a
collection of keyframes. Now that you know the theory behind keyframe animation,
it is time to turn to the practical side of things. In this section you’ll get familiar with
the
ID3DXKeyframedAnimationSet interface. This interface contains a lot of different
functions, some of which will be used in this chapter. Others will be used later on
when things like animation callbacks are covered. Check the DirectX documentation
for the complete list of functions. To create an
ID3DXKeyframedAnimationSet object,
the following function is used:
HRESULT D3DXCreateKeyframedAnimationSet(
LPCSTR pName, //Animation set name
DOUBLE TicksPerSecond, //Ticks per second
D3DXPLAYBACK_TYPE Playback, //Playback type
UINT NumAnimations, //Num animations in set
UINT NumCallbackKeys, //(more on this later)
CONST LPD3DXKEY_CALLBACK * pCallKeys, //(more on this later)
LPD3DXKEYFRAMEDANIMATIONSET * ppAnimationSet //Output
);
The most interesting parameter here is the playback type, which can be one of
the following:
D3DXPLAY_LOOP, D3DXPLAY_ONCE or D3DXPLAY_PINGPONG (The ping-pong
option will play the animation forward, then backward, and then start over). Once
you have the empty animation set created, all you need to do is to fill it with some
new keyframes, which you can do with the following function:
HRESULT RegisterAnimationSRTKeys(
LPCSTR pName, //Animation name
UINT NumScaleKeys, //Num scale keys
UINT NumRotationKeys, //Num rotation keys
UINT NumTranslationKeys, //Num translation keys
CONST LPD3DXKEY_VECTOR3 * pScaleKeys, //Scale keyframes
CONST LPD3DXKEY_QUATERNION * pRotationKeys, //Rotation keyframes
CONST LPD3DXKEY_VECTOR3 * pTranslationKeys, //Translation keyframes
DWORD * pAnimationIndex //Resulting anim index
);
Easy! Arrays of scale, rotation, and translations keyframes were created
(using the
D3DXKEY_VECTOR3 and the D3DXKEY_QUATERNION structures) and added to
the animation set using this function. In action, these functions could be used in
the following way:
76
Character Animation with Direct3D
Please purchase PDF Split-Merge on www.verypdf.com to remove this watermark.
//Create new Animation set
D3DXCreateKeyframedAnimationSet("AnimationSet1", 500,
D3DXPLAY_PINGPONG, 1, 0, NULL, &m_pAnimSet);
//Create Keyframes
D3DXKEY_VECTOR3 pos[3];
pos[0].Time = 0.0f;
pos[0].Value = D3DXVECTOR3(0.2f, 0.3f, 0.0f);
pos[1].Time = 1000.0f;
pos[1].Value = D3DXVECTOR3(0.8f, 0.5f, 0.0f);
pos[2].Time = 2000.0f;
pos[2].Value = D3DXVECTOR3(0.4f, 0.8f, 0.0f);
D3DXKEY_VECTOR3 sca[2];
sca[0].Time = 500.0f;
sca[0].Value = D3DXVECTOR3(1.0f, 1.0f, 1.0f);
sca[1].Time = 1500.0f;
sca[1].Value = D3DXVECTOR3(4.0f, 4.0f, 4.0f);
//Register Keyframes
m_pAnimSet->RegisterAnimationSRTKeys(
"Animation1", 2, 0, 3, sca, NULL, pos, 0);
This code creates an animation sequence with ping-pong playback, using both
position and scale elements. To calculate the timestamp of a certain animation key,
you need to retrieve the animation’s amount of ticks per second. For that you can
use the following function defined in the
ID3DXKeyframedAnimationSet interface:
DOUBLE GetSourceTicksPerSecond();
The function can be used like this to calculate the timestamp of a new anima-
tion key:
D3DXKEY_VECTOR3 aKey;
aKey.Value = D3DXVECTOR3(0.2f, 1.5f, -2.3f);
aKey.Time = 2.5f * aAnimSet->GetSourceTicksPerSecond();
This code creates a new position key and sets the time stamp of the key to 2.5
seconds. It is very seldom you need to manually create animation keys like this, but the
knowledge of how to do so will come in handy in the next chapter when animation
callback events are covered. Anyway, once an animation like this has been created, you
need a way to read position, rotation, and scale data from the animation for any given
time step. For this purpose you can use the following function:
Chapter 4 Skeletal Animation 77
Please purchase PDF Split-Merge on www.verypdf.com to remove this watermark.
HRESULT GetSRT(
DOUBLE PeriodicPosition, //Time step
UINT Animation, //Animation index
D3DXVECTOR3 * pScale, //Scale output
D3DXQUATERNION * pRotation, //Rotation output
D3DXVECTOR3 * pTranslation //Translation output
);
This function takes a time step and an animation index as input (remember that
an animation set can contain several animations). As output from this function, you
get scale, rotation, and translation elements.
78
Character Animation with Direct3D
EXAMPLE 4.1
Check out Example 4.1 on the CD-ROM. In it, an
ANIMATION class is created,
encapsulating an
ID3DXKeyframedAnimationSet object. The ANIMATION
class creates an animation, queries it during runtime, and then draws a simple ani-
mated square on the screen. Albeit not the most visually appealing example, study it
nevertheless and play with the different animation options.
Please purchase PDF Split-Merge on www.verypdf.com to remove this watermark.
THE ID3DXANIMATIONCONTROLLER INTERFACE
Okay, you already know how to create a set of different animations. Why is an an-
imation controller interface needed? Well, the
ID3DXAnimationController interface
controls all aspects of keyframed animation. It deals with anything from setting the
active animation to blending multiple animations, animation callbacks, and so on
(more on this in Chapter 5). In this chapter you’ll learn how to obtain this interface
as well as the functions needed to control the basic aspects of character animation.
L
OADING THE ANIMATION DATA
You have already come in contact with the function used to load the ID3DXAnimation-
Controller object in the previous chapter. If you remember, the D3DXLoadMesh-
HierarchyFromX() function was used to load the bone hierarchy from an .x file. One of
the output parameters from this function is an
ID3DXAnimationController object
containing all the animation data stored with the model. This data is loaded like this:
ID3DXAnimationController *m_pAnimControl = NULL;
D3DXFRAME *m_pRootBone = NULL;
D3DXLoadMeshHierarchyFromX("some_X_file.x",
D3DXMESH_MANAGED,
pDevice,
&someHierarchy,
NULL,
&m_pRootBone,
&m_pAnimControl);
This code loads the bone hierarchy and its meshes and stores in the m_pRootBone
variable. It also loads the animation data affecting this bone hierarchy in the m_pAnim-
Control variable. It is now through this animation controller that you can set active
animations for the character as well as update the active time, etc. The
ID3DXAnima-
tionController contains several animation sets (as covered in the previous section).
The difference between these animation sets and those created earlier is that these are
directly connected to the transformation matrices of the character bones. Here’s how
you would obtain any animations stored in an
ID3DXAnimationController:
void SkinnedMesh::GetAnimations(vector<string> &animations)
{
ID3DXAnimationSet *anim = NULL;
for(int i=0;i<(int)m_pAnimControl-
>GetMaxNumAnimationSets();i++)
Chapter 4 Skeletal Animation 79
Please purchase PDF Split-Merge on www.verypdf.com to remove this watermark.
{
anim = NULL;
m_pAnimControl->GetAnimationSet(i, &anim);
if(anim != NULL)
{
animations.push_back(anim->GetName());
anim->Release();
}
}
}
This function added to the SKINNEDMESH class fills a vector with all the names of
the animation sets stored in the character’s
ID3DXAnimationController. First the
GetMaxNumAnimationSets() function is used to query the number of animation sets,
and then the
GetAnimationSet() function can be used to get an actual animation set.
An
ID3DXAnimationController object has several tracks, where each track is a
slot for an animation set. This means that you can have several active animations at
the same time, and even blend between them. The animation controller’s tracks will
be covered in more detail in the next chapter. For now, just assume that you have
only one track with one active animation. In this case you set the active animation
for a track using this function:
HRESULT SetTrackAnimationSet(
UINT Track, //Track index
LPD3DXANIMATIONSET pAnimSet //Animation set
);
To set which animation to play, simply use the GetAnimationSet() function to
retrieve the animation set, and then use the
SetTrackAnimationSet() to activate it.
Once you’ve set the animation set for one (or more) tracks, you’re ready to start the
actual animation. You can update/play the animations using the following function:
HRESULT AdvanceTime(
DOUBLE TimeDelta, //Time to advance animation with
LPD3DXANIMATIONCALLBACKHANDLER pCallbackHandler //(next chapter)
);
80 Character Animation with Direct3D
Please purchase PDF Split-Merge on www.verypdf.com to remove this watermark.
The AdvanceTime() function only updates the local transformation matrices of the
bones. Remember that you need to update the combined transformation matrices
for all the bones after you’ve called this function, since these are the ones used in the
matrix palette. In the examples, this can be done by calling the
UpdateMatrices()
function in the SKINNEDMESH class.
Chapter 4 Skeletal Animation 81
EXAMPLE 4.2
In this next example you will finally see the Soldier move. Example 4.2
encapsulates the ID3DXAnimationController in the SKINNEDMESH class. It
also implements a few functions to help us set the active animation, advance time, etc.
Pressing the space bar while running this example will let you see the underlying bone
hierarchy and how it is animated.
Please purchase PDF Split-Merge on www.verypdf.com to remove this watermark.
82 Character Animation with Direct3D
MULTIPLE ANIMATION CONTROLLERS
So far, so good. You have one mesh, one animation controller, and, all in all, one
working character. What if you need two characters? Hmmm… The naïve way
would be to have two meshes and two animation controllers. No real problem with
that. However, what if you need an army? Clearly, having one mesh for each soldier
instance wouldn’t be the smartest approach. The solution lies in the fact that you
can clone the character’s animation controller using the following function:
HRESULT CloneAnimationController(
UINT MaxNumAnimationOutputs, //Num outputs (i.e. bones)
UINT MaxNumAnimationSets, //Num animation sets
UINT MaxNumTracks, //Num tracks
UINT MaxNumEvents, //Num events
LPD3DXANIMATIONCONTROLLER * ppAnimController //Anim controller copy
);
Once a clone has been created from an animation controller, it keeps an inde-
pendent time count and active sets of animations, etc. This means that you should
copy only the animation controller rather than the whole bone structure when you
want to create multiple instances of a character. When rendering multiple instances
of the same skinned mesh, follow this outline:
1. Call
AdvanceTime() for the active animation controller.
2. Calculate the world matrix for this character instance.
3. Update the combined transformation matrices for the skinned mesh with
the world matrix.
4. Render the skinned mesh.
5. Repeat with the next character instance.
Please purchase PDF Split-Merge on www.verypdf.com to remove this watermark.
CONCLUSIONS
This chapter started with the keyframe, worked up to a collection of animations
stored in the
ID3DXKeyframedAnimationSet() interface, and finally covered the
ID3DXAnimationController interface. You should now be comfortable with how an-
imations are built from the ground up, even though in most cases you get them
served on a silver platter. It never hurts to know how the animation pipeline works,
especially later on when more advanced topics like dynamic animation are covered.
In this chapter you had your first look at the
ID3DXAnimationController interface,
but it won’t be your last. The following chapter looks at some of the more advanced
things you can do with this interface.
Chapter 4 Skeletal Animation 83
EXAMPLE 4.3
Example 4.3 shows you in practice how this is done. In this example, four
instances of the Soldier are rendered with random animations. Try to add
more! A whole army!
Please purchase PDF Split-Merge on www.verypdf.com to remove this watermark.
CHAPTER 4 EXERCISES
Expand the Animation class created in Example 4.1. Make it easy to add new
keyframes, set animation speed, etc.
Connect the Animation class to a mesh. Make use of the scale, rotation, and
translation you get from the animation set.
Play around with the ID3DXAnimationController you retrieved from the Soldier.
See if you can create a new animation set in code and register it with the con-
troller. (Hint: The
RegisterAnimationSet() and RegisterAnimationOutput()
functions should prove useful).
84
Character Animation with Direct3D
Please purchase PDF Split-Merge on www.verypdf.com to remove this watermark.
85
Advanced Skeletal
Animation Techniques
5
In this chapter I will dive deeper into some more advanced skeletal animation
techniques. The first thing you will learn is how to blend several animations
together. This is useful, for example, when you want smooth transitions between
different animations/poses. The technique can also be used to create completely
new animations. One example of this might be if you have a Run animation and
a Fire-Rifle animation. By blending them you could have a Run-and-Fire-Rifle
animation without having to actually animate this by hand in your 3D program.
Also, at the end of this chapter, you’ll look into the topic of motion capture. This
chapter covers the following topics:
Please purchase PDF Split-Merge on www.verypdf.com to remove this watermark.