The CSS Anthology: 101 Essential Tips, Tricks & Hacks- P12 ppsx
Bạn đang xem bản rút gọn của tài liệu. Xem và tải ngay bản đầy đủ của tài liệu tại đây (1.07 MB, 20 trang )
197Forms and User Interfaces
chapter06/fieldset.html (excerpt)
<form method="post" action="fieldset.html">
<fieldset>
<legend>Personal Information</legend>
<div>
<label for="fullname">Name:</label>
<input type="text" name="fullname" id="fullname"
class="txt" />
</div>
<div>
<label for="email">Email Address:</label>
<input type="text" name="email" id="email" class="txt" />
</div>
<div>
<label for="password1">Password:</label>
<input type="password" name="password1" id="password1"
class="txt" />
</div>
<div>
<label for="password2">Confirm Password:</label>
<input type="password" name="password2" id="password2"
class="txt" />
</div>
</fieldset>
<fieldset>
<legend>Address Details</legend>
<div>
<label for="address1">Address line one:</label>
<input type="text" name="address1" id="address1"
class="txt" />
</div>
<div>
<label for="address2">Address line two:</label>
<input type="text" name="address2" id="address2"
class="txt" />
</div>
<div>
<label for="city">Town / City:</label>
<input type="text" name="city" id="city" class="txt" />
</div>
<div>
<label for="zip">Zip / Post code:</label>
<input type="text" name="zip" id="zip" class="txt" />
Download at WoweBook.Com
The CSS Anthology198
</div>
</fieldset>
<div>
<input type="submit" name="btnSubmit" id="btnSubmit"
value="Sign Up!" class="btn" />
</div>
</form>
chapter06/fieldset.css
h1 {
font: 1.2em Arial, Helvetica, sans-serif;
}
input.txt {
color: #00008B;
background-color: #E3F2F7;
border: 1px inset #00008B;
width: 200px;
}
input.btn {
color: #00008B;
background-color: #ADD8E6;
border: 1px outset #00008B;
}
form div {
clear: left;
margin: 0;
padding: 0;
padding-top: 5px;
}
form div label {
float: left;
width: 40%;
font: bold 0.9em Arial, Helvetica, sans-serif;
}
fieldset {
border: 1px dotted #61B5CF;
margin-top: 1.4em;
padding: 0.6em;
}
legend {
font: bold 0.8em Arial, Helvetica, sans-serif;
Download at WoweBook.Com
199Forms and User Interfaces
color: #00008B;
background-color: #FFFFFF;
}
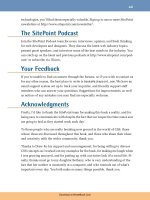
Figure 6.10 shows how the groupings are displayed by the browser.
Figure 6.10. Creating two sections in a form using the <fieldset> tag
Discussion
The <fieldset> and <legend> tags are a great way to group related information in
a form. These tags provide an easy means to group items visually, and are understood
by screen readers and text-only devices, which can perceive that the tagged items
are logically grouped together. The situation would be quite different if you simply
wrapped the related items in a styled div; users of a standard browser would under-
stand the relationship, in contrast to those unable to see the results of our CSS.
To group form fields, simply wrap the related fields with a <fieldset> tag and,
immediately after your opening <fieldset> tag, add a <legend> tag that contains
a title for the group:
Download at WoweBook.Com
The CSS Anthology200
chapter06/fieldset.html (excerpt)
<fieldset>
<legend>Personal Information</legend>
<div>
<label for="fullname">Name:</label>
<input type="text" name="fullname" id="fullname" class="txt"
/>
</div>
<div>
<label for="email">Email Address:</label>
<input type="text" name="email" id="email" class="txt" />
</div>
<div>
<label for="password1">Password:</label>
<input type="password" name="password1" id="password1"
class="txt" />
</div>
<div>
<label for="password2">Confirm Password:</label>
<input type="password" name="password2" id="password2"
class="txt" />
</div>
</fieldset>
Like other HTML tags, <fieldset> and <legend> are displayed with a default style
by browsers. The default style surrounds the grouped elements with a box, and the
<legend> tag appears in the top-left corner of that box. Figure 6.11 shows the
<fieldset> and <legend> tags as they display by default in Firefox on Mac OS X.
Download at WoweBook.Com
201 Forms and User Interfaces
Figure 6.11. Viewing unstyled <fieldset> and <legend> tags
How do I style accesskey hints?
Access keys allow users to jump quickly to a certain place in a document or follow
a link—all they need to do is press a combination of keys; usually the Alt key (or
equivalent), and another specific key. You have to let users know what that other
key is, of course!
Solution
The convention that’s followed by many computer operating systems is to indicate
which letter of a key word is its access key by underlining that letter. For example,
on a Windows machine, Alt+F opens the File drop-down menu. This functionality
is indicated by the underlining of the letter “F” in File, as shown in Figure 6.12.
Download at WoweBook.Com
The CSS Anthology202
Figure 6.12. The underline beneath the letter “F” in the word File
You can use a similar technique on your site, underlining the appropriate letters to
identify your access keys:
chapter06/accesskeys.html (excerpt)
<fieldset>
<legend><span class="akey">P</span>ersonal
Information</legend>
<div>
<label for="fullname">Name:</label>
<input type="text" name="fullname" id="fullname" class="txt"
accesskey="p" />
</div>
chapter06/accesskeys.css (excerpt)
.akey {
text-decoration: underline;
}
As you can see in Figure 6.13, the access key for each field set is underlined.
Download at WoweBook.Com
203Forms and User Interfaces
Figure 6.13. Indicating access keys with lines under the “P” in Personal and “A” in Address
Discussion
Access keys can be very helpful to site users who have mobility problems and are
unable to use a mouse, as well as to users who simply prefer using the keyboard
over the mouse to navigate. You could provide an access key that allowed these
visitors to jump straight to the form by pressing one key, for example, or to go to
the search box by pressing another. The convention of underlining the letter that
corresponds to the access key will be familiar to visitors who use this functionality,
even if other users are unaware what it means.
To add access key functionality to a form field, you simply need to add the attribute
accesskey="x" to that field, where x is the character you’ve chosen for the access
key:
Download at WoweBook.Com
The CSS Anthology204
chapter06/accesskeys.html (excerpt)
<div>
<label for="fullname">Name:</label>
<input type="text" name="fullname" id="fullname" class="txt"
accesskey="p" />
</div>
In our example, I’ve added an access key to the first form element of each group.
When a user presses the access key, focus will move to that first form field so that
users can begin to complete the form. To highlight the access key, I’ve taken the
first letter of the field set <legend> (for example, the “P” in “Personal Details”) and
wrapped it in a span with a class of akey:
chapter06/accesskeys.html (excerpt)
<legend><span class="akey">P</span>ersonal Information</legend>
I’ve styled the akey class, setting the text-decoration property to underline:
chapter06/accesskeys.css (excerpt)
.akey {
text-decoration: underline;
}
Different browsers and operating systems implement access keys in different ways.
For example, Internet Explorer, and Firefox 1.5 on Windows use the Alt key. How-
ever, Firefox version 2 and above on Windows uses Alt+Shift (at the time of writing,
however, this only works for alphabetical access keys, as opposed to numeric ones).
Safari uses Ctrl, as does Firefox on Mac OS X (again no numeric shortcuts), and
Opera uses Shift+Esc but allows users to configure their own key combinations.
Access Keys May Be Less Accessible Than They Appear
When creating access keys, take care to avoid overriding default browser or system
keyboard shortcuts!
Download at WoweBook.Com
205Forms and User Interfaces
How do I use different colored highlights
in a select menu?
Earlier, we learned how to color the background of a select menu in a form. But
is it possible to include several colors in the menu to highlight different options?
Solution
You can assign classes to menu options to apply multiple background colors within
the drop-down menu. color and background-color are the only properties you
can set for a menu item.
Safari Has No Stripes
Remember, Safari lacks support for background colors on select options, so this
solution will fail to work in that browser.
Here’s the code you’ll need:
chapter06/select.html (excerpt)
<form method="post" action="example8.html">
<div>
<label for="color">Select your favorite color:</label>
<select name="color" id="color">
<option value="">Select One</option>
<option value="blue" class="blue">blue</option>
<option value="red" class="red">red</option>
<option value="green" class="green">green</option>
<option value="yellow" class="yellow">yellow</option>
</select>
</div>
<div>
<input type="submit" name="btnSubmit" id="btnSubmit"
value="Send!" class="btn" />
</div>
</form>
Download at WoweBook.Com
The CSS Anthology206
chapter06/select.css (excerpt)
option.blue {
background-color: #ADD8E6;
color: #000000;
}
option.red {
background-color: #E20A0A;
color: #ffffff;
}
option.green {
background-color: #3CB371;
color: #ffffff;
}
option.yellow {
background-color: #FFF280;
color: #000000;
}
Thanks to this code, the drop-down menu in Figure 6.14 looks very colorful indeed.
Figure 6.14. Classes applied to options displaying within a selectmenu, as seen in the Opera browser
Discussion
We’d normally avoid using such presentational class names in our CSS. For example,
giving a heading a class name of blue would be a poor decision, as you might decide
later to change the color of all headings to green—you’d then either be left with a
bunch of headings that had a class of blue but displayed as green, or you’d have
to change all of your markup. However, in the case of a color selection form, like
in this example, common sense prevails!
Download at WoweBook.Com
207 Forms and User Interfaces
Style with Substance
Use different background colors on sets of related options, or apply alternating
row colors in your select menu.
Alternatively, Use Attribute Selectors
Once again, an alternative to adding class names to your markup would be to use
attribute selectors in your CSS. For example, instead of the selector option.blue,
you could use:
option[value="blue"] {
background-color: #ADD8E6;
color: #000000;
}
Of course, once again, you’ll have to take the lack of support from IE6 into consid-
eration.
How do I style a form with CSS that allows
users to enter data as if into a spreadsheet?
While laying out forms using CSS is possible—and recommended in most
cases—there are some circumstances in which data is more easily entered into a
form within a table. One obvious example is a spreadsheet-like web application.
Users may already be accustomed to entering data into a spreadsheet using Microsoft
Excel or another package. Keep this in mind as you design your application inter-
face—mimicking familiar interfaces often helps users to feel comfortable with your
application. Making your form look like a spreadsheet by laying it out in a table
and using CSS to format it may be the way to go. Let’s take a look at the code:
chapter06/spreadsheet.html (excerpt)
<form method="post" action="spreadsheet.html">
<table class="formdata" summary="This table contains a form to
input the yearly income for years 1999 through 2002">
<caption>Complete the Yearly Income 1999 - 2002</caption>
Download at WoweBook.Com
The CSS Anthology208
<tr>
<th></th>
<th scope="col">1999</th>
<th scope="col">2000</th>
<th scope="col">2001</th>
<th scope="col">2002</th>
</tr>
<tr>
<th scope="row">Grants</th>
<td><input type="text" name="grants1999" id="grants1999" />
</td>
<td><input type="text" name="grants2000" id="grants2000" />
</td>
<td><input type="text" name="grants2001" id="grants2001" />
</td>
<td><input type="text" name="grants2002" id="grants2002" />
</td>
</tr>
<tr>
<th scope="row">Donations</th>
<td><input type="text" name="donations1999" id="donations1999"
/></td>
<td><input type="text" name="donations2000" id="donations2000"
/></td>
<td><input type="text" name="donations2001" id="donations2001"
/></td>
<td><input type="text" name="donations2002" id="donations2002"
/></td>
</tr>
<tr>
<th scope="row">Investments</th>
<td><input type="text" name="investments1999"
id="investments1999" /></td>
<td><input type="text" name="investments2000"
id="investments2000" /></td>
<td><input type="text" name="investments2001"
id="investments2001" /></td>
<td><input type="text" name="investments2002"
id="investments2002" /></td>
</tr>
<tr>
<th scope="row">Fundraising</th>
<td><input type="text" name="fundraising1999"
id="fundraising1999" /></td>
Download at WoweBook.Com
209Forms and User Interfaces
<td><input type="text" name="fundraising2000"
id="fundraising2000" /></td>
<td><input type="text" name="fundraising2001"
id="fundraising2001" /></td>
<td><input type="text" name="fundraising2002"
id="fundraising2002" /></td>
</tr>
<tr>
<th scope="row">Sales</th>
<td><input type="text" name="sales1999" id="sales1999" /></td>
<td><input type="text" name="sales2000" id="sales2000" /></td>
<td><input type="text" name="sales2001" id="sales2001" /></td>
<td><input type="text" name="sales2002" id="sales2002" /></td>
</tr>
<tr>
<th scope="row">Miscellaneous</th>
<td><input type="text" name="misc1999" id="misc1999" /></td>
<td><input type="text" name="misc2000" id="misc2000" /></td>
<td><input type="text" name="misc2001" id="misc2001" /></td>
<td><input type="text" name="misc2002" id="misc2002" /></td>
</tr>
<tr>
<th scope="row">Total</th>
<td><input type="text" name="total1999" id="total1999" /></td>
<td><input type="text" name="total2000" id="total2000" /></td>
<td><input type="text" name="total2001" id="total2001" /></td>
<td><input type="text" name="total2002" id="total2002" /></td>
</tr>
</table>
<div><input type="submit" name="btnSubmit" id="btnSubmit"
value="Add Data" /></div>
</form>
chapter06/spreadsheet.css
table.formdata {
border: 1px solid #5F6F7E;
border-collapse: collapse;
margin: 1em 0 2em 0;
}
table.formdata th {
border: 1px solid #5F6F7E;
background-color: #E2E2E2;
color: #000000;
Download at WoweBook.Com
The CSS Anthology210
text-align: left;
font-weight: normal;
padding: 0.2em 0.4em 0.2em 0.4em;
margin: 0;
}
table.formdata td {
margin: 0;
padding: 0;
border: 1px solid #E2E2E2;
}
table.formdata input {
width: 80px;
padding: 0.2em 0.4em 0.2em 0.4em;
margin: 0;
border: none;
}
The styled form, which looks very spreadsheet-like, is shown in Figure 6.15.
Figure 6.15. A form styled to resemble a spreadsheet
Discussion
The aim here is to create a form that looks similar to a spreadsheet, such as the Excel
spreadsheet shown in Figure 6.16. Recently, I created forms similar to this for a web
application that had many tables of data. The client wanted the table to turn into
Download at WoweBook.Com
211 Forms and User Interfaces
an editable table when it was selected for editing; so while it retained the appearance
of the original data table, the contents could be edited by the user.
Figure 6.16. A spreadsheet displaying in Excel
The first step to achieve this effect is to lay out the form within a structured table,
using table headings (th elements) where appropriate, and adding a caption and
summary for accessibility purposes. The complete code for this form is provided
in the solution above. Before we add any CSS, the form should display as shown
in Figure 6.17.
Figure 6.17. The unstyled form, ready for CSS formatting
Download at WoweBook.Com
The CSS Anthology212
To create the style rules for this form, we must establish for the table a class that
contains all the spreadsheet fields. I’ve given the table a class name of formdata:
chapter06/spreadsheet.html (excerpt)
<table class="formdata" summary="This table contains a form to
input the yearly income for years 1999 through 2002">
In the style sheet, class formdata has a single-pixel border in a dark, slate gray, and
the border-collapse property is set to collapse:
chapter06/spreadsheet.css (excerpt)
table.formdata {
border: 1px solid #5F6F7E;
border-collapse: collapse;
}
Next, we can style the table headings. I’ve used the <th> tag for the top and left-
hand column headings, so to style these, all I need to do is address the <th> tags
within a table of class formdata:
chapter06/spreadsheet.css (excerpt)
table.formdata th {
border: 1px solid #5F6F7E;
background-color: #E2E2E2;
color: #000000;
text-align: left;
font-weight: normal;
padding: 0.2em 0.4em 0.2em 0.4em;
margin: 0;
}
Download at WoweBook.Com
213 Forms and User Interfaces
Figure 6.18. The form display after the table and th elements are styled
To produce an editable table, we need to hide the borders of the form fields and
add borders to the table cells. As the only input elements within the table are the
text fields that we want to style, we can simply address all input elements in the
table with a class of formdata; this saves us having to add classes to all our fields.
We add a border to the td element, and set the borders on the input element to 0.
We specify a width for the input element, as we know that the type of data that
will be added will only need a small field. We then add some padding so that text
that’s typed into the form field will stop well short of the border:
chapter06/spreadsheet.css (excerpt)
table.formdata td {
margin: 0;
padding: 0;
border: 1px solid #E2E2E2;
}
table.formdata input {
width: 80px;
padding: 0.2em 0.4em 0.2em 0.4em;
margin: 0;
border-width: 0;
border-style: none;
}
That’s all there is to it! If you use this technique, make sure that your users under-
stand that the table is editable. Removing borders from form fields will only help
users if they can work out how to complete the form—let alone realize that it exists!
Download at WoweBook.Com
The CSS Anthology214
Some Browsers Still Display Input Element Borders
Certain browsers—most notably older versions of Safari on Mac OS X—will display
the input element borders, so while the effect will be less neat, it will still be
completely usable.
How do I highlight the form field that the
user clicks into?
Applications such as Excel highlight the focused form field when the user clicks
on it or tabs to it. Is it possible to create this effect in our web form?
Solution
We can create this effect using pure CSS, thanks to the :focus pseudo-class. While
this solution works in modern browsers, including Internet Explorer 8, it fails to
work in either Internet Explorer 6 or 7:
chapter06/spreadsheet2.css (excerpt)
table.formdata input {
width: 80px;
padding: 0.2em 0.4em 0.2em 0.4em;
margin: 0;
border: 2px solid #FFFFFF;
}
.formdata input:focus {
border: 2px solid #000000;
}
Figure 6.19 shows how this code displays.
Download at WoweBook.Com
215 Forms and User Interfaces
Figure 6.19. Highlighting the form field in focus in Firefox
Discussion
This solution for adding a border (or changing the background color) of the form
field when it receives focus is a simple one. In fact, it’s as simple as adding the
pseudo-class selector :focus to your style sheet to display a different style for the
input element when the user clicks into it.
Unfortunately, as I’ve already mentioned, Internet Explorer 6 lacks support for the
:focus pseudo-class, so this effect may fail to display for some of your application’ s
users.
There is a way around this problem that, unfortunately, requires a little JavaScript.
Add the following JavaScript after the table in your document:
chapter06/spreadsheet2.html (excerpt)
<script type="text/javascript">
var editcells =
document.getElementById('form1').getElementsByTagName('input');
for (var i = 0; i < editcells.length; i++) {
editcells[i].onfocus = function() {
this.className += ' hilite';
}
editcells[i].onblur = function() {
Download at WoweBook.Com
The CSS Anthology216
this.className = this.className.replace('hilite', '');
}
}
</script>
Once you’ve added this code, you’ll need to add the class hilite to your CSS file,
using the same rules we used for the :focus pseudo-class:
chapter06/spreadsheet2.css (excerpt)
.formdata input:focus, .formdata input.hilite {
border: 2px solid #000000;
}
Your field highlighting will now work in Internet Explorer 6, as well as those
browsers that support the :focus pseudo-class.
Summary
In this chapter, we’ve looked at a variety of ways to style forms using CSS, from
simply changing the look of form elements, to using CSS to lay forms out. We’ve
seen how CSS can greatly enhance the appearance and usability of forms. We’ve
also touched on the accessibility of forms for users of alternative devices, and we’ve
seen how, by being careful when marking forms up, you can make it easier for all
visitors to use your site or web application.
Download at WoweBook.Com