Smart Home Automation with Linux- P7 pps
Bạn đang xem bản rút gọn của tài liệu. Xem và tải ngay bản đầy đủ của tài liệu tại đây (352.5 KB, 10 trang )
CHAPTER 1 ■ APPLIANCE CONTROL
43
■ Note You may need an IR bypass kit when passing IR signals over coax cables because the messages get
muddled when passing through distribution amplifiers.
IR-RF-IR Gateways
These devices relay IR data through the air, at the 433MHz radio frequency used by so much wireless
equipment, before being replayed. For these devices, you have a choice between IR-only transmissions
and TV senders.
An IR-only transmitter, such as the Powermid XL, is the simplest of these devices and will allow you
to remotely control devices without installing cables or sockets. They are fairly cheap but pass only IR
data, so the controlled device must be able to have an impact on you when you’re in another room.
TV senders are the wireless versions of the over-the-aerial cables or old TV distribution systems,
which involved an aerial amplifier and a separate aerial cable into each TV in the house. The TV sender
takes a single input and transmits it to whichever receivers are listening, encoding whatever IR signals it
also saw. There are many variants on the market, including those with SCART sockets (instead of the old-
school coaxial aerial sockets) and RCA composite video. Even the cheaper models often have a
“channel” switch on them, allowing multiple receiver-transmitter pairs to be used in the same house
without the signals getting mixed up. And with these devices becoming more mainstream, some are
almost as cheap as an IR-only transmitter, with the TV functionality becoming a free bonus feature.
IR Over IP
It is also possible to send data over your existing Ethernet cables, using devices such as the Keene IR
Anywhere over IP (KIRA). This eliminates any distance or interference issues you might get from the
other methods and also provides a way of remotely controlling IR devices from a computer, without
needing to have the computer and its IR transmitter physically in range of the device.
Being IP-controlled also means that IR signals can be sent via the Internet. Although this is pointless
in itself (because you can’t derive any benefit from changing the TV channel when you’re not sitting
watching it), it does provide an off-the-shelf way of controlling IR-based devices from a remote
computer. And if something can be controlled from a computer, then it can be controlled from anything
connected to the computer, such as a web page or cron job.
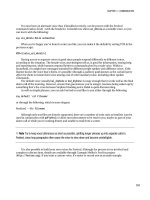
Using KIRA to retransmit IR codes first requires that you teach it those codes in the first place. This
is done by generating text files, using the software shown in Figure 1-15.
CHAPTER 1 ■ APPLIANCE CONTROL
44
Figure 1-15. Configuring KIRA
This software is available from the Keene web site
15
and has been thoughtfully written in Java,
making it Linux-friendly. After attaching KIRA to your network and after it’s used your DHCP server to
provide it with an IP address, you can add new commands. First you request that all the IR messages are
15
See www.keene.co.uk/electronics/multi.php?mycode=KIRA.
CHAPTER 1 ■ APPLIANCE CONTROL
45
sent to this machine, and then you press Learn before hitting the first key on your remote. This should
present the code, such as the following, which can then be copied and pasted into a text file for later use:
K 240C 037F 0369 03AC 034D 0624 035A 0378 0382 0378 0381 0396 0366 0377
0382 0396 0365 0396 06E0 03AF 034C 072C 0353 0378 2000
I have used a directory hierarchy for each device so that the on/off button for my TV is in the
directory ir/tv/codes/on. Since the same button performs both functions, I created a symlink between
off and on. Those with bigger houses and more TVs might like to use a more descriptive name than TV.
Although KIRA has a web page, it isn’t very configurable and limits you to four prestored IR codes.
Fortunately, it also listens for commands sent on UDP ports 30303 and 65432. The former is for device
discovery and configuration, so consequently the port cannot be changed. The latter is the IR control
port, which processes all the basic commands to control the various IR devices within range. All
responses to these commands are returned by UDP also, so you need to run two instances of the Swiss
Army knife of network utility, netcat, to handle it.
Begin by creating two terminal windows, and start a UDP server in one of them by typing the
following:
nc -u -l -p 30303
This will now listen on port 30303 for any UDP messages sent to it. Now, in the other window, send a
message to KIRA (whose IP has been determined as 192.168.1.111 by the DHCP server) on the same port.
echo disD | nc -q 0 -u 192.168.1.111 30303
You should see the other window spring to life and report various stats about the device. If not,
check that the ports are open and working with (that other Swiss Army knife of networking) netstat:
netstat -ntpl
With some averagely clever bash coding, you can achieve the same result with a script such as the
following:
#!/bin/bash
TEMPFILE=`mktemp`
nc -u -l -p 30303 >$TEMPFILE &
PROCESS=$!
echo disD | nc -q 0 -u 192.168.1.111 30303
# Wait for a second so the output has finished writing
sleep 1
kill $PROCESS
cat $TEMPFILE
rm $TEMPFILE
CHAPTER 1 ■ APPLIANCE CONTROL
46
The process for sending IR messages is the same, except you need to switch onto the IR port. Here’s
an example:
cat ir/codes/tv/off | nc -q 0 -u 192.168.1.111 65432
The only response sent to port 65432 is ACK, which can be safely ignored. However, if you do decide
to listen to port 65432 (and you have requested that all IR messages are forwarded to your PC), then you
will see the key codes appear. These can be copied from the terminal window (instead of using the web
interface) into your own configuration files. There is a supplied API document detailing each of the
commands that each port handles. Note that by using your Linux machine to maintain the IR codes, you
don’t need to ever upload keycode files to one of the four slots on its web server.
■ Note You can several KIRA devices on your network, each transmitting messages to different devices, although
for KIRA to receive messages and send them back to a PC, you must explicitly enable the functionality from its
web interface and give it the IP address where
netcat, or similar, will be listening.
IR Control
If you have a PC fairly close to the IR devices you want to control, it is easy to add a suitable USB-based
transmitter or receiver to it. These can be either bought from places like RedRat or built from one of the
circuit diagrams provided by the LIRC (Linux Infra-Red Remote Control), which also provides the
software.
■ Caution Most PCs attach USB ports directly to the motherboard, and if you make a mistake when building your
own device, you could destroy it. Purchasing a separate PCI board with USB sockets should provide some
protection from mishaps.
For IR transmission, you need to know the specific control codes of the device you want to control.
If you have a standard TV or video, this data is usually available online
( otherwise, you will also need to purchase or build an IR
receiver to teach LIRC the existing codes. Fortunately, if you took the earlier hint and bought a RedRat,
you will have a receiver built in that, along with the supplied Windows software or LIRC, can be used to
program the codes directly.
LIRC
16
is the Linux-standard method for reading and transmitting IR data. It comprises a standard
daemon, lircd, and a set of tools to record the input messages and transmit them back again. It adopts a
16
CHAPTER 1 ■ APPLIANCE CONTROL
47
modular approach to support the wide variety of LIRC devices available. Reproducing an installation
guide here would be foolhardy, but suffice to say there are three main types of supported control:
GPIO devices: These are generally supplied with TV cards, such as those from
Hauppauge. The modules are usually compiled into the standard daemon
build.
Serial port device: This covers a wide range of different devices, including
home-brew transmitters, and because they process serial data directly, they
don’t need any specific driver code. Typical circuits are available from the LIRC
web site. If you’re unsure about connecting your own electronics onto your PC
motherboard, you can buy serial PCI cards, which offer a level of protection
against rogue electronics.
Kernel drivers: These, such as the RedRat3 device, require you to build LIRC
from source and (in some cases) copy the new driver code into the LIRC
directory. From here you can rebuild the setup (data2setup.sh) file and build as
normal. These devices will make use of the /dev/lircd device, which should
have ugo+rw privileges.
Once built, the drivers can be configured and prepared according to the table at LIRC,
17
which also
provides sample configuration files for the various devices that describe each button with a human-
friendly name and the details of the IR signal to be sent. From here, you can add specific commands to
be triggered upon the various button presses within the .lircrc file, which has a format typical of this:
begin
prog = mythtv
button = Rew
config = Left
end
Each button on the remote is mapped to a function of the software (prog) in this fashion.
One of the big benefits in using RedRat, and LIRC in general, is its inclusion in many standard media
players, mixers, and TV applications. Consequently, if this is your primary purpose of IR, then you have
completed your media installation already since those commands can trigger something useful in the
existing software!
LIRC also has a network mode whereby you can communicate with an LIRC daemon through a
network socket, allowing an external application to act as if it were a local IR remote control. This is
useful for testing and as a method of remotely a PC-based media player without writing new code.
For more specific applications, you will need to make use of irexec, as shown here:
begin
prog = irexec
button = ok
config = /usr/bin/someprogram with arguments here
end
17
www.lirc.org/html/table.html
CHAPTER 1 ■ APPLIANCE CONTROL
48
In this way, you can use an IR remote to interact with other arbitrary applications, including media
players on other machines. Additionally, you can adopt the same ideas as Cosmic (mentioned earlier
and covered in Chapter 7) to develop a state-based control mechanism using very cheap IR transmitters.
Conclusion
Each device in your home should have the ability to be controlled remotely, either through the power
lines (with X10 or C-Bus), with an Ethernet socket, or through basic Infrared. This is the first step of a
two-stage process. The second is when you have a computer able to issue control messages to those
devices. At that point, they can be used seamlessly from anywhere in the world. When the device doesn’t
support such functionality, you have to hack it. And that’s where the geeky fun begins!
C H A P T E R 2
■ ■ ■
49
Appliance Hacking
Converting Existing Technology
There are three classical forms of hacking: software, hardware, and wetware (also known as social
engineering). More recently, firmware hacking has become prominent because low-cost hardware
utilizing embedded Linux has opened the door to software hackers unable to build hardware. It is
hardware hacking, and its associated software, that I will cover in this chapter.
Software Hacks
For most developers, software is an easier hack, since the chance of breaking something irrevocably is
much reduced compared to hacking hardware. In fact, when Steve Wozniak and Steve Jobs were
building machines at the Homebrew Computer Club, they reasoned that for every one hacker who was
interested in hardware, there were 100 who were keen on software, so they focused on the software
capabilities of the Apple computer.
Linksys NSLU2
This device, also known as “the Slug,” is a small, embedded Linux device intended to function as a
network addressable storage (NAS) device. You plug in power, a network cable, and (up to) two USB
hard drives, and you’re able to retrieve the data stored on it from any machine on the same network
subnet using the Samba protocol.
The machine itself is silent, powered by an Intel XScale IXP420, and incorporates 32MB of SDRAM
and 8MB of flash memory where the software is stored. Its low price point and openness of firmware
makes it attractive to hackers wanting to add or change the software on the machine. The machine was
officially discontinued in 2008 but is still available in various stores and online.
In its intended form, the Slug is a suitable machine when only a file server is needed, either to be a
remote backup for desktop work (perhaps located under the stairs or in a loft) or to provide music to
media players around the house. By changing its firmware, however, it can become the following:
• Web server (Apache, PHP, Perl, and Python are all supported)
• Mail server
CHAPTER 2 ■ APPLIANCE HACKING
50
• Printer server (the cost of a Slug can be less than the difference between a USB
printer and its networked equivalent)
• Media server (shared through Squeezebox Server, iTunes, or just Samba)
Before any software changes take place, you must first install an unrestricted version of Linux into
the firmware of the device, which takes place through its built-in web interface. There are two main
variations here: Unslung (which uses Optware packages) and SlugOS (formally called OpenSlug) based
around OpenEmbedded.
Unslung
For basic improvements and a minimal of fuss, Unslung (www.nslu2-linux.org/wiki/Unslung/HomePage)
is the preferred option because it installs over the top of the existing firmware and appears very similar
to the end user, since it is based on the original Linksys code. This firmware provides extra functionality
such as the ability to use FAT-formatted disks, which is necessary if you want to use an existing hard
drive, since any disk used in the Slug needs to be specially formatted (to ext3) before use.
It is also possible to install extra software packages through Optware using commands like the
following:
ipkg install apache
However, you need to be careful since they are installed to the internal flash memory, which can run
out very quickly and therefore lead to an unbootable device. To prevent this, you need to move the
operating system onto either one of the external drives (either a USB memory stick or an entire hard
drive, depending on the scope and size of your intended additions) in a process known as “unslinging
your Slug.” Alternatively, you can perform a hardware hack to increase the memory.
Several hundred packages are available for an unslung Slug, including the following:
• BitTorrent clients
• Streamers for Xbox Media Server
• Apache web server
• Asterisk VoIP
• CUPS
• Git
• MySQL
• SSH
As you can see, most major packages are available, making this a very low-power machine, capable
of providing most home tasks. However, they are all limited by the 2.4 kernel, so for more exotic
hardware (like Bluetooth), you will need to adopt SlugOS.
CHAPTER 2 ■ APPLIANCE HACKING
51
SlugOS
SlugOS is a much larger endeavor and treats the Slug like any other piece of hardware, with a base
operating system and separate packages for the main functionality, fitting in with the traditional Unix
ideology of “do one thing and do it well.” This also removes the Slug-specific functionality such as the
web-based configuration tool and basic services like Samba that you will consequently have to explicitly
install.
If you are using the Slug as the basis for a much larger home automation server, then this provides
greater scope in the upgrade path, because it gives you access to the many thousands of packages
provided by the OpenEmbedded project on which SlugOS is based. But doing so requires that you
devote some, or all, of one of your connected hard drives to the operating system, which is a process that
requires you to install a small system into the flash memory and then bootstrap the operating system
onto the hard drive. In doing so, SlugOS permits the use of a 2.6-based kernel, as well as RAID and NFS
functionality.
When using an external USB drive to hold the operating system, always use a hard drive (as opposed
to a memory stick). This is because some applications (such as MySQL) create a lot of memory writes to
the swap file, and since flash memory becomes unusable after about 100,000 writes, this can happen
sooner rather than later. You could, alternatively, assign the swap file to a second (hard) drive, allowing
the operating system to boot and run from a read-only memory stick.
Developing on the Slug
To write your own software for the Slug, you should start with SlugOS because this gives you access to
the standard development tools, which run on the device allowing the code to be written, compiled, and
tested on the Slug. This is known as native development. First you need to run the following command,
along with the other standard build packages (all detailed at www.nslu2-
linux.org/wiki/HowTo/SlugOSNativeCompileEnvironment), before developing your code as normal:
ipkg install slugos-native
Without a screen, however, you will not be able to use GUI debuggers such as kdbg, which can be a
scary downgrade for some. It is perfectly possible to run the machine headless, however, since you can
connect remotely through ssh or telnet. This is preferable since the speed of the machine makes a GUI
approach impractical for large applications. You would more likely write and test your application for
your desktop machine and then, when it’s ready, cross-compile for the Slug.
Cross compilation is a process whereby a compiler running on machine A is able to produce code
suitable for machine B. To do this, you need a new set of compilers, tools, headers, and libraries (known
together as the toolchain) that are built purposely for the other architecture. These are stored separate
from your existing development files since they would otherwise conflict with those running your
machine. The compilation process then occurs as normal (through either make or a variant of gcc, such
as armeb-linux-gnu-gcc) to produce a suitable executable file, or elf in Linux parlance.
The best introduction for the installation of these tools is at www.nslu2-
linux.org/wiki/DebianSlug/CrossCompiling.
Note that if you’re using only existing packages, compilation tools are not necessary in any form,
and you can rely solely on the prebuilt packages.
CHAPTER 2 ■ APPLIANCE HACKING
52
Hacking Game Consoles
Game consoles are great for playing games. Old game console are great for playing old games—and
hacking into Linux machines! As the previous generation of machines becomes cheap and
technologically obsolete, old game consoles provide a good embedded platform for media players, web
servers, control units, and the like. In this section, you will learn primarily at how these machines can be
bent to your will, rather than specific uses for them.
It is not smooth sailing, alas, because the manufacturers do not make the compilers or development
environments available to anyone outside the computer games industry, and even then it is only with
strict nondisclosure agreements (NDAs).
1
Although this should be enough to satisfy an overzealous legal
department, they then build in security measures to make it difficult to run home-brew code on them by
encrypting the disc format, BIOS, or executable. This in itself makes it an interesting problem for
hackers. And since most manufacturers lose money on the console (knowing they’ll recoup it on the
games), the subversive hackers enjoy this process even more.
Despite the ever-decreasing circles of cost, it is not worth buying a new console for the sole purpose
of hacking it into a Linux machine, but charity shops and online auctions can provide the hacker with
the previous generation of hardware at a cost that makes the time and geek-cred worthwhile. With all
technological challenges, however, the interest of those leading these console-hacking projects tends to
wane as newer and more powerful machines become available or as the time benefit outweighs the cost
of alternative equipment. Therefore, it is likely that some (or all!) of these projects might have fallen out
of favor by the time you read this, as the Xbox 360 becomes old hat and the PlayStation 4 is the current
console du jour.
Sega Dreamcast
The Dreamcast was a game console released in 1998 in the wake of the ill-fated Sega Saturn. It was the
winner of an internal competition in Sega between two teams of engineers, led by IBM researcher Tatsuo
Yamamoto and Sega hardware engineer Hideki Sato. The resulting console featured elements from both
designs and was based around a 200MHz Hitachi SH4 RISC processor and the PowerVR2 graphics chip
from VideoLogic, which is fast enough for video playback.
It also featured an optical GD-ROM drive, which supported a standard CD-ROM partition (on which
the OS was included), as well as a proprietary format section for the game. The console also marked
Microsoft’s first exploration into the hardware arena by combining the Windows CE OS with its DirectX
technology.
The console also included a visual memory unit (VMU), which in addition to being a basic memory
cartridge also featured an 8-bit process, 48 ×32 pixel LCD screen, D-pad, and four basic buttons. It was
intended to be used as an auxiliary play device, rather than a handheld console in itself, and needed to
be plugged into a controller in order to function. It was a good idea (and one reused by Sony years later
with its PocketStation device, which also featured IR control), but it was not powerful enough for any
significant work, compared to the equivalent technology at that time.
Sega was also ahead of the curve by providing peripherals for the Dreamcast such as a mouse,
keyboard, and Ethernet (known colloquially as a broadband adapter, or BBA). The latter two are
considered essential for the installation and use of Linux.
1
An NDA is a legal document formed by companies to prevent you from talking about their technology or ideas with
anyone else.