How to Do Everything With Your Scanner- P12 ppsx
Bạn đang xem bản rút gọn của tài liệu. Xem và tải ngay bản đầy đủ của tài liệu tại đây (130.49 KB, 5 trang )
Most scanners today have multiple resolution settings for scanning
different media such as text or photos. Check the instructions for your
scanner to adjust the scan settings.
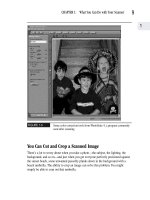
How to Change the Resolution Settings on Your Monitor
You can actually easily change the resolution settings on your monitor using the
Windows Display Properties dialog box. To adjust the resolution of your monitor
follow these steps:
1. From the Windows Start menu, go to Settings and then Control Panel. The
Control Panel window appears on your desktop.
2. Double-click the Display icon to open it. The dialog box shown in Figure 2-10
appears.
3. Click the Settings tab to display the options shown in Figure 2-11, which
allow you to set the color depth and monitor resolution higher or lower.
4. Be sure to click OK after you’ve adjusted the settings. A dialog box prompts
you to view the new resolution settings prior to confirming them.
FIGURE 2-10
Select the Display icon from the Control Panel window.
Click the
Display icon
CHAPTER 2: How Scanning Technology Works
39
2
Please purchase PDF Split-Merge on www.verypdf.com to remove this watermark.
FIGURE 2-11
Use the slider control in the dialog box to adjust monitor resolution.
Matching Scanner and Printer Specifications
Your first impulse might be to match the resolution specifications of your printer and
scanner. After all, if your scanner captures 600 ppi, wouldn’t it seem that a 600-dpi
printer should be able to do a great job with it? This isn’t necessarily the case.
Generally, aim to scan an image at a higher resolution than your output device. For
example, if you have a 600-dpi printer, scanning at 800 ppi is probably your best bet.
Scanning at 1,200 ppi might also be a good tactic. Extra pixels capture added detail,
enabling you to apply effects with more precision, and maximizing printer output quality;
however, if your image is destined for a specific purpose, such as offset printing or Web
use, be sure to reduce the resolution to the necessary size as a final step.
Downsides of scanning at higher resolutions are that the scan takes longer to com-
plete, and creates larger image files that take up more space on your hard drive. More
importantly, scanning at too high a resolution can cause your printer software to crash.
Since there is not a one-to-one ratio between your scanner’s ppi setting and the
printer’s dpi setting, the printer does not place dots on the page in the same ratios and
proportions as the scanner records them. The printer takes the dpi data from your
scanner, and employs an entirely different mathematical algorithm to decide how
Use slider control to change
monitor resolution
40
How to Do Everything with Your Scanner
Please purchase PDF Split-Merge on www.verypdf.com to remove this watermark.
densely to place the dots on the paper to arrive at its own dpi. Extremely high image-
scanning relative to printer capability can put a real burden on the software that was
never designed to handle such a disproportionate conversion.
Different Originals Require Different
Scan Techniques
Not all originals are created equal when it comes to scanning. The type of original
media you’re scanning is a big factor in determining the optimum resolution settings
for your scanner.
Original scanned images and media fall into five basic categories, each of which
calls for a distinct scanning technique:
Color photos Reproducing color photos presents the special challenge of capturing
color accurately, and without a red, green, or blue cast. This process, called calibration,
is covered in detail in Chapter 6. Color scans require a bit depth of 24 or greater.
Grayscale These images are black-and-white representations, and do not require
as high a bit depth as color scans. Loss of detail from scans that are too light or
too dark is a common problem encountered when working with grayscale. Proper
calibration, as discussed in Chapter 6, is a must when working with these images.
Line art Line art is images with solid edges, usually line drawings. Examples of
line art include logos, pencil drawings, black-and-white clip art, and other simple
graphics. Since line art is in only two colors (black and white), the main focus
when scanning line art is reproducing the edges or lines of the image to be as
faithful as possible to the original. Resolution requirements for line art are
generally higher than for color and grayscale media.
Transparency (including film) A transparency is an image that exists on film.
When you scan a transparency, light is captured as it passes through the film.
With other types of media, light is reflected off the surface of the image. As with
grayscale images, scanners must be carefully calibrated to avoid reproductions that
are too light or too dark. Color balance is also an issue, since transparencies are
prone to greenish and yellowish casts. You can learn more about scanning film and
transparencies in Chapter 12.
Text Scanning text documents is similar to scanning line art, and requires high-
resolution capability to preserve the sharpness and readability of the original. You
also need to install special optical character recognition (OCR) software. Text
scanning is discussed in Chapter 13.
CHAPTER 2: How Scanning Technology Works
41
2
Please purchase PDF Split-Merge on www.verypdf.com to remove this watermark.
Software to Optimize Your Scan
Your scanner and other hardware devices are only half the equation in creating a good
scan. The scanner software that directs and calibrates your scanner, and the image-
editing program tools you apply after scanning, also control the finished scanning
product.
Types of Scanner Software
Most scanners come with several different types of software. Generally, the better the
quality of your scanner, the better the software that comes along with it. The following
software is usually bundled with a new scanner:
Drivers This is the basic software required to run your scanner device, enabling
it to communicate with your computer. You don’t need to do any comparison
shopping on this particular software, other than checking that the scanner you
want to purchase is compatible with your computer’s operating system software
(for example, whatever version of Windows you’re using.)
Scanner program This is the program that interfaces with your scanner driver,
enabling you to view and store the recorded information, or in some cases, apply
editing changes to the newly-scanned image before committing to saving the
resulting scan. Not all scanner programs are created equal. Compare them on the
basis of the tools they provide, such as cutting, cropping, brightness, contrast, and
sharpening. It is particularly useful if your scanner provides you a sophisticated
color adjustment tool called a histogram, which is discussed in Chapter 10.
Imaging or photo-editing software Today most scanners come with image-
editing software that not only allows you to correct flaws in scanned images, but
also to do many fun and creative projects. Image-editing software enables you to
do things after the scan such as combining images from different photos into one;
adding special effects; applying filters and colorizing techniques; adding frames,
borders, and props to photos; and creating greeting cards and novelty items.
Optical character recognition (OCR) software This is a task-specific type of
software that gives your scanner the ability to read documents and text, and create
a text file on your computer.
42
How to Do Everything with Your Scanner
Please purchase PDF Split-Merge on www.verypdf.com to remove this watermark.
This book covers steps specific to the software programs most commonly bundled
with today’s scanners; however, you can do most projects covered using a wide variety
of image-editing or OCR programs on the market. It’s simply a matter of checking the
specific instructions for your particular software product, and referring to the figures
and illustrations.
The Important Role of Software During a Scan
A basic principle of good scanning technique is that you perform most of your
image adjustments and correction chores during the scanning process. Image-editing
software allows you to correct and enhance photos for which the original was defective,
but you might have to spend a lot of time correcting something your scanner software
would have avoided in the first place.
Most scanner software allows you to efficiently perform the following tasks during
the scanning process:
Cutting and cropping You can specify which portions of a photo you want to
appear in the finished scan. For example, you can eliminate a stray passerby from
the background, or crop a headshot of your subject.
Controlling resolution Most scanners have several settings to vary the ppi (or dpi)
of your scan. You might, for example, want to scan and save a photo to be sent
over the Internet at a lower resolution than one you plan to publish in a magazine.
(Scanning at higher resolutions creates much larger, more cumbersome files than
images scanned at lower resolutions.)
Color correction Color-correction tools, previously the exclusive domain of
image-editing software, are now included with many scanners to allow you to
correct for various factors as you scan.
Become familiar with the image-correction tools your scanner offers. You
save time and end up with a better-quality scanned image by performing
as many image-editing and color-correction tasks as possible during
the scan.
CHAPTER 2: How Scanning Technology Works
43
2
Please purchase PDF Split-Merge on www.verypdf.com to remove this watermark.