How to Do Everything With Your Scanner- P24 pdf
Bạn đang xem bản rút gọn của tài liệu. Xem và tải ngay bản đầy đủ của tài liệu tại đây (144.9 KB, 5 trang )
sensitive and has a hard time reading fuzzy-edged characters. If you absolutely
have to scan a fax, have it sent to you using a large type size, and the Fine rather
than Standard resolution setting.
Develop an eye for which defects can be repaired. Don’t panic about a few
specks of dust, or a slight blurring. The paint and sharpen tools in your image-
editing software will enable you to attend to these sorts of things. If you have a
torn or wrinkled photo, however, try to locate an original in better condition. After
working on scanning and image-editing projects for a while, you get a feel for
how much work it takes to fix certain things.
Overexposed is better than underexposed. If you have a choice between
an overexposed image and an underexposed one, pick the overexposed version.
Overexposed photos contain more image data and are much easier to fix using
your image-editing software.
The Two Ways to Perform a Scan
Just as you can open or copy a file more than one way in Windows, you can usually
accomplish a scanning task by more than one method. The method you choose—
pushing a button or selecting the scan option from the software menu—won’t affect
your finished result. It’s strictly a matter of user preference.
Although most new models of scanners offer external push buttons, older
and less expensive models might not. If this is the case, you have no
choice but to execute a scan by opening the scanner’s software.
Open Your Scanner Software
To start a scan using the software, you must first open the software by selecting it
from your Programs menu, or clicking an icon installed on your desktop. Once you
open the software, you can usually begin your scanning operation via a dialog box or
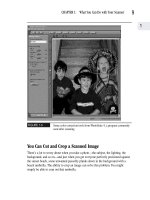
command menu. Figure 5-6 shows the software bundled with the Hewlett-Packard
5370C scanner. Commands listed under the Scan menu enable you to view and save
your scanned images.
CHAPTER 5: The Basics for Your First Scan
99
5
Please purchase PDF Split-Merge on www.verypdf.com to remove this watermark.
FIGURE 5-6
The software bundled with the Hewlett-Packard 5370C scanner
Use the External Buttons
The advantage of having external buttons on your scanner is that you don’t have to
open your software program to start a scan. This saves you a few seconds. Many
scanners open the software program when you push the button to allow you to edit the
image or select the program you want to send the scanned image to.
Select the Right Image Output Type
This chapter is confined to the basics, and avoids having you do a lot of configuring
for your first scan. Your scanner software does a pretty good job of selecting default
settings for scanning an image. This means you don’t have to provide it with a lot of
image information prior to your first scan. To get optimum results, however, you need
100
How to Do Everything with Your Scanner
Please purchase PDF Split-Merge on www.verypdf.com to remove this watermark.
to identify an image output type for the image you’re scanning. Most scanners prompt
or allow you to select from some or all the following types of image output:
Black and white/line art This type of image format supports only black and
white—similar to the appearance of a pen-and-ink drawing. It can include patterns
and lines to give the effect of shaded areas, but the lines are drawn in only one
shade. Your scanner uses a high resolution to produce this sort of output so the
lines appear clear and sharp.
Grayscale This type of image contains a continuous range of black, gray, and
white tones. Professional photographers and graphic artists think of grayscale in
terms of many “steps” or shades of gray. Your scanner and printer use a process
called half-toning to reproduce the continuous image using a series of dots. When
you select grayscale on your scanner as your image output type, you’re configuring
it to produce the dotted, or half-toned, image.
True color This output setting, which is also referred to as 8-bit color, sets your
scanner to reproduce millions of shades. As with grayscale, true color sets your
scanner to produce a digital half-tone image.
256 color This setting outputs 256 colors or shades of gray for a half-tone image
composed of colored dots.
Tex t During your scan your text is formatted to readable, ASCII characters.
ASCII is a system of coding letters to numeric values that can be interpreted by
your computer. The acronym stands for American Standard Code for Information
Interchange.
Text and image If this sophisticated option is available on your scanner, you can
preserve both the text and image in a single scan.
Chapter 6 tells you more about these different image types.
Sending Your Image to Its Final Destination
An image that’s just been scanned is sort of in limbo. After your scanner has captured
an image, it needs to send it to another software application somewhere on your
computer to be saved as a file within that application.
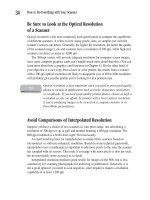
Scanners differ as to how they allow you to specify the “destination application”
for a scanned image. For example, Hewlett-Packard scanners allow you to click the
icon shown in Figure 5-7 and access a menu of applications your scan can be sent to.
CHAPTER 5: The Basics for Your First Scan
101
5
Please purchase PDF Split-Merge on www.verypdf.com to remove this watermark.
You can also select the Save As option from the File menu to save your image in a
default application you’ve specified.
FIGURE 5-7
Sending an image to a specific program
If you are not sure how to specify destination software for your image, or
you need to change it, try searching your scanner’s online help menu
using a query such as “saving.”
Click to send
to specific
program.
102
How to Do Everything with Your Scanner
Please purchase PDF Split-Merge on www.verypdf.com to remove this watermark.
Scanning
Techniques for
Different Types
of Images
Chapter 6
Copyright 2001 by The McGraw-Hill Companies, Inc. Click Here for Terms of Use.
Please purchase PDF Split-Merge on www.verypdf.com to remove this watermark.