How to Do Everything With Your Scanner- P25 potx
Bạn đang xem bản rút gọn của tài liệu. Xem và tải ngay bản đầy đủ của tài liệu tại đây (194.29 KB, 5 trang )
How To…
■ Recognize line art, grayscale, and different types of color images
■ Clearly scan line art
■ Capture a grayscale image to its best advantage
■ Scan vibrant color images
Human beings have an instinctive desire to produce images. Only a couple hundred
thousand years after our ancestors first began scrawling on cave walls, our species has
evolved the ability to reproduce digital images with scanners and PCs.
Images captured in digital form fall into five general categories: line art, black and
white, color, half-tone, and text. This chapter tells you how to recognize and differentiate
different types of images, and how to adapt your scanning techniques to best capture
them.
Overview of the Different Types of Images
If you’re serious about scanning, you need to know about the different kinds of
originals. There are five types of images you can expect to be working with:
Line art Line art is an image consisting of a single color (such as black) against
a single-color background (such as white), or vice versa. The term is a little mis-
leading because the image doesn’t necessarily need to be lines. For example, a
solid black circle on a uniform white background is considered line art. Figure 6-1
is an example of line art.
Grayscale A black-and-white photo (like most of the figures in this book) is an
example of a grayscale image. A grayscale image appears to have smooth, continuous
shading gradations ranging from black to white, with all the shades of gray in
between.
Color When graphic artists refer to a color image, they usually mean an image
such as a photograph or transparency that’s made up of a continuous range of
color tones.
Half-tones When you scan a photograph that’s been printed in a color magazine
or newspaper you’re actually scanning a type of image called a half-tone. Color
photographs are reproduced on a printing press using a process called half-toning,
in which continuous tones are translated either manually or digitally into a matrix
of dots that emulate the tones in the original. The technique allows a printing press
104
How to Do Everything with Your Scanner
Please purchase PDF Split-Merge on www.verypdf.com to remove this watermark.
to produce the continuous tones of a color photo using black, yellow, cyan, and
magenta dots. Figures 6-2 and 6-3 show an original image, and the same image
reproduced using a particular half-toning technique and resolution that make the
normally indiscernible dots visible to the naked eye.
Text Scanning text requires the use of optical character recognition (OCR)
software, discussed in Chapter 13.
All the foregoing images require you to take a slightly different approach to
scanning to get the optimum result.
FIGURE 6-1
This blue jay is an example of line art.
CHAPTER 6: Scanning Techniques for Different Types of Images
105
Please purchase PDF Split-Merge on www.verypdf.com to remove this watermark.
FIGURES 6-2 AND 6-3
An original color image (left) and a scanned half-tone
showing the dots that compose the image (right)
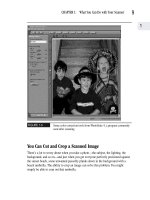
Scan Clear, Clean, Line-Art Images
When you’re working with line art, the operative words are sharpness and clarity. The
goal is to produce clean lines that lend a professional quality to your line art–scanning
project. You can achieve this by scanning at the right resolution and choosing the
correct color setting on your scanner.
Scan Line Art at a High Resolution
The rule of thumb for resolution when scanning line art is quite simple: the higher
the better. The higher the resolution setting, the clearer and sharper your final image
will be. Increasing resolution increases the density of the pixels that make up an
image.
Denser pixels along the edges of each line of an image make the image appear
sharp and clear. Too low a resolution, and the lines of the image have a fuzzy,
jagged effect. Line-art images are particularly prone to this effect when enlarged,
as illustrated in Figure 6-4, which shows a portion of an enlarged line-art image.
Enlarging has the effect of reducing the resolution of the image and decreasing the
density of the pixels.
106
How to Do Everything with Your Scanner
Please purchase PDF Split-Merge on www.verypdf.com to remove this watermark.
FIGURE 6-4
The lines of the blue jay (shown in Figure 6-1) when the photo is
enlarged
When you scan line art, start by scanning at a resolution that matches the dpi
(dots per inch) setting on your printer. For example, if you’re working with a 600 dpi
printer, try scanning at 600 ppi (which stands for pixels per inch). Test your results by
printing a copy of the image, then compare the result by scanning at a slightly higher
or lower resolution. You might find that scanning at 1,200 ppi makes your file very
large, but doesn’t improve the quality of your image very much.
It’s very important to print a test copy of your image at the size you’ll
actually be producing. When you view an image on screen, the tendency
is to zoom in and blow up the image to a much larger size than you
actually need for your printed copy. When you enlarge any image three
or four times, you can get it to appear fuzzy and jagged.
CHAPTER 6: Scanning Techniques for Different Types of Images
107
Please purchase PDF Split-Merge on www.verypdf.com to remove this watermark.
How to Capture Black-and-White Bitmaps and Vectors
The lines that make up a line-art image might be thick or thin, and placed at different
intervals; however, all the lines have one color of dots, usually black.
Availability of Black-and-White Settings
Since the only color you need to capture is black, it makes sense to set your scanner
to capture as few colors as possible. Scanners capture the line art as something called
single-bit or binary images. Some old scanners don’t have settings for less than 16
different shades, while virtually all new scanners have specific black-and-white
settings for capturing two-shade binary images.
Many scanners offer you a choice between two types of black-and-white settings.
They allow you to select either a bitmap or vector for your black-and-white image.
Figure 6-5 shows the drop-down menu for the Hewlett-Packard Precision Scan Pro,
which offers such a choice.
FIGURE 6-5
Some scanners offer you both bitmap and vector options for black-and-
white scans.
108
How to Do Everything with Your Scanner
Please purchase PDF Split-Merge on www.verypdf.com to remove this watermark.