How to Do Everything With Your Scanner- P36 doc
Bạn đang xem bản rút gọn của tài liệu. Xem và tải ngay bản đầy đủ của tài liệu tại đây (157.03 KB, 5 trang )
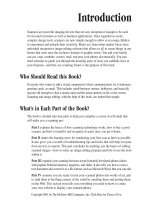
This chapter is intended to educate about different image-editing tools.
The information presented here is not specific to the user interface of
any particular image-editing program.
An Overview of Your Image-Editing Toolbox
Image-editing is one of the most fun and creative activities you can undertake with
your PC. You probably already have dozens of ideas as to the types of projects you’d
like to accomplish with your scanner. In creating most of your projects, you’ll make
use of image-editing tools from one or more of the following categories:
Cropping and positioning tools These types of tools allow you to cut off part
of your photo, or resize the entire picture without losing any of its content. You
can also reposition, rotate, and create a mirror image of your photo, depending on
the range of these features your image-editing program offers.
Correction tools You can virtually go back in time to fix what went wrong at the
point you snapped the photo. Image-editing tools allow you to compensate for
the effects of overexposed film or a blurry, unfocused image. A tool that corrects the
red-eye effect from a flash is my personal favorite.
Repair tools These program features allow you to take care of damage that can
occur to a photo after it’s developed—scratches, stains, wrinkles, spills, and other
wear and tear.
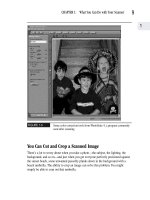
Pixel cloning tools Did you ever wonder what people meant when they talked
about “airbrushed” photos? Airbrushing is taking colored dots (called pixels) from
a surrounding area of a photo and using them to cover something you don’t want
to appear in the finished picture. The color insert illustrates the use of a cloning
tool to take care of a model’s bad hair day and smeared lipstick by covering the
wayward locks and runaway makeup with pixels from surrounding areas in the
photo.
Colorizing tools These tools allow you to give subtle or bold impact to a photo
by selectively applying color. You can also enhance or create a mood by tinting a
photo. The color insert has examples of both these techniques.
Composition tools These tools allow you to cut and paste photos on your
screen, and create a single picture from multiple images.
CHAPTER 10: Which Photo-Editing Tools Are Useful for Specific Tasks
159
10
Please purchase PDF Split-Merge on www.verypdf.com to remove this watermark.
Painting and drawing tools Most image-editing applications have drawing and
painting tools that allow you to superimpose lines, shapes, and other markings.
Other special effects Some image-editing programs offer special effects that
allow you to distort photos (as if you were looking into one of those fun house
mirrors) and create interesting visual effects such as fog, wind, and rain. These
features are not specifically discussed in this book, but if you’re interested, you
should look for these features when comparing image-editing programs. Also
check to see if they’re included with software you’ve already purchased.
Cropping and Resizing Your Photos
You can alter the size of your photos by cropping (cutting) material from around the
edges, or by shrinking or expanding the entire photo without altering its content. The
ability to alter the size of your photo is particularly useful when you’re creating a
project, such as a greeting card, for which you need a photo that fits nicely within
the finished piece.
Locating a Cropping Tool
Cropping allows you to remove portions of the photo that surround your main subject.
Cropping is such an important feature that your scanning software—as well as your
image-editing software—usually comes with this capability. As you might recall from
Chapter 2, scanner software is the program that allows you to control the functioning
of your scanner using an interface that appears on your computer desktop.
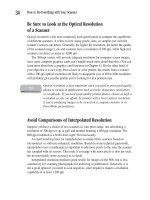
When the Cropping Tool Is Useful
Lopping off part of your photo with a cropping tool can achieve the following:
Focusing more attention on your subject matter By getting rid of extraneous
background, your subject appears larger and more prominently in a photo of the
same size.
Getting rid of distracting or irrelevant background Is your picture of you and
your fiancé on the sunset beach ruined by an unknown passerby you didn’t notice
at the time of the shot? You might be able to rid yourself of the unwanted intruder
by simply cropping him or her out of the photo.
160
How to Do Everything with Your Scanner
Please purchase PDF Split-Merge on www.verypdf.com to remove this watermark.
Correcting an off-center photo Do you have trouble centering your subjects
when you take a photo? Cropping allows you to change the center of the photo by
lopping a bit off one side or the other.
Eliminating worn or damaged edges Torn corners and frayed edges can be
fixed using some editing tools discussed later in the “Fixing Scratched, Torn,
Wrinkled, and Stained Photos” section; however, it might be easier to just trim
them off with your image-cropping tool.
A Sample Cropping Job
Figures 10-1 and 10-2 show a photo before and after cropping. Notice how cropping
the photo both gets rid of extraneous background and focuses more attention on the
main subject of the picture.
FIGURE 10-1
A photograph before cropping
CHAPTER 10: Which Photo-Editing Tools Are Useful for Specific Tasks
161
10
Please purchase PDF Split-Merge on www.verypdf.com to remove this watermark.
FIGURE 10-2
Cropping the photograph makes the subject appear
larger and more prominent.
Cropping Tips
Cropping is an easy job, regardless of which image-editing program you might be
using. Consult the Help menu to find out how to locate the cropping tool. Most
cropping tools display your photo within a set of boundary lines on the screen, and
you indicate where you want to crop the photo by moving the boundary lines.
162
How to Do Everything with Your Scanner
Please purchase PDF Split-Merge on www.verypdf.com to remove this watermark.
Here are a few tips to keep in mind when cropping a photo:
■ Make sure that you’ve selected a cropping tool, rather than a resizing tool.
Resizing will increase or decrease the size of the entire photo without
removing any unwanted areas.
■ Save your original image to a separate file before you begin cropping, and
make sure you’re satisfied with the effects of your cropping before saving the
newly cropped image. Most image-editing programs have an Undo feature
(like the one that comes with Microsoft Word) that allows you to restore your
original photo; however, you cannot use the Undo feature once you’ve saved
your cropped photo.
■ When cropping an unwanted background object, don’t crop so much from
one side that your photo is off center. If you can’t crop the offending object
and keep your subject centered, consider using the clone tool, discussed later
in this chapter, rather than the cropping tool, to remedy the problem.
■ Remember that if you crop a photo, the size will not change. The remaining
portions of your image will fill the same dimensions as your original photo,
resulting in a lower overall resolution. This might be an issue affecting the
quality of your final project if you crop a large area from a photo that was
originally scanned at a low resolution.
Resizing a Photo
Resizing a photo is a process that involves a different tool from cropping. When you
resize, you retain all the subject matter in the original photo, but change the size of it.
Depending on the program you’re using, you might have more than one option as to
how to resize your photo.
Some programs have resizing tools that enclose your photo within a boundary box
(like the cropping tools). You move the boundary lines around the photo to make
the photo smaller. This type of resizing can be difficult to use because you have to
adjust the height and width manually and in precisely the same proportions to avoid
distorting the photo. Figures 10-3, 10-4, and 10-5 illustrate how this type of distortion
alters the appearance of your subjects.
CHAPTER 10: Which Photo-Editing Tools Are Useful for Specific Tasks
163
10
Please purchase PDF Split-Merge on www.verypdf.com to remove this watermark.