How to Do Everything With Your Scanner- P57 doc
Bạn đang xem bản rút gọn của tài liệu. Xem và tải ngay bản đầy đủ của tài liệu tại đây (219.05 KB, 5 trang )
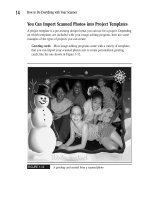
you create a cute greeting card for your mother, and a week later need to create one
for your boss. Simply open the file in which you’ve saved mom’s card and modify the
text and images as necessary to create a proper acknowledgment for your boss. You
can open the file and modify it again and again in the future as the birthdays of other
friends and family members come up.
Add Frames and Borders to Scanned Photos
No one knows who started the custom of framing pictures, but adding just the right
frame or border is an act of artistry in itself. Image-editing software allows you take
this creative task to a new technological level.
Using PhotoSuite to Create Frames and Borders
PhotoSuite allows you to create two distinct types of frames and borders:
Templates that look like a frame Since these are templates, you can’t resize
them. You need to resize your photos to fit into them. The PhotoSuite program CD
offers dozens of frames from which you can choose. The PhotoSuite content CD
that comes with the program offers more than 100 additional frame templates.
Borders that can be resized Borders are frame-like effects that can be resized
to fit snugly around photos of any dimension.
Working with PhotoSuite Frames
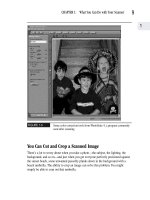
Generally you want your frame to enhance rather than overpower your picture, like
the framing job shown in Figure 15-2. Other times it’s the frame that gives the picture
impact, as in Figure 15-3.
To access and use a PhotoSuite frame template, follow these steps:
1. Click the large Compose button on the Welcome screen, or the Compose button
on the Navigation bar. The Navigation bar is located below the Menu bar.
2. Click Frames & Edges on the Activity panel displayed, then choose a category
of frame or border types from the drop-down menu on the left side of the
screen. A number of layout templates are displayed in the work area, as shown
in Figure 15-4.
3. Double-click the frame template you want to use. An enlarged version of the
frame appears in the work area.
264
How to Do Everything with Your Scanner
Please purchase PDF Split-Merge on www.verypdf.com to remove this watermark.
FIGURE 15-2
A frame that complements a scanned photo
FIGURE 15-3
A frame with impact
CHAPTER 15: Making Works of Art and Fun from Scanned Photos
265
15
Please purchase PDF Split-Merge on www.verypdf.com to remove this watermark.
FIGURE 15-4
PhotoSuite allows you to select from dozens of frame templates.
4. Click the Add Photos button, then the Computer button. Browse for the photos
you want to add. Use your mouse to resize, rotate, and reposition your photos
within the template.
5. When you’re finished, click the Return button to return to the previous menu.
When working with a PhotoSuite frame template, adjust the size of a
photo by dragging the size handles located along the perimeter of its
bounding box. To widen or lengthen a photo, drag the appropriate
middle handles. To enlarge or reduce a photo proportionately, drag the
appropriate corner handles.
266
How to Do Everything with Your Scanner
Please purchase PDF Split-Merge on www.verypdf.com to remove this watermark.
Adding a PhotoSuite Border to a Photo
PhotoSuite borders are a sort of one-size-fits-all frame. They have an advantage over
frames because they shrink or expand if you resize your photo. To use and access a
PhotoSuite border, follow these steps:
1. After you have opened the photo you want to use in PhotoSuite, click the
Compose button on the Navigation bar, directly below the Menu bar, then the
Adjust Objects button on the Activity panel.
2. Click the Add Borders button.
3. Click the photo on your work area so it’s enclosed in a bounding box.
4. In the dialog box on the left side of the screen, choose a border category, as
shown in Figure 15-5. The border styles contained within the category are
displayed.
5. Drag a border from the Activity panel to the object or photo, and click Return
when you’re finished.
FIGURE 15-5
PhotoSuite allows you to drag and drop a decorative
border onto your photo.
CHAPTER 15: Making Works of Art and Fun from Scanned Photos
267
15
Please purchase PDF Split-Merge on www.verypdf.com to remove this watermark.
To remove a border that doesn’t look just right, click your photo, then
click the Remove button on the Activity panel. To adjust a border’s width,
select the object or photo the border currently encloses, and adjust the
Width slider to make the border thinner or thicker.
Frames and Borders Using Other
Image-Editing Programs
If you’re using a program other than PhotoSuite, you can generally find out which
frame templates and border features are available by searching the keyword “frame”
in the Help menu of your image-editing program.
PhotoDeluxe does not include frame templates; rather, the manufacturers of this
software recommend that you create your own photo frame by using the tips and
procedures described in the next section.
Creating Your Own Frame or Border Effect
Without a Template
If your image-editing software doesn’t include frame or border effects, don’t despair.
It’s easy to create your own frames and borders using the two simple techniques
described in this section.
Make a Frame by Layering
Many image-editing programs allow you to layer photos and backgrounds on top of
each other and to add effects. By centering the photo you want to frame over an image
you’ve scanned or imported, you can create an interesting framing effect, as I’ve done
in Figure 15-6, in which I’ve layered a scanned photo over another copy of the same
image, to create a dramatic frame without the use of my template.
To accomplish a frame or border effect by layering as I’ve just described:
1. Scan or import the photo or image you want to use as background into your
image-editing software as an open project.
2. Scan or import the photo you want to frame as an object on top of the image
in Step 1, and resize or adjust the photo until it appears properly centered over
the image you’re using as a border.
3. Save the newly framed photo in a project file.
268
How to Do Everything with Your Scanner
Please purchase PDF Split-Merge on www.verypdf.com to remove this watermark.