How to Do Everything With Your Scanner- P62 doc
Bạn đang xem bản rút gọn của tài liệu. Xem và tải ngay bản đầy đủ của tài liệu tại đây (135.75 KB, 5 trang )
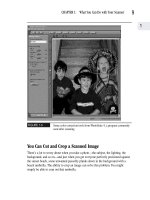
FIGURE 15-24
Laminated bookmarks from photos make great keepsakes.
3. Click Bookmarks on the next Activity panel displayed. A number of layout tem-
plates are displayed on the work area. Then, click the Next button to open the
template as a project file. Click the Compose button to prepare for the next step.
4. Click the Add Photos button to add photos to the template, and the Add/Edit
Text button to add and modify the text and captions using the text editor, as
discussed earlier in this chapter.
CHAPTER 15: Making Works of Art and Fun from Scanned Photos
289
15
Please purchase PDF Split-Merge on www.verypdf.com to remove this watermark.
Making T-Shirts from Scanned Photos and Drawings
Making t-shirts from scanned photos and drawings is such an easy process you really
don’t need a book to learn how to do it. In fact, all you need besides your scanner is
some iron-on transfer paper, a t-shirt, and an iron.
You simply print your scanned image or photo onto some iron-on transfer paper that
you load into your printer as you would any other paper. Several companies
manufacture the iron-on transfer paper you need for this project. You can find it at just
about any office supply store, or visit the Avery website at www.avery.com. A six-pack
of transfer sheets, as of the writing of this book, costs about $12.
T-shirts bearing photographs of the kids or scanned images they’ve
drawn are gifts kids love to give to their friends, parents, and
grandparents.
Creating Customized Refrigerator Magnets
Refrigerator magnets are useful in any household. You can purchase sheets of magne-
tized plastic that can be cut to the shape of any image with regular scissors. Just glue
an image onto the magnetized sheet and cut around the image.
You can find magnetized sheets at most office stores, or visit www.avery.com. A
three-pack of transfer sheets, as of the writing of this book, costs about $6.
The Possibilities Are Endless
Is your head spinning from all the projects in this chapter? Is your to-do list growing
longer and longer?
We’ve only scratched the surface of what you can create with your scanner. Tem-
plates expedite the process, but working without a template gives you unlimited
flexibility. No doubt you’re beginning to see your scanner as a tool of creative self-
expression, as well as a handy peripheral device. The next chapter provides you with
even more ideas for items that are practical as well as fun.
290
How to Do Everything with Your Scanner
Please purchase PDF Split-Merge on www.verypdf.com to remove this watermark.
Communicating
Through Scanned
Photos
Chapter 16
Copyright 2001 by The McGraw-Hill Companies, Inc. Click Here for Terms of Use.
Please purchase PDF Split-Merge on www.verypdf.com to remove this watermark.
How To…
■ Make personalized stationery and note paper
■ Design business cards and logos
■ Use scanned photos in a presentation
■ Make name tags, gift tags, and signs
■ Distribute coupons and certificates
We might operate on a paperless basis someday, but that day is far in the future. Most
electronic communication is presently reduced to some form of paper.
Paper communication is portable and immediate in a way that electronic commu-
nication might never be. It doesn’t require that the recipient be sitting in front of a
computer to read it. Paper—in the form of cards, stationery, and brochures—can be
distributed for reading on the fly. It can be passed by hand, posted on a wall, and
stuck to a lapel as a name tag.
This chapter helps you combine some of the best aspects of both electronic and
paper media.
Designing Stationery Using Scanned
Photos and Images
Stationery can set the mood of the message, and make a personal statement beyond
the words on the paper. Scanning technology allows you to create stationery and note
paper ranging from high-impact to subtly elegant. This section offers a few ideas and
sample layout illustrations to help you get started.
Designing Stationery That Makes a Statement
When you first rev up your scanner, it’s tempting to design elaborate stationery for
business or personal use, importing all sorts of images and interesting props—but
showing off your new scanner’s capabilities is not the goal of effective communi-
cation. More is not always better when it comes to making just the right statement,
particularly for business communication.
When you design your own stationery, you don’t have the feedback from a
professional printer who can offer you a trained eye from developing hundreds of
292
How to Do Everything with Your Scanner
Please purchase PDF Split-Merge on www.verypdf.com to remove this watermark.
layouts—but you can borrow the following tips from the printing pros for a good layout
design for a business:
■ Select the color and quality of your paper carefully. Pay particular attention to
the texture and thickness. Avoid paper that is thick and grainy or thin and
glossy. Opt instead for a texture that falls between these extremes, to convey a
confident, understated image.
■ Pay the extra money for stationery bearing a watermark. It can make a good
subliminal impression.
■ Avoid trying to make too strong a statement with colored paper, which might
distract from your graphics and undermine a professional image. Stick with
off-whites, beiges, and grays. If you choose a stronger color, stay with pastel
colors, although even these tones are not generally recommended. Follow this
advice even if you’re in a creative profession such as media relations.
■ Remember to choose the color of your stationery to complement your logo
and overall layout.
■ Opt for smaller-scale logos and art on your stationery, without sacrificing
legibility of text or clarity of any imported photographic images. Professional
printers concur that less is generally more when it comes to conveying a
professional image.
■ Scan logos and other images you’re planning on importing at slightly lower
resolutions than you normally would, since they will be smaller than images
you would use for other purposes. When the small-size image or logo is
printed, too high a resolution can cause reduced clarity and smudging.
(Smudging results from trying to print more image data per inch than your
printer is capable of.)
■ Experiment with different fonts. The text editor of your image-editing pro-
gram probably comes with several. Figures 16-1 through 16-3 illustrate the
dramatically different effects that can be achieved by changing fonts.
■ Consider using a cutout image of yourself or your product. Chapter 10 tells
you about the cutting tools you can find in your image-editing program.
CHAPTER 16: Communicating Through Scanned Photos
293
16
Please purchase PDF Split-Merge on www.verypdf.com to remove this watermark.