Thiết kế web với joomla 1.6(5).x part 28 potx
Bạn đang xem bản rút gọn của tài liệu. Xem và tải ngay bản đầy đủ của tài liệu tại đây (1.44 MB, 10 trang )
Part III: Working with Components, Modules, and Plugins
284
l
Clicks: Indicates the number of times the banner has been clicked on by visitors to the
site.
l
Tags: Shows any Tags associated with each of the banners. Tags can be used to set condi-
tions on the display of Banners.
l
ID: The system-generated user ID number.
Finally, at the bottom of the screen, below the content area, is the Display # option. Change the
value in the combo box control to alter the number of banners that are displayed on the page.
The default value can be altered by changing the List Length option on the Global Configuration
Manager.
Understanding Banner Parameters
Global options for the Banner Manager component can be configured by means of the parameters
option. The parameters are viewed and modified by clicking the Parameters icon on the Banner
Manager toolbar. Clicking the icon causes a lightbox to be superimposed on top of the page. Inside
the lightbox are the parameter variables that are available.
The Banner Manager includes a very limited number of parameters:
l
Track Banner Impression Times: Set the option to Yes to track the number of impres-
sions per banner per day.
l
Track Banner Click Times: Set the option to Yes to track the number of clicks on each
banner each day.
l
Tag Prefix: Set a prefix to be used for the Tag matching function. This improves the per-
formance of the Banners module.
After you have set the parameters you desire, click the Save button at the top right to save your
changes or click Cancel to close the parameters window without saving the changes.
Managing Clients
Clients are created by the administrator for the purpose of grouping banners. Every banner must
be assigned to a client. Although clients provide one unit of organization for banners, another level
of organization is available — Banner categories. Before you can add your first banner you must
have at least one banner client and one banner category.
To view the clients in your system, click on the Clients link at the top of the Banner Manager.
Chapter 12: Using the Banner Manager
285
Tip
If you have no need for multiple clients, simply create a single client and assign all your banners to that client.
Exploring the Banner Client Manager
The Banner Client Manager displays a list of all the clients that exist in the system. You can use this
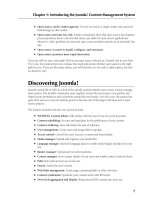
interface to add new clients and to review and edit existing clients. Figure 12.2 shows the Banner
Client Manager.
The toolbar at the top of the Banner Client Manager provides quick access to the following functions:
l
Delete: Select one or more clients from the list and then click this icon to delete the
client(s).
l
Edit: Select a client from the list and then click this icon to edit the client details.
l
New: Click to create a new client.
l
Help: Click to access the online Help files related to the active screen.
FIGURE 12.2
The Banner Client Manager.
Part III: Working with Components, Modules, and Plugins
286
Below the three links and above the list of Clients is the Filter field. The Filter works like a search
box. Type a word or phrase into the field and then click Go. Click the Reset button to clear the fil-
ter and display all the entries.
The main content area of the screen contains a list of all the banner clients in your Joomla! site.
The columns provided are:
l
#: An indexing number assigned by Joomla!
l
Checkbox (no label): Click in a checkbox to select a client; this is needed if you want to
use several of the toolbar options.
l
Client Name: The name given to the client.
l
Contact: The contact associated with this client.
l
# Banners: The number of banners associated with the client.
l
ID: The system-generated user ID number.
Finally, at the bottom of the screen, below the content area, is the Display # option. Change the
value in the combo box control to alter the number of banner clients that are displayed on the
page. The default value can be altered by changing the List Length option on the Global
Configuration Manager.
Creating clients
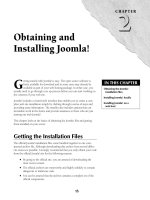
Clients are created from the New Banner Client dialogue, as shown in Figure 12.3. To access the
New Banner Client dialogue, click the New icon on the toolbar at the top of the Banner Client
Manager.
The toolbar at the top of the New Banner Client dialogue provides quick access to the following
functions:
l
Save: Click this icon to save your work, create a new client, and exit the New Client
dialogue.
l
Apply: Click to save your work and create a new client without exiting from the New
Banner Client dialogue. This option lets you save without exiting the screen and is useful
in case you are interrupted or otherwise want to save yet keep working on this screen.
l
Cancel: Cancels the task and exits the New Banner Client dialogue.
l
Help: Displays the Help files related to the active screen.
Three links are located below the toolbar: Banners shows you the Banner Manager, discussed in
the previous section. Clients shows you the Banner Client Manager. Categories shows you the
Banner Categories Manager, discussed in the next section.
Chapter 12: Using the Banner Manager
287
FIGURE 12.3
The New Banner Client dialogue.
To create a new banner client, follow these steps:
1. Access the Banner Client Manager. To do so, go to the Components menu and
select the Clients option from the submenu under the heading Banners. The Banner
Client Manager loads in your browser.
2. Click the New icon on the toolbar at the top of the Banner Client Manager. The New
Banner Client Dialogue opens. Refer to Figure 12.3.
3. In the Client Name field, type the name of the client. This field is required.
4. In the Client Contact field, type the name of the person who will be your contact
for this client. This field is required.
5. In the Contact E-mail field, type the Client’s Contact’s e-mail address. This field is
required.
6. Add any notes you like in the Extra Information text box; this field is optional.
7. Click the Save icon on the toolbar at the top right to save your new banner client.
The dialogue closes and returns you to the Banner Client Manager.
Part III: Working with Components, Modules, and Plugins
288
Editing and deleting clients
Existing banner clients can be edited from the Banner Client Manager. To edit a client, either click
on the client name in the Banner Client Manager, or select the client and then click the Edit icon
on the Banner Client Manager toolbar. Regardless of which method you use, the system opens the
Edit Client dialogue.
The Edit Client dialogue is identical to the New Client dialogue, with the same fields and require-
ments as discussed in the previous section.
To make changes to a client, simply alter the desired fields in the Edit Banner Client dialogue
and then click the Save or Apply icon on the toolbar. Any changes you have made are applied
immediately.
To delete one or more clients, follow these steps:
1. Open the Banner Client Manager.
2. Select one or more clients.
3. Click the Delete icon.
Caution
Deleting a banner client is permanent and cannot be undone. Moreover, there is no confirmation dialogue —
clicking the Delete icon immediately deletes the client! Note, however, that a client cannot be deleted if ban-
ners are assigned to that client. If you want to delete the client, first delete or re-assign any banners assigned to
that client.
Managing Categories
Categories, like clients, are an organizational tool for grouping banners. Every banner must be
assigned to a category. Categories are independent of the clients grouping, that is, a banner can
belong to any combination of the category and client fields.
Tip
If, in your system, there is no need for multiple categories, simply create a single category and assign all your
banners to that category.
Exploring the Banner Category Manager
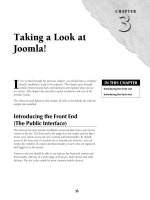
Categories are created and edited through the Banner Category Manager. The Banner Category
Manager is accessed by clicking on the Banner option under the Components menu. After the
Banner Manager loads, click the link labeled Categories to access the Category manager. Figure
12.4 shows the Category Manager as it appears with the Joomla! 1.5.x sample data in the system.
Chapter 12: Using the Banner Manager
289
FIGURE 12.4
The Banner Category Manager.
The toolbar at the top of the Banner Category Manager provides quick access to the following
functions:
l
Publish: This option is not relevant to banner categories. Note that while this will change
the category’s publication state in the Published column, it has no impact on the front end
of the site.
l
Unpublish: This option is not relevant to banner categories. Note that while this will
change the category’s publication state in the Published column, it has no impact on the
front end of the site.
l
Delete: Select one or more categories from the list and then click this icon to delete the
category(s).
l
Edit: Select a category from the list and then click this icon to edit the category details.
l
New: Click to create a new category.
l
Help: Click to access the online Help files related to the active screen.
Part III: Working with Components, Modules, and Plugins
290
Three links are below the toolbar. Clicking on the Banners link takes you to the Banner Manager.
The Clients link takes you to the Banner Client Manager. The Categories link leads to the Banner
Categories Manager. The Banner Manager and the Banner Client Manager are discussed in previous
sections of this chapter.
Below the three links and above the list of categories are two sorting tools. On the left side of the
screen is the Filter field. The Filter works like a search box. Type a word or phrase into the field
and then click Go. Click the Reset button to clear the filter and display all the entries.
On the right side of the screen is the Select State filter — a combo box that lets you filter the list by
whether the category is published or unpublished. Returning the Select State filter to its default
position resets the control and displays all the banner categories in the system.
Note
Although the Banner Category dialogue displays the Published field and a filter is provided for this field, it has
no applicability to banner categories.
The main content area of the screen contains a list of all the banner categories in your Joomla! site.
The columns provided are:
l
Checkbox (no label): Click in a checkbox to select a category; this is needed if you want
to use several of the toolbar options.
l
Title: This field displays the name given to the category. Click on the title to edit the cate-
gory details.
l
Published: This field is not applicable to the banner categories.
l
Order: Controls the ordering of the categories on the page. Change the integer values and
then click the Save icon to reorder the items on the screen.
l
Access Level: This field is not applicable to the banner categories.
l
ID: The system-generated user ID number.
Finally, at the bottom of the screen, below the content area, is the Display # option. Change the
value in the combo box control to alter the number of categories that are displayed on the page.
The default value can be altered by changing the List Length option on the Global Configuration
Manager.
Creating categories
New categories can be created from within the Banner Category Manager. Figure 12.5 shows the
New Category dialogue. Remember, you need at least one category on the system before you can
begin adding banners to your site.
Chapter 12: Using the Banner Manager
291
FIGURE 12.5
The New Category dialogue.
The toolbar at the top of the New Banner Category dialogue provides quick access to the following
functions:
l
Save: Click this icon to save your work, create a new category, and exit the New Category
dialogue.
l
Apply: Click to save your work and create a new category without exiting from the New
Banner Category dialogue. This option lets you save without exiting the screen and it use-
ful in case you are interrupted or you otherwise want to save yet keep working on this
screen.
l
Cancel: Cancels the task and exits the New Banner Category dialogue.
l
Help: Displays the Help files related to the active screen.
The workspace on this dialogue has two sections, labeled Details and Description.
Part III: Working with Components, Modules, and Plugins
292
The Details section of the New Banner Category dialogue includes the following fields:
l
Title: This field is used to assign the category a name. This field is the only required field.
l
Alias: The alias is the internal name for the item. If you leave this field blank, the system
will automatically use your title for the alias, with any spaces converted to hyphens. Note
that if you want to add a value to this field, it only takes lowercase letters with no spaces.
l
Published: This field is not applicable to the banner categories.
l
Category Order: Sets the order of the appearance of this category in the list of categories
in the Banner Category Manager. This can be altered directly from the Banner Category
Manager.
l
Access Level: This field is not applicable to the banner categories.
l
Image: This field is not applicable to the banner categories.
l
Image Position: This field is not applicable to the banner categories.
The Description area at the bottom of the dialogue provides a free text field into which you can
add a description of the banner category. Note that this is provided for the benefit of the adminis-
trators and does not appear on the front end of the site. The Image button below the description
field is really of no use for banner categories.
To create a new banner category, follow these steps:
1. Access the Banner Category Manager. To do so, go to the Components menu and
select the Categories option from the submenu under the Banners heading. The
Banner Category Manager loads in your browser.
2. Click the New icon on the toolbar at the top of the Banner Category Manager. When
you click on that icon, the New Banner Category Dialogue opens. Refer to Figure 12.5.
3. In the Title field, type the name you want to use for the category. This field is the
only required field.
4. Select and complete any other fields you wish; all other fields are optional.
5. Click, the Save icon on the toolbar at the top right to save your new banner cate-
gory. The dialogue closes and returns you to the Banner Category Manager.
Editing and deleting categories
Existing banner categories can be edited from the Banner Category Manager. To edit a category,
either click on the category title in the Banner Category Manager or select the category and then
click the Edit icon on the Banner Category Manager toolbar. Regardless of which method you use,
the system opens the Edit Category dialogue.
The Edit Category dialogue is identical to the New Category dialogue, with the same fields and
requirements as discussed in the previous section.
Chapter 12: Using the Banner Manager
293
To make changes to a category, simply alter the desired fields in the Edit Banner Category dialogue
and then click the Save or Apply icon on the toolbar. Any changes you have made are applied
immediately.
To delete one or more categories, follow these steps:
1. Open the Banner Category Manager.
2. Select one or more categories.
3. Click the Delete icon.
Caution
Deleting a banner category is permanent and cannot be undone. Moreover, there is no confirmation dialogue —
clicking the Delete icon immediately deletes the category! Note, however, that a category cannot be deleted if
there are banners assigned to that category. If you want to delete the category, first delete or reassign any ban-
ners assigned to that category
Managing Banners
Creating, copying, editing, and deleting banners are all tasks performed from within the confines
of the Banner Manager. The only additional resource you need is the artwork for the banner itself.
Note
The advertising banner files must be created outside the Joomla system. Typically these files are .gifs, .jpgs, or
other artwork formats. You cannot actually create the ads themselves inside Joomla!, you can only add existing
graphic files to Joomla!
Creating banners
Adding banners to the Joomla! system is called creating banners, although, you are not actually
creating the ads; you are merely adding them to the system. To get started, click the New icon on
the toolbar at the top of the Banner Manager. Figure 12.6 shows the New Banner dialogue.
The toolbar at the top of the New Banner dialogue provides quick access to the following functions:
l
Save: Click this icon to save your work, create a new banner, and exit the New Banner
dialogue.
l
Apply: Click to save your work and create a new banner without exiting from the New
Banner dialogue. This option lets you save without exiting the screen and is useful if you
are interrupted or you otherwise want to save yet keep working on this screen.
l
Cancel: Cancels the task and exits the New Banner dialogue.
l
Help: Displays the Help files related to the active screen.