Thiết kế web với joomla 1.6(5).x part 59 pptx
Bạn đang xem bản rút gọn của tài liệu. Xem và tải ngay bản đầy đủ của tài liệu tại đây (1.74 MB, 15 trang )
543
CHAPTER
Customizing Joomla!
Functionality
IN THIS CHAPTER
Understanding basic principles
Using the right tools
Discovering the Joomla! API
Working with components
Working with modules
Working with plugins
J
oomla! is extensible and customizable by design. The system’s various
components, modules, and plugins are easily identified and can be tar-
geted for customization. This chapter focuses on the basics of customiz-
ing those key elements.
Components, the system’s most complex element, employ the Model-View-
Controller architecture that cleanly segregates the business logic from the pre-
sentation layer. Although the MVC architecture helps make the planning and
creation of new components simpler, component creation remains a challeng-
ing and sometimes complex task suited more to experienced programmers.
Modules are the most commonly modified element in the system. Managing
the customization of modules is relatively easier than working with compo-
nents and can be done by anyone with basic programming skills and an
awareness of the system requirements and architecture.
Plugins tend to be focused on providing narrow and sometimes esoteric
functonality. And although creating a plugin may require more knowledge of
the underlying Joomla! framework, the Joomla! system includes plugin tem-
plates that make the creation of new plugins an easy task.
In this chapter, I take you through the key elements and anatomy of compo-
nents, modules, and plugins and discuss how to approach customizing them
to suit your needs. Along the way, I also look at overriding the output of the
system’s components and modules.
Part IV: Customizing and Extending the System
544
Understanding Basic Principles
Customizing the functionality of the Joomla! CMS means modifying or creating components, mod-
ules, and plugins. As you have seen in previous chapters, modules and components have varying
roles on the front end and on the back end of your site. Plugins are enabling applications that pro-
vide extended functionality for other elements of the system.
Customization of Joomla’s functionality varies widely in difficulty. You are most likely to make
customization to modules. Modules are often self-contained and are relatively easy to work with.
Plugins tend to be highly specialized and more often the provenance of a developer who needs to
add some enabling functionality to a new component. Components are by far the most complex of
these various extensions and often have both front-end and back-end elements that have to be con-
sidered when you are engaged in customization. Given the complexity of component architecture,
and the key role that components play in the system, component customization is by far the more
difficult task.
As a general rule, modifications to the core files should be undertaken reluctantly. The textbook
approach is to create a new version of the component, module, or plugin and make your modifica-
tions to that code; you can then install your new extension and manage it independently of the
core. Modifications made to core files can be more difficult to maintain when it comes time to
update or upgrade your site. Modifications made to the core can also be troublesome if site mainte-
nance is taken over by someone other than the developer. In either case, unless the changes are
well-documented, they can be easy to miss and hard to replicate.
Using the Right Tools
As with any type of work, the right tools can make the job significantly easier. Although the selec-
tion of an individual tool kit is a personal and subjective decision, a few tools are clear winners,
and there are a few that have been tailored specifically to work with Joomla!
Tools you need to customize a Joomla! site
In broadest and most basic terms, customizing a Joomla! site requires access to the following tools:
l
Web Browser: You should have access to all of the most common browsers for testing
purposes, but for development purposes the Firefox browser is the tool of choice. The
existence of a number of add-ons that extend the functionality of Firefox have pushed
Firefox into the forefront for developers. Several of these addons are discussed below.
Firefox can be downloaded free of charge from
www.mozilla.com
l
An editing program: Many editing programs are available, and everyone seems to have
their own favorites. Many people use Adobe’s Dreamweaver, although I do not think that
it is the easiest program or the best choice for working with PHP. Mac and Linux users, in
particular, may find other choices preferable to Dreamweaver. Dreamweaver is a commer-
cial application.
Chapter 21: Customizing Joomla! Functionality
545
l
An FTP client: Again, there are a multitude of choices here and many people have their
own favorites. If you are using the Firefox browser, the FireFTP add-on gives you an effec-
tive FTP client that works directly from inside the browser. Download this add-on for free
at
/>
While the items listed above may technically be all that you need (a number of developers
get by with just these), if you want to do more, you can use other options. A popular
choice among more sophisticated developers is the Eclipse Integrated Development
Environment (IDE). Eclipse provides not only a powerful authoring environment, but also
includes professional-quality debugging tools, integration with Subversion, and a variety
of utilities that can make your work easier. Download the Eclipse IDE free of charge from
Tip
If you are not familiar with Eclipse, you may want to start with the the Joomla! docs article entitled “Setting up
your workstation for Joomla! development.”
/>Tip
If you are looking to do a bit of quick work to the presentation layer, say, merely adding a bit of JavaScript to a
template, or modifying the CSS, you don’t need anything more than your browser. You can use Joomla’s built-
in Template Editor function to make changes to templates or their related CSS file. For a discussion of the
Template Editor, see Chapter 20.
Useful extensions that aid customization
You can extend your Joomla! site, your Firefox browser, or your Eclipse workstation. Here’s a list
of popular add-ons and extensions that can make customization of your Joomla! site easier:
l
Firebug: This add-on for Firefox provides a number of aids to Web development. With
Firebug installed, you can click on an element on the screen and view the code that pro-
duces it, the CSS that styles it, and a variety of related information. Firebug is particularly
useful when working on the presentation layer of a site. The YSlow and PageSpeed addons
discussed in this list integrate with Firebug. Download the Firebug addon free of charge at
/>l
FireFTP: As mentioned, the FireFTP add-on is an FTP client that runs from inside Firefox
as a new tab in the browser window.
l
Phing: This Eclipse extension is designed to ease packaging, deploying, and testing appli-
cations. This works very well with extension development and helps provide an easy way
to manage multiple changes and versions to your custom extensions. Download Phing for
the Eclipse IDE free of charge at
o.
l
Web Developer: This Firefox addon is targeted more at Web designers than program-
mers. It offers many of the same functions as Firebug and offers a toolbar that gives quick
Part IV: Customizing and Extending the System
546
access to many options. Download the Web Developer addon for the Firefox browser free
of charge at
/>l
YSlow or PageSpeed: These add-ons for the Firefox browser help identify performance
issues on web pages. These are diagnostic tools that help you identify bottlenecks, large
files, and slow spots in your pages. Download the YSlow addon for the Firefox browser
free of charge at
Download PageSpeed free of charge at
/>page-speed/download.html
.
Tip
The Joomla! Extensions Directory has a separate category containing a list of Developer Tools. Visit
/>Discovering the Joomla! API
The Joomla! CMS is an application built on top of the Joomla! framework. The framework is docu-
mented in the Joomla! API. Joomla! also relies on several third-party libraries, and some overlap
exists between the Joomla! API and portions of some of these libraries.
Note
Where possible, you should always give preference to the Joomla! API calls, instead of calling third-party
libraries directly.
Those users who want to create new extensions for Joomla!, or who want to contribute to the
Joomla! development efforts, need to spend some time and become acquainted with the Joomla!
API. The dedicated API web site is
The contents of that site are
automatically generated by the phpDocumentor package and are based upon an analysis of the
Joomla! source code.
Additional documentation can be found at the Joomla! Documentation Wiki at
http://docs.
joomla.org/
. There is also a manually produced API reference at mla.
org/Framework
. All of these resources are worth at least a quick glance for those interested in
creating Joomla! extensions.
Note
Although the Joomla! API is a useful resource, it can always use improvement. If you want to help out, you can
contribute to the Joomla! API Reference Project. There’s no need to join a working group or seek permission;
simply sign up on the site and jump in. The documentation can always use further explanation, examples, cor-
rections, and amplifications.
/>Chapter 21: Customizing Joomla! Functionality
547
Working with Components
Components are at the heart of the Joomla! system. The main content area of each page is gener-
ated by a component, and many of the site’s modules are dependent in some way on components
for their data. Components are the most complex element of the system to customize. Many issues
are involved, from the presentation of data to the manipulation of the database. A complete discus-
sion of component development is worthy of a book of its own, and a full discussion of the topic is
beyond the scope of this one chapter.
The following sections demonstrate how to execute simple modifications to a component and
introduce the basic concepts that underlie the creation of new components.
Knowing the elements of a component
The system’s components are divided into two categories: Site components and Administrator com-
ponents. The front-end Site components are located in the directory
/components. The back-end
Administrator components are located in the directory
/administrator/components. All
components use the same naming convention:
com_componentname.
With Joomla! 1.5, the project adopted the MVC Component architecture. That is, components are
built around the creation of models, views, and controllers. Understanding the MVC concept is key
to understanding how to work with Joomla! components.
Model-View-Controller is a software design pattern that helps developers plan an application and
then organize the code into a consistent and logical framework. The segregation of the application
into models, views, and controllers makes it easy to separate the business logic of the application
from the presentation of the data. The key advantage of this approach is that you can work with
the presentation of the data without having to make changes to the underlying application’s logic.
Looking at each of the three elements in turn shows the following:
Models
The model provides routines to manage and manipulate the data for the application. In most cases,
the data is pulled from the database, although other data sources can be used. The Joomla! frame-
work provides the abstract class JModel.
Views
The view portion of the application renders the data. The view does not modify the data; it only
displays what is retrieved. The view is technically part of the site’s presentation layer and includes
one or more templates that provide the formatting of the data. Note that views can display data
from multiple models. The Joomla! framework provides the abstract class JView.
Part IV: Customizing and Extending the System
548
Controllers
The controller reacts to actions, triggers the retrieval of data from the model, and passes the data to
the view for display. The role of the controller is to associate the model with the view. The Joomla!
framework provides the abstract class JController.
The anatomy of a typical component
Joomla! 1.5’s Polls component provides a simple example of the typical Joomla! component
architecture.
The Polls component has both a front-end and a back-end element. The front-end component pro-
vides the polls output that appears in the main content area of the page. A separate Polls module is
connected to this component to provide the Poll form you see in the sidebar module position in
the default configuration. The back-end Polls component provides the admin interface that allows
for the creation and management of your Polls data. The back-end component is located at
/
administrator/components/com_polls
. The front-end component can be found
at
/components/com_poll.
The front-end Component directory contains the following:
l
/assets
l
controller.php
l
index.html
l
/models
l
poll.php
l
router.php
l
/views
Note
You can see in this list the elements that correspond to the MVC architecture: The
/models
directory, the
/views
directory, and the
controller.php
file.
The key file is poll.php. This is the first file called when the component is in use and is respon-
sible for loading the proper controller, in this case the file
controller.php.
The
controller.php file defines the controller class and functions needed for this component.
The controller file automatically loads the model that has the same name as the view and pushes
the data to the view.
The
/models directory contains the model for our component. The key file for the model is /
models/polls.php
, and a generic index.html file. The polls.php file specifies the class
PollModelPoll, which sets out our model behavior and extends the system’s JModel class. In the
Chapter 21: Customizing Joomla! Functionality
549
case of the Polls component, the model queries the database to extract the number of hits, voters,
and the related date information.
The
/views directory contains the files for the component’s view:
l
index.html
l
/poll
In the Joomla! system, each view has its own directory. In the case of the Polls component, there is
only one view, named poll, hence the presence of the sub-directory
/poll. The /poll directory
contains the following files:
l
index.html
l
metadata.xml
l
/tmpl
l
view.html.php
The key file for the view is the view.html.php file. The view file pushes the data to the tem-
plate, which is located inside the
/tmpl directory. The key functionality in this file is the class
PollViewPoll, which extends the system’s JView class.
Note
The metadata.xml file is included in this view to give a title and a description to the view.
The last piece of the puzzle is formatting of the final component output. This is done through the
use of template files. Each view has a separate directory, named
/tmpl, that contains the template
files. The contents of the
/tmpl directory for the poll view are:
l
default_graph.php
l
default.php
l
default.xml
l
index.html
The poll view uses two templates, default.php and default_graph.php. The default.
php
is the primary file and calls the default_graph.php file in the course of rendering the
output. These two files contain the HTML needed to format the data on the screen.
Note
The final file, default.xml, has no role in the actual data output. It only provides the name and description
information for the page layout that is displayed during the Menu Item Type selection.
The /assets directory contains a collection of various graphical elements and CSS for the use of
the component:
Part IV: Customizing and Extending the System
550
l
blank.png
l
index.html
l
poll_bars.css
l
poll.png
Note
The Polls component also contains several files that are not unique to the component. Each of the directories
listed above includes an
index.html file. These files serve no purpose other than to block persons from access-
ing the directory index by typing into their browsers the URL of the directory. If a user enters the directory path
as an URL, he is served the
index.html file, which displays only a blank page. You can see these files in all the
directories of your Joomla! installation. Also note the
router.php. This file is not specific to the Polls compo-
nent. It is used frequently throughout the Joomla! components to help with the creation of URLs.
Overriding component output
The Joomla! system allows you override the output of components by creating one or more new
view templates and inserting them into your active template directory. This approach to overriding
component output allows you to leave the core files untouched; all your changes are made to a
new file which is segregated from the core component files. This system has the added advantage
of making it easy to keep up with your modifications; no matter how many components you over-
ride, all the changed filed are all kept in one place.
By way of an example, I am going to make modifications to the two templates that control the out-
put of the default Poll component. To override the templates, follow these steps:
1. Copy the files /components/com_poll/views/poll/tmpl/default.php and
/components/com_poll/views/poll/tmpl/default_graphs.php
2. Open your active template directory and place the copied file inside a sub-directory
named
/html/com_poll/poll. For example, if you are using the default rhuk_
milkyway template, you will create these two files:
/templates/rhuk_milkyway/
html/com_poll/poll/default.php
and /templates/rhuk_milkyway/
html/com_poll/poll/default_graph.php
3. Make your changes to the new files.
4. Save your changes. The new templates will now override the original templates and be
displayed on the site.
Note
I have copied two template files only because I need to make changes to both of them. If you only need to
change one, just copy one.
To show this process in more detail, here are the code changes made to the Poll component’s
template files.
Chapter 21: Customizing Joomla! Functionality
551
Both the default Poll component and the Poll module provide a link to the results of the poll. The
results of the poll are shown in the main content area of a dedicated page; it is the output that
appears on that page that I want to change. If you look at the default output, you will see that the
results page includes:
l
A Page Title, which is the same as the Poll question
l
A combo box listing the Poll question
l
The Poll question
l
The answer choices
l
A Summary of the poll activity.
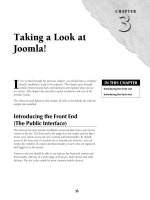
Figure 21.1 shows the default Poll component’s results page output.
FIGURE 21.1
The results page produced by the default Poll component. Note the Poll question appears three times on
the page!
Part IV: Customizing and Extending the System
552
I find the default formatting to be redundant and less than optimal for sites that plan to display the
output of only one poll. There are no parameters that allow you to get rid of the repetition of the
Poll question, so I am going to modify the view to eliminate the redundancies. I also clean up the
results layout a bit to display the results on one line, rather than one two lines per result. To do
this, I must modify both the templates in the view, as follows.
First, the key file for the poll view is
default.php, which looks like this:
<?php // no direct accessdefined(‘_JEXEC’) or die(‘Restricted
access’);?>
<?php JHTML::_(‘stylesheet’, ‘poll_bars.css’, ‘components/com_poll/
assets/’); ?>
<form action=”index.php” method=”post” name=”poll” id=”poll”>
<?php if ($this->params->get( ‘show_page_title’, 1)) : ?>
<div class=”componentheading<?php echo $this->escape($this->params-
>get(‘pageclass_sfx’)); ?>”>
<?php echo $this->escape($this->params->get(‘page_title’)); ?>
</div>
<?php endif; ?>
<div class=”contentpane<?php echo $this->escape($this->params-
>get(‘pageclass_sfx’)); ?>”>
<label for=”id”>
<?php echo JText::_(‘Select Poll’); ?>
<?php echo $this->lists[‘polls’]; ?>
</label>
</div>
<div class=”contentpane<?php echo $this->escape($this->params-
>get(‘pageclass_sfx’)); ?>”>
<?php echo $this->loadTemplate(‘graph’); ?>
</div>
</form>
This file contains the code that places the combo box containing the Poll question on the page. To
remove that from the output, delete these lines:
<div class=”contentpane<?php echo $this->escape($this->params-
>get(‘pageclass_sfx’)); ?>”>
<label for=”id”>
<?php echo JText::_(‘Select Poll’); ?>
<?php echo $this->lists[‘polls’]; ?>
</label>
</div>
Note: these are lines 13-18
I’ve gone ahead and deleted the div that wrapped the combo box as it would be empty without
the combo box. Keeping it in the code would serve no purpose.
Next, I need to open up the other template file to take care of the remaining items on my list. The
other file is
default_graph.php. This file is called for display in the last lines of the default.
Chapter 21: Customizing Joomla! Functionality
553
php file (<?php echo $this->loadTemplate(‘graph’); ?>)and it is this template that
supplies the results and the graphics that go with them. This file is significantly longer; I do not
show it all here as I want to focus on only the code being modified.
The Poll question and the accompanying image are controlled by these lines of code:
<thead>
<tr>
<th colspan=”3” class=”sectiontableheader”>
<img src=”<?php echo $this->baseurl; ?>/components/com_poll/assets/
poll.png” align=”middle” border=”0” width=”12” height=”14” alt=”” />
<?php echo $this->escape($this->poll->title); ?>
</th>
</tr>
</thead>
Lines 5-12 in the file.
The preceding code creates a row in the table that shows the small graph image and the Poll ques-
tion. By deleting these lines I remove those items from the output.
Next, I want to change the formatting to show the Poll results on a single line. In the default configu-
ration the results for each poll choice are shown on two lines. Here is the default code in question:
<?php foreach($this->votes as $vote) : ?>
<tr class=”sectiontableentry<?php echo $vote->odd; ?>”>
<td width=”100%” colspan=”3”>
<?php echo $vote->text; ?>
</td>
</tr>
<tr class=”sectiontableentry<?php echo $vote->odd; ?>”>
<td align=”right” width=”25”>
<strong><?php echo $this->escape($vote->hits); ?>
</strong> 
</td>
<td width=”30” >
<?php echo $this->escape($vote->percent); ?>%
</td>
<td width=”300” >
<div class=”<?php echo $vote->class; ?>”
style=”height:<?php echo $vote->barheight; ?>px;width:<?php echo
$vote->percent; ?>%”></div>
</td>
</tr>
<?php endforeach; ?>
To affect this change, I need to change the preceding code, as follows:
<?php foreach($this->votes as $vote) : ?>
<tr class=”sectiontableentry<?php echo $vote->odd; ?>”>
<td width=”150”>
Part IV: Customizing and Extending the System
554
<?php echo $vote->text; ?>
</td>
<td align=”right” width=”25”>
<strong><?php echo $this->escape($vote->hits); ?>
</strong> 
</td>
<td width=”30” >
<?php echo $this->escape($vote->percent); ?>%
</td>
<td width=”300” >
<div class=”<?php echo $vote->class; ?>”
style=”height:<?php echo $vote->barheight; ?>px;width:<?php echo
$vote->percent; ?>%”></div>
</td>
</tr>
<?php endforeach; ?>
Save these changes and you are done. Your new templates now override the original templates and
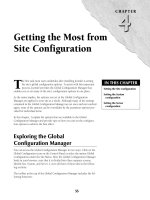
can be displayed on the site. The result of these two changes can be seen in Figure 21.2.
FIGURE 21.2
The results page produced by the default Poll component.
Chapter 21: Customizing Joomla! Functionality
555
Creating a new component
Although a complete tutorial on creating new Joomla! components is beyond the scope of this text,
you should be aware of some basic principles. In the sections that follow, I go through some of the
most important issues. If you want to explore this topic in more detail, there are a number of
excellent resources on the topic in the official Joomla! Developer documentation.
Note
To help get you started, the Joomla documentation site includes an excellent tutorial called Tutorial:
Developing a Model-View-Controller Component. Start with Part 1 at
/>Component_-_Part_1
.
Minimum requirements
Defining the minimum requirements for developing a component is difficult because the require-
ments are defined by the extent and nature of the functionality of the component you are building.
Even the ideal of providing a model, a view, and a controller is merely advisory, rather than com-
pulsory. Moreover, your component may not need both a front end and a back end; many compo-
nents exist in one place only. The best advice is to define what you need the component to do, and
then look at the most efficient way to get it done. If the component can benefit from a proper MVC
architecture you should use it; if it cannot, then do only what is needed.
Note
The other factor to consider is whether you want to distribute the component. If you want to release the com-
ponent for others to use, you should follow the MVC framework.
Tip
If you’re looking for a quick start, you might want to check out the Joomla! Component Creator, a non-com-
mercial tool available for download at the Joomla! Extentions Directory.
/>Registering a component
Registering your component in the database is a quick way to make it visible in the back-end
admin interface, so you can turn it on and off and work with it during development.
Note
Registering a component is optional; you can achieve the same thing by setting up the installer information in the
XML file and using the Joomla! Extension Installer to handle this automatically. However, because you are likely
to be writing and revising your component, you may want to register it at the very beginning of the process, so
you can see the impact of your changes and manipulate the component more easily during development.
Part IV: Customizing and Extending the System
556
Registering a component is simply entering a record for the component into the jos_components
table in your site’s database. You can accomplish this process either by running an SQL query or by
accessing phpMyAdmin and entering the information manually. To register a new component using
phpMyAdmin, do the following:
1. Access phpMyAdmin on the server where your Joomla! installation is located.
2. Select the name of your database from the list on the left. The database information
loads in the screen.
3. From the list of tables on the left side of the screen, select the option jos_components.
The jos_components table summary information displays on the right side of the screen.
4. Click the Insert tab. The Insert dialogue loads.
5. Type the name of your new component in the field marked name.
6. In the field labeled link, type option=com_componentname, where the string com-
ponentname represents the machine-friendly name of your component.
7. In the field labeled admin_menu_link, type option=com_componentname, where
the string componentname represents the machine-friendly name of your compo-
nent.
8. In the field labeled admin_menu_alt, type a short description for your component.
9. In the field labeled option, type com_componentname, where the string component-
name represents the machine-friendly name of your component.
10. In the field labeled admin_menu_img, type js/ThemeOffice/component.png.
11. Click the button labeled Go. The system now creates a new row ino the table contain-
ing your component information.
After your component is registered, you will be able to access it from the Joomla! admin system
where you can easily assign it to the front end and view your work in progress.
Packaging a component
Proper packaging may not be a concern if your component is only intended for your own use, but
if you intend to give your component to others, or you want to install it again elsewhere, you
should create a proper installation package for the component. Proper packaging allows you to
manage component installation through Joomla’s default Extension Installer.
Packages are archives that contain all the necessary elements of a component, along with an XML
file containing the information needed by the Joomla! Installer. The XML file must include the
information needed both to install and to uninstall the component as well as the information
needed for adding any menu items needed for the back-end admin interface for your component.
The installation package must also contain any SQL scripts needed to set up the database properly.
Caution
Make sure that your XML file is created in UTF-8 format.
Chapter 21: Customizing Joomla! Functionality
557
Given the wide number of variables related to component installers, and the fact that configuration
is very dependent upon the component itself, you should refer to the Installer API when it comes
time to create a Component Installation Package. The Installer API is located at:
http://docs.
joomla.org/Using_the_installer_API_to_support_package_installation
Working with Modules
Modules are the most commonly modified pieces of the Joomla! core. Modules are easy to custom-
ize and are even relatively easy to create from scratch. This section covers the elements of a typical
module, customization of a module, and module creation.
Understanding the elements of a typical module
The system’s modules are divided into two categories: Site modules and Administrator modules.
The front-end Site modules are located in the directory
/modules. The back-end Administrator
modules are located in the directory
/administrator/modules.
The easiest way to see all the elements of a typical module is to look at an example. The default
system’s Login module is typical of Site modules throughout the system. The Login module sup-
plies a Login form for front-end users, along with links to the Password Reset and Username
Reminder functions. If front-end user registration is enabled in the Global Configuration Manager,
then the module also includes a user registration link labeled Create an account.
The Login module is a Site module and is located at
modules/mod_login. The contents of the
directory are:
l
helper.php
l
index.html
l
mod_login.php
l
mod_login.xml
l
/tmpl
l
default.php
l
index.html
The mod_modulename.php file
The mod_modulename.php is the principle functional file for the module. This file is the first
thing called by the system when the module is needed. It contains the initialization routines and
includes the
helper.php file. It will also call the template that will display the module output.