Laptops All-in-One Desk Reference For Dummies- P48 docx
Bạn đang xem bản rút gọn của tài liệu. Xem và tải ngay bản đầy đủ của tài liệu tại đây (329.57 KB, 10 trang )
Using ReadyBoost
444
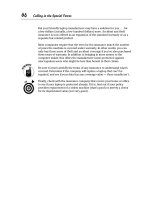
Finally, you’ve got to have the right type of flash memory key to enable
ReadyBoost. When you plug an external memory block into a laptop running
Windows Vista, the operating system runs a quick performance test; if the
memory is too slow, a message informs you that it can only be used for data
storage, and not as an extension of system memory. See Figure 1-7. It’s likely
that ReadyBoost won’t accept older flash memory keys you already own.
When you go shopping, look for devices labeled as “Vista Ready” or
“ReadyBoost Ready.”
Using ReadyBoost
Vista notices anytime you plug a flash memory key into a laptop, and the
operating system asks if you want to speed up your system using the
memory or use the memory as a place to hold files. If you choose to speed
up the system with ReadyBoost, the system displays a Properties screen for
the memory and a new tab that supports ReadyBoost. Here you can adjust
the amount of space you want to allow the system to use for cache; you can
devote all the memory to that purpose or divide the memory between cache
and file storage.
The minimum amount of flash memory for ReadyBoost purposes is 256MB,
and any amount beyond that offers improvements in performance. The maxi-
mum is 4GB.
Figure 1-7:
My new
laptop and
my new
flash
memory key
work well
together,
but the
operating
system
determined
that the
memory
was not
fast enough
to be
used with
ReadyBoost
technology.
34 140925-bk07ch01.qxp 4/8/08 12:50 PM Page 444
Book VII
Chapter 1
Adding RAM
Using ReadyBoost
445
When this new technology was introduced, Microsoft recommended that the
way to get the best ReadyBoost performance was to match the capacity of
the flash memory device to the amount of installed system memory. Thus, if
you have 2GB of RAM in the machine, you would get the best performance
by installing 2GB of ReadyBoost-compatible flash memory. This may change
with future updates and Service Packs for Windows Vista; keep posted on
changes by visiting the Microsoft web site and searching for ReadyBoost.
To be recognized as a ReadyBoost device, the flash memory has to be all in
one device; if you install two flash memory keys in two different USB ports,
Vista recognizes only one of them (the device with the earlier alphabetic
drive identification) as available for ReadyBoost.
34 140925-bk07ch01.qxp 4/8/08 12:50 PM Page 445
Book VII: Upgrading Your Laptop
446
34 140925-bk07ch01.qxp 4/8/08 12:50 PM Page 446
Chapter 2: Adding or Replacing a
Drive: Internal, External, CD, or DVD
In This Chapter
ߜ Reading the spinning library within your laptop
ߜ Downsizing a drive, affecting design
ߜ Protecting a drive from traveling insults
ߜ Installing a replacement drive
ߜ Going external for storage
ߜ Changing optical specs: CD and DVD upgrades
A
hard disk drive or a CD or DVD drive is basically very large, very fast,
revolving filing cabinets. Oh, and they’re served by an extremely efficient
and quick librarian who knows where everything is at all times, can go and get
your information in the blink of an eye, and never takes a coffee break.
Disk drives record information by placing tiny electrical charges on a mag-
netized surface. CD or DVD drives use optical recording methods, burning
teensy pits or making dark marks on a reflective disc. Either way, your com-
puter is recording the 0s and 1s of binary data on a circular medium. In gen-
eral, the absence of a magnetic or optical mark at a particular location
indicates a 0, and the presence of a mark is interpreted as 1.
A magnetic hard disk drive uses a platter that is spelled with a k, a disk. A
CD drive, which is a computer adaptation of a music-playing device devel-
oped in Europe, uses a platter that is spelled with a c, a disc. DVD drives
were developed simultaneously for computers and home-theater systems,
and for my purpose I use the disc spelling. Do any of these distinctions
really matter? Only to copy editors and others (like me) who are paid to
obsess over tiny details . . . and get them right.
Inside a hard disk drive one or more platters spin at a constant speed, while
one or more heads move in from the outside (or back from the center) of
the disk to read information recorded at a particular location or write new
data. (That’s why we call them read/write heads.)
Don’t do this (open your laptop, that is) at home; allow me to do it for you.
In Figure 2-1 you can see the guts of a laptop from my collection.
35 140925-bk07ch02.qxp 4/8/08 12:50 PM Page 447
Going Tiny, Laptop Style
448
Depending on the hard disk drive’s density (how closely data is packed
together) and the drive’s overall capacity, it may have only one platter or
two or more platters. Most hard disk drives also record information on both
top and bottom of each platter. To go along with the multiple platters, the
drive has an equivalent number of read/write heads — one for each side of
the platter.
The drives spin at a very high rate of speed; a typical laptop hard drive rotates
at least 4,200 times per second and, at today’s high end, as much as 7,200 or
10,000 revolutions per second. (Old-fashioned floppy disk drives, no longer
common, spun at just 300 revolutions per minute in their final versions.)
And finally, unlike floppy disk drives or optical drives (CDs and DVDs), hard
disk drives are sealed units, with their platters and read/write heads protected
from damage by dirt, dust, and sticky substances that could make them liter-
ally grind to a halt.
Going Tiny, Laptop Style
While the basic design of a laptop’s hard disk drive is similar to a drive in a
desktop PC, some very important differences exist. A laptop drive has to be
Figure 2-1:
Its protective
cover
removed,
here is the
interior of a
basic hard
disk drive.
This model,
from a
desktop
computer,
has three
platters and
six read-
write heads
that move in
from the
outside to
the core.
35 140925-bk07ch02.qxp 4/8/08 12:50 PM Page 448
Book VII
Chapter 2
Adding or Replacing
a Drive: Internal,
External, CD, or DVD
Going Tiny, Laptop Style
449
✦ Much smaller and much lighter (because you’ll be stowing and carry-
ing it)
✦ Much less demanding of electrical power (since it often runs on battery
power)
✦ Built and installed to resist damage to its platters or to the information
recorded on them (because a laptop is specifically intended to be moved
around from one place to another)
Making ‘em small
Drives intended for a laptop have to be miniaturized, of course, because
they need to fit within a notebook case; PC designers can use hard drives of
almost any shape or weight. The standard PC drive is 3.5 inches wide, and
about 1 inch thick.
For a current laptop, a typical hard disk drive is about the size and weight of
a pack of playing cards. Most laptops use drives that are 2
1
⁄2 inches wide and
a bit more than
1
⁄3 inch thick (9.5mm); today’s tiniest are just 8.5mm thick,
which is almost exactly
1
⁄3 inch.
The next step down is a 1.8-inch-wide device you can install within the
laptop or as a plug-in PC Card or Express Card. And now you see tiny drives
half again as wide, popping up at 0.85 inches: That’s less than an inch
square. Smaller than a postage stamp. These tiny drives are in cell phones,
digital audio players, PDAs, and digital cameras, but laptops are next.
And we’ve begun seeing the first solid-state hard disk drives for laptops —
essentially, permanently installed flash memory. They’re relatively fast and
have no moving parts, which is a good thing. On the downside, they’re (cur-
rently) very expensive when compared to “old-fashioned” mechanical hard
disk drives, and for that reason the first models have relatively small capaci-
ties of 64GB.
The other part of the miniaturization equation is the push for a reduction in
weight. To some designers and laptop users, weight is the equivalent of
racing decals on a sports car; they want to brag about how their new laptop
weighs just 27 ounces. (To others, the issue is more about practicality. A 5-
pound laptop case can begin to feel like a 50-pound iron anvil at the end of a
day of traveling from home to airport to hotel.)
A typical modern 2
1
⁄2-inch notebook hard drive weighs somewhere near 100
grams, or about 3
1
⁄2 ounces, an amazing feat of productive shrinkage. And the
newest 1.8-inch-wide drives are as light as 62 grams, or just over 2 ounces.
35 140925-bk07ch02.qxp 4/8/08 12:50 PM Page 449
Going Tiny, Laptop Style
450
Making ‘em efficient
Reducing the drives’ power demands means longer batteries use while you
travel. Two factors are at work here:
✦ Reduced draw of current with ultra-efficient motors and low-friction
bearings.
✦ Lower power draw usually generates less heat within the closed case of
a laptop and therefore requires less power demands by cooling fans.
Making ‘em sturdy
Although I’ve been known to occasionally gently kick the PC that sits beneath
my desk when its internal fans start to vibrate like a 747 preparing for takeoff,
in general a hard drive in a full-sized PC lives a pretty sheltered life. It doesn’t
get moved very often, isn’t likely to fall, isn’t in a spilled coffee’s pathway, and
it doesn’t have to go through X-ray machines. (And I also protect it against
electrical surges or brownouts by plugging the machine into a capable uninter-
ruptible power supply.)
Downsizing and data transfer
Although high-end laptops are now available
with drives that spin at the same high speeds
as the best desktop devices, most laptop hard
drives spin slower to reduce power demands.
One effect of a slower speed is a potential reduc-
tion in the data transfer rate. It’s simply a matter
of physics: The read/write head waits for a par-
ticular spot on the disk to come beneath it. If one
drive spins twice as fast as another, there could
be a delay of as much as nearly 100 percent
between grabbing bits of separated data.
A second factor is that data transfer is fastest at
a drive’s outer tracks — tracks with the largest
circumference. More circumference means the
capacity for more data in a particular track.
(
Circumference
is the actual distance around
the circle.) At the same rotational speed, more
data in a track means faster throughput. If you’re
working with smaller platters on a laptop’s drive,
the outer circumference is going to be less. A 3-
inch circle has a circumference of about 9.4
inches, while a 2-inch circle is a mere 6.3 inches.
In addition to possible differences in the rotation
speed, the larger drive in this example has a cir-
cumference about 50 percent larger.
Other components that affect the speed of trans-
fer of data include the motherboard design and
the chipset used. If you purchase a current
machine, it most likely uses a SATA (serial ATA)
hard drive and disk controller hardware, which
is as fast as a consumer-grade machine is going
to function. Older laptops use PATA (parallel ATA,
also called IDE) drives and standards, which are
slightly slower in certain circumstances.
35 140925-bk07ch02.qxp 4/8/08 12:50 PM Page 450
Book VII
Chapter 2
Adding or Replacing
a Drive: Internal,
External, CD, or DVD
Replacing a Laptop Hard Drive
451
Alas, a laptop is nowhere nearly as pampered. It faces a hundred threats in the
office and on the road. It can fall off the airport X-ray machine, be dropped off
a desktop, suffer a sudden soaking, or even pick up a bit of sand or dirt.
And so engineers have devoted themselves to building stronger and better
protected disk drives for laptops. The first step: guarding against damage
from a fall. Engineers have two ways to accomplish that:
✦ Passive design safeguards. These elements include cushioning the hard
drive against damage — things that include stronger materials, tiny
springs or rubber mounting, and the like.
✦ Active safeguards. A few companies make these, including Lenovo (suc-
cessor to IBM) with its Active Protection System for some of its ThinkPad
laptops. Like the sensor in a car airbag, the disk drive watches for sudden
changes in motion that include acceleration (as a laptop tumbles off a
desk) or deceleration (as it hits the floor). It reacts within half a second to
park the drive’s read/write heads in a place where they won’t crash into
the platters and then it stops the drive’s spin.
Hiring, Firing, and Wiring
Engineers have gone back to the wiring past. New technologies allow serial
communication to operate at extremely fast speeds, without any of the com-
plexities of parallelism.
Serial ATA (SATA) requires only four thin wires in a casing similar to a tele-
phone cable. The first specification for SATA requires only four 500 millivolt
(
1
⁄2 volt) signals; future versions are expected to allow signal voltages half
again as strong at 250 millivolts, or 1/4 volt.
And within the next few years, SATA will break out of the box to offer some-
thing quite logically called external SATA (eSATA). This allows high-speed
communication with new drives and other devices. Think of it as USB on
speed.
Replacing a Laptop Hard Drive
The first few generations of laptops came with hard disk drives deeply embed-
ded within their sealed cases. Removing one to replace or upgrade it was a
difficult, time-consuming, and expensive process that generally required the
involvement of a professional repair shop.
35 140925-bk07ch02.qxp 4/8/08 12:50 PM Page 451
Replacing a Laptop Hard Drive
452
An R word is missing from this chapter. I speak only of replacing a hard disk
drive, not repairing it. The fact is that a hardware failure (a crashed head, a
damaged motor or platter) or a fried electronic circuit is almost never worth
repairing. The only exception: for a price (a large one), some specialty labs
can recover essential and irreplaceable data from some failed drives.
Maintaining regular data backups is a lot less expensive.
Today, nearly all current laptops have made the hard disk drive modular; the
drive either slides into a bay on the side or latches into a compartment on the
bottom. The drive is held in a special carrier that matches the laptop case,
and exposed is a set of small connectors that deliver power to the device and
send and receive data. In this design, you unplug an original drive and install a
new one: plug and play.
From serial to parallel and back
Serial wiring is the original design for most
communication within and outside a PC. This
was the best engineers could come up with at
the time: the eight bits of a computer byte (or
word) were strung, one behind the other, and
sent down a pair of wires, one in each direc-
tion. (Other wires were in the cable for special
signaling.)
Serial communication works, although at first
it was slow. First of all, each byte had to be sep-
arated by code to show where it began and
ended. And many designs also added error-
checking or error-correcting codes that allowed
the computer to figure out if all the received
information was accurate. Finally, serial com-
munication was simply slow because it was the
equivalent of a two-lane highway; every bit had
to follow one behind the other and there was no
passing lane.
The next development in personal computers
was parallel communication. In this design, all
eight bits of a computer word were sent at the
same time along an 8-wire cable or a 16-wire
cable for bidirectional exchange. This was
adopted for most uses that required bunches of
information transmission: Printers were among
the first places these cables went.
Parallel communication was also adopted for
the transfer of data within a computer — from
the microprocessor to the hard disk drive and
back, as one example. Inside a computer—
desktop or laptop—the motherboard and the
drive had to be connected by an unwieldy 40-
or 80-wire cable and a 40-pin connector. And 26
of the wires had to carry 5-volt signals.
That worked for more than a decade as engi-
neers pushed the speed of communication
across the parallel superhighway faster and
faster. But eventually they ran into problems of
physics: minor imperfections in cables or the
tiniest of variation in length might mean that
one of the eight bits might arrive a millisecond
before or after the others. The result: a traffic
jam.
35 140925-bk07ch02.qxp 4/8/08 12:50 PM Page 452
Book VII
Chapter 2
Adding or Replacing
a Drive: Internal,
External, CD, or DVD
Replacing a Laptop Hard Drive
453
Installing a plug-in drive
The best of the systems make changing a hard drive as easy as swapping a
battery. In Figure 2-2 you can see one example of a laptop hard disk in a car-
rier and the empty bay awaiting its installation.
A reminder: Always remove both the AC adapter and the laptop’s battery
before handling any of the machine’s internal parts. Don’t take the chance of
having any electrical power in the laptop that could be shorted out by a tool,
screw, or other conducting material.
Follow these basic steps for working with a drive that’s already installed in a
carrier designed for your laptop:
1. Turn off the laptop.
2. Unplug the AC adapter.
3. Prepare your work area.
You want a clean, well-lit, and stable surface. Place a soft cloth or other
cushioning material to protect the top of the laptop; you can use almost
anything that isn’t metallic or packing an electric charge.
4. Remove the battery.
5. Ground yourself before touching the old drive, and again before
opening the bag or box that holds the new drive.
Figure 2-2:
Turned on
its back,
you can see
how this
particular
hard disk
carrier
design holds
a drive in a
cage; the
data and
power
connectors
plug into
mating ports
in the laptop.
35 140925-bk07ch02.qxp 4/8/08 12:50 PM Page 453