Joomla cho người mới bắt đầu part 8 pps
Bạn đang xem bản rút gọn của tài liệu. Xem và tải ngay bản đầy đủ của tài liệu tại đây (1.89 MB, 10 trang )
Chapter 4
[ 77 ]
Step 1: Customize the layout
In Chapter 3 you've seen that the overall site layout (columns, colors, typography, and so on)
is set in the site's template les. Joomla! makes it easy to edit the current template using the
Template Manager. In this case, we'll choose a new color scheme, add a new header image,
and make a few addional changes.
Customize the color scheme
The color scheme of Joomla!'s default rhuk_milkyway template is all too well known.
There must be thousands and thousands of websites with a dark blue background, dark
blue rounded menu corners, and dark blue heading texts. Corporate and professional
looking as this may be, it's also about as special as a dark blue Japanese sedan in a car
park full of dark blue Japanese sedans. Of course, you don't want your client to think
their new website is just the same as everybody else's, so let's change things a lile.
Time for action – choosing a color variation
The rhuk_milkyway template oers you a choice of color schemes or "color variaons".
Let's pick a dierent one:
1. Navigate to Extensions | Template Manager and click on rhuk_milkyway.
2. In the Template: [ Edit ] screen, change a few values in the Parameters secon.
Select Color Variaon: Black and select Background Variaon: Black.
3. There are three Template Width opons:
Fluid with Maximum: The width of the template is liquid; in a big window,
it will be displayed wider.
Medium: The width of the template is set to 930 pixels.
Small: The width of the template is set to 750 pixels.
Fluid: The minimum size is 750 pixels; the width varies with the
window size.
Choose Medium. We'll have a xed page width of 930 pixels.
Download at Wow! eBook
WWW.WOWEBOOK.COM
Web Building Basics: Creang a Site in an Hour
[ 78 ]
4. Click on Preview. You'll noce the background color has changed to a very dark
grey—nothing fancy, nothing extremely excing, but it does go nicely with the
SRUP logo color. Moreover, the Main Menu border has changed to a stylish black:
What just happened?
By seng a few parameters in the Template Manager Edit screen you changed the width
and colors of the site template. Choosing a xed width means the size of the layout will be
the same, no maer how big the users' monitor or browser window may be. A xed width of
900+ pixels is very popular these days and is used by big sites such as www.apple.com and
www.microsoft.com. It looks good on most screens and leaves some room for le-hand
side and right-hand side margins. Having a xed width gives you pixel perfect control over
the size of the layout; you won't have to bother adjusng our layout or graphics for dierent
screen sizes (such as the xed width header graphic we're going to replace in a minute).
The rhuk_milkyway template lets you change the colors and the overall width of the layout.
There are other templates available with their own set of parameters that allow you to
choose the number of columns or set other layout opons.
Download at Wow! eBook
WWW.WOWEBOOK.COM
Chapter 4
[ 79 ]
Time for action – preparing a new header le
As it is, our design sll very much looks like any Joomla! site—and that big Joomla! logo on
every page isn't helping much! You'll replace this with your client's logo. The original Joomla!
logo is just 298 pixels wide and 75 pixels high. We'll create a new image that takes up the full
width and height of the header; this way, we can change the site's looks disncvely with
just one graphic.
1. Open up your image eding tool. In this example, we'll use Adobe Photoshop,
but any image editor will do.
2. The space where we want to place our image (the full width and height of the
template header) has these dimensions: 920 x 108 pixels. To leave room for a
lile margin, we'll create a new header le of slightly smaller dimensions: 900
x 98 pixels. Click on New. In the Width and Height boxes, ll in 900 and 98
pixels. Choose Background Contents: Transparent.
3. In Photoshop, the PNG le shows a grey and white "checkerboard" background.
This indicates the background is transparent, which means the colors of the header
background will shine through. This way, the logo image you create blends in nicely
with the overall design.
Download at Wow! eBook
WWW.WOWEBOOK.COM
Web Building Basics: Creang a Site in an Hour
[ 80 ]
4. Now you can create any logo you like. Let's skip the details, as these depend on
the specic needs of your site and the tool you are using. For this example, I've
created a nice rounded Web 2.0 style logo using two free fonts: Airstrip Four from
www.dafont.com (see www.dafont.com/faq.php for installaon instrucons)
and the Calibri Windows system font, I have also applied some Photoshop shapes
and eects.
5. Save the image as a PNG le. In Photoshop, click on Save for Web and Devices,
choose the PNG-24 le format, and save the image as srupheader.png. Make
sure to select the Transparency checkbox to preserve the transparent back-
ground.
Click on Save.
6. In the next screen, choose a locaon on your computer and click on Save
again. Done!
A previous version of the Microso Internet Explorer browser (version 6)
doesn't display PNG images correctly if they contain transparent areas. If you
want to accommodate for visitors using this old browser, it's beer to use an
image without transparency. Another soluon is to use a Joomla! extension
that remedies this specic browser issue. In Chapter 10, you'll learn more on
adding extensions to Joomla!. Do a Web search for "Ulmate PNG Fix Plugin"
to read more about this specic PNG extension and its use.
Download at Wow! eBook
WWW.WOWEBOOK.COM
Chapter 4
[ 81 ]
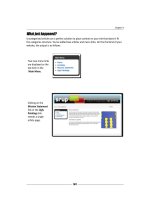
What just happened?
The header image le to replace the default Joomla! logo is ready, but we're not done yet. To
get Joomla! to display this new le, we'll upload the image le to the web server and change
a few simple lines in the template code
Living without Photoshop—free alternaves
Photoshop may be a ne graphic eding tool, but it's not exactly cheap. The standard
Windows graphics editor Paint can do the job—but it's capabilies are very, very
basic. Fortunately, there are many excellent and free Photoshop alternaves. You
can even have essenal Photoshopping capabilies on your computer without
installing a thing. Just browse to www.pixlr.com and start creang and eding!
If you're looking for free graphic eding soware programs, do a Web search
for Paint.NET or GIMP. Both are very capable programs; Paint.NET is beginner
friendly and at the same me quite powerful. The GIMP, an acronym for GNU
Image Manipulaon Program, is arguably the most popular free Photoshop
contender. It's an open-source program that features a truckload of photo
retouching and image eding tools.
Download at Wow! eBook
WWW.WOWEBOOK.COM
Web Building Basics: Creang a Site in an Hour
[ 82 ]
Time for action – display the new header image le
Let's get Joomla! to show our new header image. To do this, you'll rst upload the le to your web
server using FTP—which is very similar to moving or copying les on your own computer using File
Explorer in Windows or the Finder on the Mac. If you've installed Joomla! yourself, you've already
used FTP to put the Joomla soware les on the web server (see Chapter 2 on installing Joomla!).
If you're new to FTP, you can read more on the Web on using FTP soware such as FileZilla
(www.siteground.com/tutorials/ftp/filezilla.htm).
1. Using your FTP program, connect to your web server and nd the root directory
where Joomla! is installed. Browse to the /templates/rhuk_milkyway/images
directory. This is the directory that contains the images les for the default Joomla!
template, rhuk_milkyway. Upload the srupheader.png le you just created
to this folder.
Next,we'll take a peek under the Joomla! hood and change a rule in the template les to
point to the new image le. Yes, you're going to change a few lines of code—but don't worry,
it's really straighorward and we're going to explain this code thing in a minute.
2. In the Joomla! Control Panel, choose Extensions | Template Manager. In the Tem-
plate Name column, click on the name of the default template, rhuk_milkyway.
3. Click on the Edit CSS buon, select template.css and click on Edit. The Template
Manager editor screen opens. Scroll down to nd the code that starts with div#logo.
This is the code that tells Joomla! where the logo is posioned on the screen and what
image le should be used.
Download at Wow! eBook
WWW.WOWEBOOK.COM
Chapter 4
[ 83 ]
4. Change the background: url code to refer to the new image le. This code
should now read: background: url( /images/
srupheader.png) 0 0 no-repeat;
5. Change the width and height values to reect the size of the new image. To
shi the image a lile to the le-hand side, decrease the margin-left value.
The three lines of div#logo should now read:
width: 900px;
height: 98px; mar-
gin-left: 25px;
6. Click on the Save buon. Click on Preview to see the results on the frontend. If you
sll see the Joomla! logo press F5 to force your browser to refresh (reload the page).
What just happened?
The new look for your site is beginning to take shape. You have updated the CSS stylesheet
of the current Joomla! template to point to your new header le. You've replaced the
original logo image with a new image that takes up all of the header screen space.
CSS stylesheets? Come again?
You've just changed some code in one of the Joomla! template les. Specically, you've
opened up the CSS le. Eding the CSS le of a Joomla! template is a quick way to change
the appearance of your site. But just what is it, this CSS thing?
You probably know web pages are documents containing HTML code. HTML tells
the web browser what content it should display and roughly where this content is
placed on the web page.
These HTML documents can be linked to Cascading Style Sheets (CSS) les. These
CSS les tell the web browser how the data in the HTML le should be displayed.
CSS is a relavely simple set of rules that dene the web pages' colors, fonts, page
layout, and more.
Download at Wow! eBook
WWW.WOWEBOOK.COM
Web Building Basics: Creang a Site in an Hour
[ 84 ]
As CSS instrucons are stored in a separate le, these layout instrucons can be linked to
(and used by) any number of HTML documents. In other words—changing one line in a CSS
le can change the appearance of a number of web pages using that CSS le. You've just
seen an example of this when you made all pages on the site display a new logo image by
eding the template.css le.
Joomla's built-in CSS editor screen makes it easy to quickly tweak the current template's layout
details; however, you do need to have some knowledge of CSS for this. If you're new to CSS you
can nd a wealth of informaon on the Web. Just google the phrase "introducon to CSS" or
"CSS tutorial" and you'll be presented with some great resources. To get a quick introducon,
have a look at www.yourhtmlsource.com/stylesheets/introduction.html.
We'll be exploring CSS in more detail in Chapter 11.
One last thing: Clean up a little whatchamacallit
It's me for one last template customizaon job. You may have noced a lile… well, a lile
whatchamacallit in the center of the design, just below the header:
These are two half spheres stuck together. It's what remains of the Top Menu. When the
Top Menu is enabled, these two spheres are displayed to the le-hand side and right-hand
side of the menu links. Now that you have vigorously removed the contents of the site and
disabled the Top Menu module, the template design leaves a few unwanted traces.
Time for action – remove the whatsis
We won't use the top menu on our site, so we want to remove all traces of it. To do this,
we'll have to delete a few lines in the template stylesheet:
1. Navigate to Extensions | Template Manager and click on rhuk_milkyway. Click on
the Edit CSS buon and select the CSS le template.css. Click on the Edit buon.
2. Find the CSS code that starts with /* horizontal pill menu *//.
3. Now, select all code of the horizontal pill menu styling: from the table.pill
style to the style pill # menu a # active_menu-nav.
4. This last style denion ends with background-position: 0 0;}.
Download at Wow! eBook
WWW.WOWEBOOK.COM
Chapter 4
[ 85 ]
5. Because we will never use the horizontal menu in this site, we will remove these
styles. Press the Delete key.
6. Click on Save and then click on Preview. The header looks nice and clean.
What just happened?
You've changed the template stylesheet to remove some unnecessary formang. Again,
you've experienced how easy it is to use the built-in CSS editor to tweak the current
template's layout.
Have a go hero – explore layout settings
As you've seen, there are two ways to inuence the look and feel of your current template.
The rst way is tweaking the template parameters; the second is eding the template
stylesheet. Have a go and experiment a lile with the built-in template parameters. Get
a feel for the eects that the dierent parameters have by trying out some width sengs
and color combinaons. Pick your avor, click on Apply, and click on Preview to see the
output on the frontend.
You'll noce that template parameters only allow you to change a limited set of opons.
It's far more powerful to take a look under the hood and edit the template CSS les in the
Joomla! editor. That way, your layout opons are only limited by your CSS skills. Take a scroll
through the template editor CSS les to get a feel for what coding in CSS is like—you'll noce
that CSS rules are, for the most part, wrien in plain English and don't look at all dicult
to understand.
Step 2: Add content
The template now looks OK, but the site's sll empty. It's high me to actually populate it
with some arcles! In the previous chapter, you've already made one simple arcle that t
neatly into the Joomla! example site. However, when you create your own site you'll want
to choose a more structured approach.
Download at Wow! eBook
WWW.WOWEBOOK.COM
Web Building Basics: Creang a Site in an Hour
[ 86 ]
Create a foundation rst: Make sections and categories
If you have some experience in designing stac websites, you've probably created new pages
in two steps. You start making a new HTML document—the page—and then added a link to
that page, making sure your new content can be found.
In Joomla!, you have to take a lile preparatory acon. Before you make new pages, you
create containers for your content. These containers are called secons (the top level) and
categories (the second level). Categories hold arcles. You have seen secons and categories
in acon in the sample site you explored in the previous chapter (and you've deleted them
later on). We won't go into the specics of organizing content just now, as we'll be exploring
the ins and outs of secons and categories in the next chapter. For now, let's experiment a
lile and see how this thing works.
As you've got a ght deadline to meet, we'll follow the three content creaon steps the quick
and dirty way. For this basic site, one secon split up into two categories will do.
Time for action – create a section and some categories
Your client wants to publish a range of arcles on the club acvies on their new site; that's
what they're all about. Specically, they want arcles on lectures and meengs.
How can we categorize these arcles the Joomla! way? Let's create an Acvies secon and
add two categories in that secon: Lectures and Meengs.
1. Navigate to Content | Secon Manager. Click on the New buon.
2. In the Title eld, type Acvies. Don't worry about the other elds; you can
leave them empty for now. Click on Save. You have created a secon.
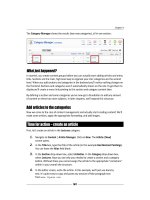
3. Navigate to Content | Category Manager. Click on the New buon.
4. In the Title eld, type Lectures. As there is only one secon, the category is
automacally added to this secon. Click on Save. You've created a category
in the Acvies secon.
5. Adding more categories is done in a similar way. In the Category Manager, click
on New again to add a Meengs category. Click on Save.
Download at Wow! eBook
WWW.WOWEBOOK.COM