Joomla cho người mới bắt đầu part 10 docx
Bạn đang xem bản rút gọn của tài liệu. Xem và tải ngay bản đầy đủ của tài liệu tại đây (1.85 MB, 10 trang )
Chapter 4
[ 97 ]
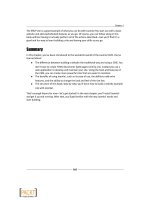
What just happened?
Uncategorized arcles are a perfect soluon to place content on your site that doesn't t
the categories structure. You've added two arcles and menu links. On the frontend of your
website, the output is as follows:
Two new menu links
are displayed as the
last item in the
Main Menu.
Clicking on the
Mission Statement
link or the Ugly
Painngs link
reveals a single
arcle page.
Download at Wow! eBook
WWW.WOWEBOOK.COM
Web Building Basics: Creang a Site in an Hour
[ 98 ]
Have a go hero – clean up the Main Menu
You'll have noced that Main Menu items are shown in the order that you've created them.
The last two menu items you've just added, are displayed at the boom of the menu. You
can change the order of items in the main menu by navigang to Menus | Main Menu and
clicking on the arrows in the Order column to move things up or down. Try this out now. For
example, try to move the Ugly Painngs arcle link to the second posion:
Put some content on the home page—at last!
Now that you've stued your site with content, there's one essenal page to take care of.
As we haven't added anything to the home page yet, its main content area is sll empty.
It may seem strange that you do not start with the home page when adding content;
aer all, it's the ocial entrance to the site. However, you do need to have the actual
content—arcles—before you can start publishing anything on your home page.
Aer all, the home page usually is a selecon of content items—teasers, images,
or hyperlinks—drawn from the rest of the site.
Add items to the home page
How do you control which pieces of content are shown on the home page? When you write
a new arcle (Content | Arcle Manager | New), or edit an exisng arcle in the Arcle
Manager, you can choose whether you want the arcle to be displayed on the home page.
In the Arcle : [Edit] screen, click on the Front Page : Yes radio buon.
Download at Wow! eBook
WWW.WOWEBOOK.COM
Chapter 4
[ 99 ]
Another way to quickly add items to the home page (or remove them) is to use the Arcle
Manager overview screen (Content | Arcle Manager). A check mark in the Front Page
column means the arcle is displayed on the home page. Clicking on the check mark changes
it to a cross. This indicates the arcle will not be displayed on the home page. We'll try this
out right now.
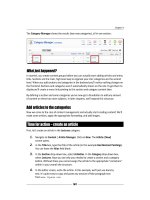
Time for action – adding items to the home page
Let's add some stu to the home page through the Arcle Manager.
1. Navigate to Content | Arcle Manager.
2. In the Front Page column, click on the red cross of four arcles: Deplorable Sll
Lifes, Ugly Art Lecture, The Art of Bob Ross, and This Years Meeng. The red cross
turns into a green check mark. The results are shown in the following screenshot.
Four arcles are set to show on the Front Page:
Download at Wow! eBook
WWW.WOWEBOOK.COM
Web Building Basics: Creang a Site in an Hour
[ 100 ]
3. Click on Preview. You've got a home page lled with content! Four arcles are
displayed on the home page as intro texts with Read more links:
Download at Wow! eBook
WWW.WOWEBOOK.COM
Chapter 4
[ 101 ]
What just happened?
By clicking on the icon in the Front Page column in the Arcle Manager you have added
four arcles to the home page. On the frontend, these four arcles are now shown in the
default Joomla! Front Page layout; the rst intro text is displayed in the full mainbody width,
the intro texts below that are presented in two columns. We'll leave this for now—but rest
assured, you'll learn how to tweak these display opons to your heart's content in the
later chapters.
Remove the "Welcome to the Front Page" heading
By default, a Joomla! home page shows the headline "Welcome to the Front
Page". We don't want to keep that message. To remove it, we'll have to tweak
the sengs of the Home link in the Main Menu:
1. Navigate to Menus | Main Menu.
2. Click on Home.
3. In the Parameters (System) secon, delete the text in the Page Title box.
4. Click on Save. The Page Title has now been removed.
It's not enough to just leave the welcome message and change Show Page Title
to No. In that case, the page tle would eecvely disappear from your home
page. However, it would sll show in the browser Title Bar.
The Front Page is not the home page (or is it?)
Are you in for a lile confusion on Joomla! jargon? You'll noce Joomla! uses the word Front
Page instead of home page. Technically, these two are not the same:
The home page is the full page the user sees when clicking on Home in the Main
Menu; it's the top level page of your site.
In Joomla!, the Front Page is the main content area (the mainbody) within the home
page. The home page can feature other items—modules—around the mainbody.
In other words, there is more to the home page than just the Front Page in the form of
modules. As modules aren't part of the Front Page, you cannot control them through the
Front Page sengs. You'll use the sengs of the modules themselves to control whether
they appear on the home page. We'll see an example of that when we add a Poll module
later in this chapter.
Download at Wow! eBook
WWW.WOWEBOOK.COM
Web Building Basics: Creang a Site in an Hour
[ 102 ]
Step 3: Add extras through components and extensions
You've just taken a few giant leaps! You have customized the layout of your new site, framed
a structure, and have created and published the contents to match. If this were a stac HTML
site, this would be about it. This would be all there was to a website. In Joomla!, however,
the fun has just begun. You can now add funconal or even just plain cool extras. For this,
you'll use Joomla!'s components and extensions—that's where the Joomla!'s real magic
power lies.
Components and extensions, what's the difference?
To manage Joomla!'s extended funconality, you'l l nd yourself working with b oth the
Components and the Extensions menu in the backend. The main dierence between these
two is that components are more powerful and more complex; they're applicaons within
the Joomla! applicaon. Modules are smaller add-ons that can contain all sorts of dynamic
informaon. Somemes, components and modules are designed to work together.
So, in spite of the dierences between components and extensions, behind the scenes, they
generally serve the same purpose. Both enhance your site's funconality.
For now, we'll be using components and extensions that are included in the
default Joomla! setup. Later, you'll probably want to add other extensions.
There are thousands of them available on the Web, providing whatever
funconality you might want to add to your site. You'll learn more about
adding extensions in Chapter 10.
Add a contact form
Let's take care of one of the last items on your client's wish list and enable site visitors to get
in touch through a contact form. Adding this form will take two steps. First, we'll create a
contact; aer that, we'll create a menu link that displays a contact form.
Download at Wow! eBook
WWW.WOWEBOOK.COM
Chapter 4
[ 103 ]
Time for action – create a contact
Let's add a contact, that is, someone whose (mail) address and other contact details can be
displayed on the form page and who will receive the form data in their mailbox.
1. Navigate to Components | Contacts. The Contact Manager opens. Click on New.
2. In the Contact : [New] screen, enter the details for the contact. In the Name box,
enter SRUP Sta.
3. In the Category drop-down list, select Contacts.
4. In the Informaon secon, enter the contact informaon details you want to display.
In this case, just ll out the E-mail box and the Telephone box. It is important to
specify a valid e-mail address, because this is where the form data will be sent to.
5. None of the other items in the Informaon secon are mandatory. However, you
should add some text in the Miscellaneous informaon box. This will be displayed
as an introductory text on the form page. You might want to add text such as:
Would you like to know more? Call us or ll out the form below. We'll get
in touch as soon as possible.
6. In the Contact Parameters secon you can specify whether you want to show or
hide specic contact details on the contact form page. In this case, we want to
display only Name, Telephone, and Miscellaneous Informaon. You could, of
course, display more contact details to oer visitors various ways to respond.
7. In the E-mail Parameters secon, it's important that E-mail form is set to Show. This
will add the contact form to the contact informaon page—just like we want to.
8. Click on Save.
What just happened?
To be able to create a contact form, you have to rst creat a contact. Using the Jo omla!
Contact Component, you can build a comprehensive system of contacts organized by
contact categories. For our goal, just one contact name and e-mail address will suce.
Download at Wow! eBook
WWW.WOWEBOOK.COM
Web Building Basics: Creang a Site in an Hour
[ 104 ]
Time for action – create a Contact Form menu link
Now that a contact exists you can add a link to a contact form to the main menu:
1. Navigate to Menus | Main Menu.
2. Click on New.
3. In the Select Menu Item Type list, select Contacts | Standard Contact Layout.
4. Enter a Title for the menu item (for example, Contact).
5. In the Parameters-Basic secon, in the Select Contact drop-down box select
the contact you just created: SRUP Sta.
6. In the Parameters (System) secon, add a Page Title (for example, Get in touch).
This will be displayed at the top of the form.
7. Click on Save. The site now has a Contact menu link that displays a contact form:
Download at Wow! eBook
WWW.WOWEBOOK.COM
Chapter 4
[ 105 ]
What just happened?
You have used the Contacts Component to create a contact and added a menu link to a
contact form. Again you have experienced how powerful menu links are in Joomla!. Just by
selecng the Menu Item Type: Standard Contact Layout you have created a menu link that
takes the visitor to a contact form page.
Add a Poll
The SRUP people would like to enable a bit of user interacon on their site. They suggest
adding a poll, a simple survey of one mulple-choice queson. In Joomla!, the polling
funconality is built-in.
Time for action – create a Poll
First, let's create the Poll queson and the set of possible answers:
Navigate to Components | Polls. In the Poll Manager screen, click on New.
1. Click on Published: Yes to make sure the poll will be displayed in the frontend.
2. Leave Lag unchanged. A visitor may vote only once a day (the standard Lag
of 86,400 seconds, i.e., 24 hours).
3. In the Poll: [Edit] screen, enter the details of the survey. In the Title box, enter
What would you like to read about on our site?
4. In the Opons secon, add four possible answers: Painng Tutorials, Museum
and Gallery Tips, History of Bad Painngs,and The World's Worst Painters.
5. Click on Save.
Download at Wow! eBook
WWW.WOWEBOOK.COM
Web Building Basics: Creang a Site in an Hour
[ 106 ]
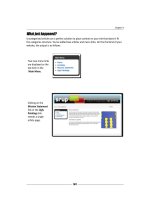
Time for action – display the Poll
The Poll component uses the Poll module. This module tells Joomla! on what pages the Poll
should appear and on what posion it should be displayed:
1. Navigate to Extensions| Module Manager. Click on New.
2. In the Module: [New] screen, click on the Poll module. Click on Next.
3. In the Title box, type Vote!.
4. Click on Show Title: Yes.
5. Select Posion: right. The survey will appear in the right-hand side column.
6. In the Menu Assignment secon, click on Select Menu Item(s) from the List. Select
mainmenu: Home. You can have the survey appear on any page; in this case, it will
appear only on the home page.
7. In the Module Parameters secon, select the poll you've created.
8. Click on Save and click on Preview. The Poll is displayed on the frontend:
What just happened?
Your site now shows a simple poll on the home page. The site visitor can select one opon,
click on the Vote buon, and view the results. The results are shown in the main
content screen.
Download at Wow! eBook
WWW.WOWEBOOK.COM