Joomla cho người mới bắt đầu part 22 potx
Bạn đang xem bản rút gọn của tài liệu. Xem và tải ngay bản đầy đủ của tài liệu tại đây (1.57 MB, 10 trang )
Chapter 8
[ 217 ]
Have a go hero – try out some Menu Item Types
The extensive list of Menu Item Types looks inving; why don't you have a go at the dierent
types of menu items? Add a new menu link to the main menu and choose a menu item
type you haven't used yet. Check out the Search, External Link, or the Separator menu
item types; they're prey straighorward. Some others, such as the User link, are quite
complex and won't immediately make sense—but don't worry, they won't mess up your
site permanently and you can easily delete unwanted menu items in them again. In the
course of this book, you'll learn to use many of these menu item types.
Why do you have to create menu links manually, anyway?
You might wonder why you have to add menu links yourself—isn't that a boring job? Well
maybe, but creang menu links gives you a huge amount of control. Not only do you control
the type of page the link points to, but also which links are displayed, in what order they
appear, on what pages they show up, in which menu they appear, and so on. Moreover, you
can choose a menu structure that doesn't have be idencal to the site structure. If you want
to link from the home page menu straight to a registraon page, you can do that (even if that
page isn't part of your main site structure). This way, you can limit the number of clicks and
lead your visitors through your site easily.
And don't worry, you'll only make menu items poinng to the main pages and content
groups—not to each and every page. Menus usually point to overview pages, some selected
arcles, and special funcon pages (such as a login form, contact form, search page). Joomla!
will automacally create links to any amount of arcles below the main levels, using
overview pages, as you've seen in Chapter 6.
Creating plain text links
Somemes you'll want to show hyperlinks that are not part of a menu, but are embedded in
an arcle text. How do you create these? It's doable, but it does take quite a few steps.
Time for action – creating text links
The SRUP website is in desperate need of an internal hyperlink from one page to another,
a link from the Mission Statement page to the Ugly Painngs overview page. Let's create
this link:
1. Before you can create a hyperlink, you have to get the URL of the target page.
Navigate to the Menus | Main Menu and open the target page to edit it.
Download at Wow! eBook
WWW.WOWEBOOK.COM
Helping Your Visitors Find What They Want: Managing Menus
[ 218 ]
2. In the Link: eld, select all of the text (press Ctrl + A) and copy it (press Ctrl + C).
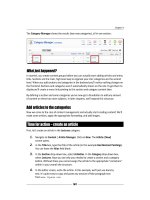
3. Now create a link to the URL you just copied. Navigate to Content | Arcle
Manager and open the arcle that needs to contain the link in the editor.
In this example, we've selected the Mission Statement arcle.
4. Select the word or words that should be a hyperlink and click on the hyperlink icon
in the editor:
Download at Wow! eBook
WWW.WOWEBOOK.COM
Chapter 8
[ 219 ]
5. A pop-up screen appears. In the Link URL box, paste the target page URL and add a
Title for the hyperlink. The Title will show up when the visitor hovers the mouse
pointer on the link. In this example, we've entered Discover Ugly Painngs as
link Title.
6. Click on Update. The pop-up screen closes. In the editor screen, click on Save and
click on Preview to see the results on the frontend.
Check out the arcle on the frontend to see if the text is now a hyperlink:
Download at Wow! eBook
WWW.WOWEBOOK.COM
Helping Your Visitors Find What They Want: Managing Menus
[ 220 ]
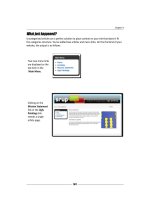
What just happened?
You've created a text hyperlink from an arcle to another page in the same site. You can
only create a link to a page that has a menu link poinng to it. To be able to create a text
hyperlink, you rst have to explore the menu link of the target page and get the URL
informaon you need.
In the previous screenshots, you can see the editor buons and pop-up screens available
when Joomla!'s default text editor, Tiny MCE, is set to Funconality: Extended. Although
the normal funconality seng will do in most cases, you might want to consider acvang
these advanced opons. See Tip: Extending the text editor in Chapter 6.
If you oen need to add text links to arcles, it's much easier to use another
editor, the Joomla! Content Editor (JCE). Its approach is much more intuive
and it allows you to just click and select the target page (without rst having
to look up the target page URL). To know more about the JCE editor, see
Chapter 10.
Pop quiz – test your menu knowledge
1. How many menus can you add to your website?
a. Six Menus (the Main Menu and ve other menus).
b. As much as you want.
c. You can only have one Main Menu.
2. How can you add submenu items to a menu?
a. By creang "parent links"and "child links".
b. By assigning a dierent Parent Item to a menu link than the default (Home).
c. By creang a new menu.
3. When you create a new menu link, why does Joomla! show such a big list of Menu
Item Types?
a. To en hance navigaon.
b. To enable you to create new menus.
c. To enabl e you to create dierent types of target pages.
Download at Wow! eBook
WWW.WOWEBOOK.COM
Chapter 8
[ 221 ]
Summary
In this chapter, we learned a lot about creang user-friendly navigaon through Joomla!
menus. This is what we covered:
By default, new menu links are added to the boom of the menu link list. You can
move menu links up and down in the Menu Item Manager.
You can set up a second menu that funcons completely independent from the main
menu. That way, you can move links that don't t the main menu to a separate, less
prominent posion. You can create as much separate menus on your website as you
like.
Menus can be more than one level deep. By assigning a parent item to a menu link,
you create a submenu item.
You can also create interrelated menus, such as a main menu showing parent links
and a secondary menu on a dierent page posion that automacally shows child
links.
Submenus aren't the only way to make secondary content visible. Main links can
point to overview pages with (automacally generated) links to content from those
secons or categories.
To create hyperlinks in an arcle text, you rst have to retrieve the URL of the target
page and copy it when creang a hyperlink in the arcle text editor.
You've now nished making a basic, funconal, and easy to navigate website. In the next
chapters, we'll take things further—aer all, dynamic database-driven CMS magic doesn't
stop at creang basic sites. In the next chapter, you'll learn how to add extra funconality,
such as the ability for your visitors to contribute content or to register as site members.
Download at Wow! eBook
WWW.WOWEBOOK.COM
Download at Wow! eBook
WWW.WOWEBOOK.COM
9
Opening Up the Site: Enabling Users
to Contribute and Interact
In the last few chapters you have set up a site for your client. It's a very up-
to-date Joomla!-powered site, but there's sll something old fashioned
about it. Aer all, you're sll the only person who has access to it and
who is allowed to add and manage content. You haven't yet beneted from
Joomla!'s built-in tools to create a team of specially designated power users
who can log in to the site to add or edit content. In Joomla!, you're allowed
to add as many content contributors as necessary and you can give them
permission to create or edit arcles, or to do even more.
But opening up your site to the world doesn't end there; Joomla! oers some
powerful methods to engage your Web visitors and turn them into acve users.
You can enable visitors to register and give them exclusive access to premium
content. Also, you can allow them to rate arcles, giving others a good
indicaon of must-read content.
In this chapter, you'll learn:
Creang and managing user accounts: enabling Web team members to log in
and maintain the site contents
Conguring self-registraon for site visitors and creang content for registered
users only
Allowing users to rate arcles
Download at Wow! eBook
WWW.WOWEBOOK.COM
Opening Up the Site: Enabling Users to Contribute and Interact
[ 224 ]
Creating user accounts for team members
Aer you've installed Joomla!, there's only one user: the Super Administrator. When you
take a look at the User Manager (Site |User Manager), you can check the user details of
the Super Administrator: the default Name (by default this is Administrator), the Username
(admin), whether this user is currently Logged In, whether his account is Enabled, the
user's E-mail address, the me of the user's Last Visit, and the user's ID (an idenfying user
number that's only used by the system):
What different types of user accounts can you create?
In the User Manager you can create new users and assign them to a specic Group, granng
them various levels of access to the site. There are ve groups available, each with their own
set of permissions:
1. Registered users
These are regular site visitors, except for the fact that they have registered and acvated
their account. Aer they have logged in with their account details, they can view content
that may be hidden from ordinary site visitors ("guests") because the Access Level has been
set to Registered. The site administrator can select this access level for all kinds of content,
from modules and menu items to individual arcles (through Parameters (Arcle)):
Registered users may have special access rights, but they can't contribute content. They're
part of the user community, not of the Web team. We'll discuss user registraon later in this
chapter (see the secon Allowing visitors to register).
Download at Wow! eBook
WWW.WOWEBOOK.COM
Chapter 9
[ 225 ]
2. Frontend content contributors
Up to now, you've only experienced Joomla!'s backend eding capabilies. However, it is also
possible to log in to the frontend, to edit or add arcles to the site. We'll see how that works
in a moment. The idea behind having frontend eding possibilies is to lower the threshold
for non-technical content contributors. They don't have to bother to learn the backend
interface and can edit, and add, arcles directly in an interface that they already know—the
public frontend of the site.
The following are the three types of frontend content contributors, each having their own
permission levels:
Authors can submit new content for approval by a Publisher or someone higher in
rank, but they can't edit exisng arcles.
Editors can submit new arcles and edit exisng arcles. A Publisher or higher must
approve their submissions.
Publishers can submit, edit, and publish arcles in the frontend.
Authors and editors can't publish content. Only aer approval by a Publisher
(or someone higher in rank) will the content they submit be visible. Although this has its
advantages—someone will be double-checking all content before it's published—having
to review all of the new arcles can create an extra workload for those with publishing
permissions, and it could possibly turn into a boleneck impeding a steady ow of new
content. That might be a reason to instead assign Publisher permissions to your Web team
members. Publishers have the same permissions as authors and editors, but (as you might
have guessed) they are the ones who can also publish content.
Generally, assigning a user to the Publisher group will be a good choice when
you want Web team members to be able to individually add and publish
content, without you having to grant them access to the (more complex)
backend of the site. Publishers can easily create new content without having
to learn their way around in the backend—or being able to create havoc by
changing things they shouldn't.
3. Backend content contributors and administrators
Finally, there are three types of backend users. They have all the permissions of the frontend
group, but they are also allowed to login to the backend to add and manage content and to
perform administrave tasks:
Managers can do all that Publishers can, but they are also allowed backend access
to add or delete arcles, and they can also create and manage secons and
categories. They have limited access to administraon funcons.
Download at Wow! eBook
WWW.WOWEBOOK.COM
Opening Up the Site: Enabling Users to Contribute and Interact
[ 226 ]
Administrators can do all that Managers can and have access to more ad-
ministraon funcons. They can manage users, add or remove extensions,
and change the site template.
Super Administrators have no restricons. They can do everything possible in the
backend. When Joomla! is installed, there's always one super administrator account
created. That's usually the person who builds and customizes the website. In the
current example website, you're the super administrator.
Time for action – giving a user frontend authoring permissions
Suppose your client wants to create a Web team—a couple of people who should
become responsible for content maintenance—let's create user accounts for these
content contributors.
1. Navigate to Site | User Manager, Joomla!'s backend manager where you can view,
edit, and create site users.
2. There's just one user, you. By default, Joomla! calls this rst user Administrator
(although this user belongs to the Super Administrator group). To add anoth-
er user, click on the New buon in the toolbar.
3. In the User: [New] screen, add User Details as desired. In this example, we've
entered Jim Van Gogh in the Name eld. In the Username eld we've entered
jvgogh. Enter a valid E-mail address and a password for the new user.
4. In the Group box, select Author. This will allow the new user to submit and edit
content (aer logging in to the frontend of the site).
Download at Wow! eBook
WWW.WOWEBOOK.COM