Hướng dẫn sử dụng Coreldraw x5 - part 3 pot
Bạn đang xem bản rút gọn của tài liệu. Xem và tải ngay bản đầy đủ của tài liệu tại đây (946.27 KB, 10 trang )
T
he dozens of enhancements and improvements to CorelDRAW in version X5 aren’t
as obvious on paper as you’ll experience; everything from significantly more precise
drawing tools to a comprehensive color management system helps get what you envision
down on the printable page. This version boasts something new and welcome to users at all
skill levels and professions—both professional graphics designers and entrepreneurs with
little artistic experience will be drawn to CorelDRAW.
Whether you’re new to CorelDRAW or an old hand, you should take a few moments and
review the new features covered in this chapter. Although features are categorized, everyone
will find something to like in the sections to follow. You’ll discover that “working smart”
can also be a lot of fun.
Download and extract all the files from the Chapter 01.zip archive to follow the
tutorials in this chapter.
Features for the Graphics Designer
CorelDRAW X5 starts you off right with new drawings, with the New Document dialog
box. From there, you’ll notice several enhancements to DRAW’s familiar design tools
including new ones. Here’s an overview of what’s in store in this new version and covered
in The Official Guide.
The Create a New Document Dialog Box
Unless you choose to override this feature, every time you choose File | New, or click the
New button on the standard toolbar, the Create a New Document dialog box appears, as
shown next. In the Create a New Document dialog you can choose color mode and color
profile options, which alone are lifesavers when you have, for example, a dozen bitmap
images to import and you need color consistency between what you draw, the color mode
of the bitmaps, and the color profile of your intended output. Whether it’s to the screen as
a web page, or to a commercial printer—color reproduction and color accuracy are at the
heart of every document you begin. Chapters 27 and 28 are your guides to personal and
professional printing.
Additionally, document resolution (in dpi, or dots per inch) can be declared before you
begin a drawing. The usefulness of this enhancement becomes immediately clear when you
need to draw something for commercial presses—the document would be 300 dpi—or for
the Web, which usually uses from 72 to 96 dpi screen resolution. You also have the familiar
page size and orientation options, and also you can convert an existing document’s color
profile to a different one of your choosing.
4 CorelDRAW X5 The Official Guide
Corel PHOTO-PAINT has the same dialog for new documents as CorelDRAW.
Ill 1-1
Drawing Tool Enhancements
One of the things you won’t see in version X5—that you’ll like—is the smoothness with
which the Freehand and Artistic media tools produce paths. Corel Corp. has worked very
hard to refine these curve tools, and you’ll find you might not even need to use the Reduce
Nodes feature while drawing.
Also, arrowheads (and tails!) you apply to paths can now be scaled to suit the proportion
you need when designing maps and other diagrams. Suppose you need to convince a friend
who’s coming to visit you at your loft in SoHo in New York that the taxi will be much
cheaper coming into Newark Liberty instead of JFK Airport—a fact only New Yorkers seem
to know. Your intricate map needs 10-point outline paths, but the preset Arrowhead 2 is
much too large to fit on East Houston Street and would cover part of Hamilton Fish Park.
The solution is simple.
CHAPTER 1: What’s New in CorelDRAW X5? 5
1
Scaling an Arrowhead
1. Select the 10-point path (with Arrowhead 2 applied), and double-click the Outline
pen properties (nib) icon on the status bar to display the Outline Pen dialog.
2. Click the Options button below the arrowhead, and then click Attributes from the
drop-down list.
3. Set the Length and Width interactively: put your cursor between the arrows to the
right of the number field so the cursor becomes a double-headed arrow with the
horizontal bar in the center, and then drag down in this example. Dragging up
increases the Length or Width. This user interface element is called an elevator
button; you can also enter values by typing them into the num boxes. At right, you’ll
see the preview window change the size of the arrowhead. In this example when the
Length is about 40 points and the Width is about 34, you can click OK, and then
click OK to exit the Outline Pen dialog, and your arrowhead is scaled to your liking.
Ill 1-2
New to version X5 is the B-Spline tool for drawing perfectly smooth curves. B-splines
are unlike paths produced with the Bézier and other drawing tools; they don’t always have
6 CorelDRAW X5 The Official Guide
Original arrowhead
Scaled arrowhead
Double-click
Outline icon.
nodes directly on a path to steer a curve segment after or during drawing, and they don’t
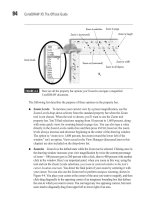
have control handles for the curve’s nodes. Figure 1-1 shows a creative example of B-
splines—on a locked layer below the drawing is an image of a retro coffee table and chair,
and the table is decorated with a design reflecting the art sensibilities of the late 1950s. The
pattern was drawn with the B-Spline tool in Float control point mode. When you draw with
this tool in Float control point mode, you’re best off clicking instead of click-dragging: a
faint series of dashed line segments is produced off the curve with control nodes, also off the
curve of the path you draw. You simply have to try this tool to appreciate its many uses. To
end a path, double-click, and then use the Shape tool to refine the curve. Editing the curve is
done by dragging the control nodes. In 3D modeling applications, these dashed lines
connecting nodes are called “control hulls”—a hull shapes each path segment. At any time,
you can put a control node directly on a path segment by clicking the Make Control Point
Clamped button on the property bar. To make the path editable as you’d edit all other paths
created with any of the Curve tool group, choose Arrange | Convert To Curves (
CTRL+Q).
However, unless you have a truly specific need for converting the control hull to nodes along
a path, don’t do this, because it will destroy the smoothness of the path when you edit it with
the Shape tool.
CHAPTER 1: What’s New in CorelDRAW X5? 7
1
FIGURE 1-1 The new B-Spline drawing tool is like having a traditional French curve at your
disposal in CorelDRAW.
B-Spline tool
Float control point
Make Control Point Floating
Make Control
Point Clamped
New Corner Edits for Rectangles
CorelDRAW X5 has better and easier to use Fillet (rounded corner)/Scallop/Chamfer
features on a docker whenever you want to embellish a sharp turn in a path. Now, these
same features are available on the property bar whenever you’ve drawn a rectangle, even
one you’ve drawn with the Smart Drawing tool. If you’re not familiar with editing corners of
rectangles and other shapes, the steps aren’t Newtonian or anything:
1. If you’ve drawn a rectangle, choose the Shape tool for custom editing, and then click
either the Fillet, Scallop, or Chamfer button on the property bar. This action sets all
four corners of the rectangle to have an equal, predefined amount of corner alteration.
2. To change the amount of corner alteration, drag with the Shape tool on one corner
control node, toward or away from the original corner. By default, the Edit Corners
Together lock button on the property bar is switched on, and all edits you perform to
one corner apply to all corners.
3. Let’s say you’re an asymmetrical sort of designer and want one corner more deeply
cut than the other three. Unlock the Edit Corners Together button by clicking it. Now
CTRL-click one of the corner control nodes and drag. You can also click a corner
node to select it, and then release the mouse button, and then click-drag the control
node to edit only that corner.
4. If you want to lop off the corners of a polygon created with, for example, the
Polygon tool—or any freeform shape you’ve designed that has a sharp cusp turn
along the path—you need to choose Window | Dockers | Fillet/Scallop/Chamfer.
Choose one of the operations from the drop-down list, and then use the elevator
button to increase or decrease the radius the docker uses to trim the corners. You’ll
see a live preview in faint blue around the object, and you click Apply when you’re
satisfied with the preview.
Figure 1-2 shows callouts for the buttons used for rectangles, and there’s also an illustration
of a severely messed-up polygon or two, perfect for certificates and fancy badges. Corel
didn’t cut any corners with the Fillet/Scallop/Chamfer feature in X5, but you will.
The Relative Corner Scaling button is for when you want to change the size of a
rectangle, with or without changing the corner work you’ve done. If the option is
enabled, the corners of your rectangle scale proportionately when you use the Pick
tool or other method to increase or decrease the rectangle’s size. When you turn
this feature off, you can get some really weird and visually interesting effects.
Imagine making deep corner cuts on a rectangle, and then making the rectangle
half its original size…but the corners remain the same cut size.
8 CorelDRAW X5 The Official Guide
Revamped Mesh Fill Tool
The Mesh fill tool has undergone some refinements, and it’s not only easier to work with,
but it’s also a positive joy to fill an object and then move colors around in it, in a way that
makes fountain fills look like kids’ stuff. Here’s a short example you can work through in
less than 2 minutes: try to think of another way to get a feathered drop shadow that you can
move anywhere on the drawing page!
1. Open Bowl of fruit.cdr and then choose Tools | Object Manager so you can arrange
the object you’ll create to go behind the grouped bowl of grapes, but in front of the
background rectangle. Click the little + symbol to the left of the Layer 1 entry so
you can see the contents of Layer 1.
CHAPTER 1: What’s New in CorelDRAW X5? 9
1
FIGURE 1-2 Why settle for plain rectangles when you can fancy up the corners with the new
rectangle features in X5?
Fillet
Scallop
Chamfer
Edit Corners
Together
Relative
Corner
Scaling
Scallop
Fillet
Chamfer
Round-
cornered
polygons
Hold
CTRL to edit
individual corner.
2. With the Ellipse tool, click-drag an oval that suggests the shape and size of a cast
shadow beneath the bowl. Then click a dark shade of black on the Color Palette, and
finally, right-click the “None” color well to remove the outline from the object.
3. On the Object Manager list, click-drag the Ellipse entry to below the Group of 137
Objects entry, but above the Rectangle entry.
4. Choose the Mesh fill tool from the toolbox; it’s in the group with the Interactive fill
tool. With the ellipse selected, you’ll see mesh nodes and a dashed outline depicting
the default two rows and two columns of mesh areas for the fill within the ellipse.
5. Marquee-select the entire object with the Mesh fill tool, and then on the property bar
click the Transparency button to the right of the num box to reveal the slider—drag
the slider to 100% transparency.
Ill 1-3
10 CorelDRAW X5 The Official Guide
Marquee-select
all the Mesh fill
nodes.
Set Transparency to 100%.
6. Click the pasteboard area of the workspace, the area outside of the page, to deselect
everything, and then click the center mesh intersection node.
7. Click-drag the Transparency slider on the property bar to 0% transparency, all the
way to the left.
8. Have some fun shaping the ellipse to make it a little more irregular and less like an
ellipse. You’ll see that the Mesh fill’s transparent regions change as you reshape the
ellipse, and you can make the fill even more intricate by click-dragging any of the
mesh intersection node control handles. You can also recolor and specify a different
transparency by clicking a path and then editing it. Figure 1-3 shows some of the
editing in progress.
If you’d like to open and examine a complex illustration that demonstrates the creative
use of the Mesh fill tool, check out wet.cdr, as shown in Wireframe and Enhanced views in
Figure 1-4. On occasion a Linear or Radial fountain fill will complete a graphic idea you
have in mind, but it you want to approach painting-like compositions and photorealistic drawing
of natural shapes, the enhanced Mesh fill tool in version X5 is your ticket.
CHAPTER 1: What’s New in CorelDRAW X5? 11
1
FIGURE 1-3 Work with the Mesh fill tool to make color and transparency transitions in a way
that regular fountain fills cannot match.
More Power to PowerTRACE
The auto-trace feature in X5 has been supercharged in this new CorelDRAW version to the
point where it rivals—if not exceeds—the smoothness and accuracy of Vector Magic, a
favored late entry in the stand-alone bitmap-to-vector application field of software. The
feature set will seem familiar, but you’ll be pleased at the new results. As an acid test, the
author enlarged a single character from a shareware font and deliberately aliased the copy.
Figure 1-5 shows the results of a very challenging assignment for PowerTRACE. The result
actually was a usable character for a typeface, and as you can see here, even with all the
jaggy bitmap aliasing, Corel PowerTRACE maintained smoothness and accuracy in the trace
and produced far fewer control points than were in the original typeface!
12 CorelDRAW X5 The Official Guide
FIGURE 1-4 Use the Mesh fill tool on objects you want to make look reflective,
semitransparent, or just less like “computer art.”
Intersection node
A patch
Mesh fill
tool
Color
Transparency
If you’d like to try this little experiment, open Tracing.cdr. At right is the bitmap; you
select it, click the Trace Bitmap button on the property bar, choose Outline Trace from the
drop-down list, and then try the Detailed logo setting. At left in this file is the finished
trace—the objects were combined so the trace is one combined path that could be exported
as a TrueType character, but the font already exists as shareware, so case closed on this one.
New Pixel View
Under View you have a new entry in X5: the Pixel view
of everything on your page. This is a welcome addition to
DRAW for everyone who needs to preview a button or other
web graphic before exporting it. Pixel view works hand-in-
hand with the new graphic resolution settings: you’ll clearly
see a preview of individual pixels on the page when you
zoom in if your document is defined at a screen resolution
such as 72 or 96 pixels per inch (ppi).
CHAPTER 1: What’s New in CorelDRAW X5? 13
1
FIGURE 1-5 The improved PowerTRACE feature can smoothly trace even poor copies of
bitmap images.
Aliased bitmap
Corel PowerTRACE
conversion
PowerTRACE character
Original vector character Corel PowerTRACE conversion
Ill 1-4