Hướng dẫn sử dụng Coreldraw x5 - part 12 doc
Bạn đang xem bản rút gọn của tài liệu. Xem và tải ngay bản đầy đủ của tài liệu tại đây (1.01 MB, 10 trang )
The following list describes the purpose of these options on the property bar:
●
Zoom Levels To increase your current view by a preset magnification, use the
Zoom Levels drop-down selector from the standard property bar when the Zoom
tool is not chosen. When the tool is chosen, you’ll want to use the Zoom tool
property bar. You’ll find selections ranging from 10 percent to 1,600 percent, along
with some quick views for zooming based on page size. You can also type a value
directly in the Zoom Levels combo box and then press
ENTER; however, the zoom
levels always increase and decrease beginning at the center of the drawing window.
The option to “zoom in to 1,600 percent, but zoom toward the lower left of the
window” isn’t an option. Views saved in the View Manager (discussed later in this
chapter) are also included on the drop-down list.
●
Zoom In Zoom In is the default state while the Zoom tool is selected. Clicking once in
the drawing window increases your view magnification by twice the current percentage
of zoom—100 percent goes to 200 percent with a click, then to 400 percent with another
click in the window. Here’s an important point: when you zoom in this way, using the
tool and not the Zoom Levels selections, you zoom in centered relative to the tool’s
cursor location onscreen. You direct the final point of your zoom by centering it with
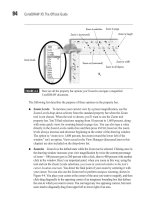
your cursor. You can also use the Zoom tool to perform marquee zooming, shown in
Figure 4-4. You place your cursor at the corner of the area you want to magnify, and then
click-drag diagonally to the opposing corner of an imaginary bounding box that defines
the area to which you want to zoom. You can target any two opposing corners, but most
users tend to diagonally drag from upper left to lower right of an area.
94 CorelDRAW X5 The Official Guide
FIGURE 4-3 Here are all the property bar options you’ll need to navigate a magnified
CorelDRAW document.
Zoom in (command)
Zoom to all objects
Zoom to width
Zoom to height
Zoom levels
Zoom out (command)
Zoom to selection
Zoom to page
CorelDRAW’s zooming extent runs from a minimum of 1 percent to a maximum of
264,583 percent. You’d be hard-pressed to need a greater magnification range. The
Royal Observatory in Edinburgh is currently looking into CorelDRAW X5—they
downloaded the trial version.
●
Zoom Out To decrease your view magnification using the Zoom tool, click the
right mouse button anywhere on or off your document page, or hold
SHIFT in
combination with the left mouse button (in case your right mouse button is broken).
Alternatively, click the Zoom Out button (shown next) on the property bar. Doing so
decreases your view to your last-used magnification or by a power of 2, and the
center of the zoom out is the center of the drawing window. Just as with zooming in,
zooming out while using the Zoom tool is directed by the location of the Zoom tool
cursor onscreen. If you want, for example, to zoom out to the upper right of a page,
you put the cursor at the upper right of the page and then right-click. To zoom out
while any tool is selected, press
F3.
Ill 4-4
CHAPTER 4: Navigation and Page Setup 95
4
FIGURE 4-4 Marquee-dragging is the easy way to pinpoint a location and zoom in.
Begin at a corner.
Click-drag to the opposing corner.
Zoomed-in area
Zoom in (normal tool state,
click left mouse button)
Zoom out (hold SHIFT while using
Zoom tool, or right-click)
●
Zoom One-Shot The Zoom One-Shot command is for selecting the Zoom tool
momentarily for a single Zoom In or Zoom Out command while you are using any
tool. Once the zoom has been accomplished, your previous tool reappears. This
zoom command is available in CorelDRAW, but you won’t find it on any toolbar or
on the property bar. Instead, it’s an unassigned feature that you can access only
through customization using a button. If you prefer to use keyboard shortcuts,
F2 is
your key. To make the Zoom One-Shot command appear as a button in a logical and
convenient place, the property bar is ideal—the Zoom One-Shot button can be seen
there whenever the Pick tool is chosen. First, make sure nothing is selected with the
Pick tool, or this isn’t going to work. Open the Options dialog (
CTRL+J), click
Workspace | Customization | Commands to display the command customization
page, and choose View from the drop-down menu. Then, find the Zoom One-Shot
button, drag the button to the property bar (between the Nudge Distance and
Duplicate Distance boxes is good), and then release the button, though only after
you see an I-beam to confirm that you’re adding the button to the desired location.
Ill 4-5
●
Zoom To Selected When you have one or more objects selected in the drawing
window, choosing this command changes your view magnification and viewing
position of the page to show the entire selection in the window. Choose Zoom To
Selected from either the Zoom property bar or the Zoom Levels drop-down menu.
You can also Zoom to a selected object while any tool is selected by pressing
SHIFT+F2.
96 CorelDRAW X5 The Official Guide
●
Zoom To All Objects Zoom To All Objects changes your view magnification
to display all objects visible in your document window, regardless of whether the
objects are on or off the current document page. Choose Zoom To All Objects from
either the Zoom property bar or the Zoom Levels drop-down menu. Alternatively,
use the
F4 shortcut while any tool is selected.
●
Zoom To Page This changes your view to fit your current page size completely
within the document window. Choose Zoom To Page from either the Zoom property
bar or the Zoom Levels drop-down menu, or press
SHIFT+F4 while any tool is
selected.
●
Zoom To Page Width/Height These two commands enable you to zoom your
view to the entire width or height of the current page. You’ll find these tool buttons
in the Zoom property bar or the Zoom Levels drop-down menu.
Using the Mouse Wheel for Zooming
Affordable, high-quality input devices such as the mouse and even some styli for graphics
tablets have had a combo wheel/button between the left and the right since the 1990s.
Applications (when the engineers wrote the feature in) can scroll a document window and
also zoom a document window. Happily, Corel engineers built in this capability for zooming
(it’s enabled by default). To zoom into a page, push the scroll wheel away from you; zooming
out is done by dragging the mouse (or stylus) wheel toward you, as shown here. If you don’t
care for this feature, you can restore mouse wheel action to scrolling by choosing Options
(
CTRL+J) | Workspace | Display, and then choosing Scroll from the Default Action For Mouse
Wheel drop-down list.
Ill 4-6
If your zooms feel jerky when you’re using the scroll wheel, this is not a CorelDRAW
problem, but rather that of the physical wheel (the way it was designed). But you may
be able to fine-tune the scroll action using the manufacturer’s mouse driver options.
The best place to check for mouse options is in Windows Start Menu | Control Panel |
Whatever icon you see for your mouse (if any). If there’s no icon for your mouse (or
other input device) in the Control Panel, check Start | All Programs.
CHAPTER 4: Navigation and Page Setup 97
4
98 CorelDRAW X5 The Official Guide
Customizing View Shortcuts
Many of the Zoom and Hand tool commands in CorelDRAW have preassigned
shortcut keys that can be changed. To access these shortcut key commands for
viewing, follow these steps:
1. Open the Options dialog (CTRL+J) or choose Tools | Options.
2. On the left side of the dialog, under Workspace, click to expand
Customization, and then click Commands to view the Commands page.
3. Choose View from the drop-down menu at the top-left corner of the right side
of the dialog, and notice that a list of view items appears below it. In this list,
click to select the tool or command to change, as shown next.
Ill 4-7
4. Click the Shortcut Keys tab at the top of the rightmost section of the dialog to
display the shortcut key options. Click to make an insertion point in the New
Shortcut Key box, and then press the key combination (or single key) that you
want to assign as the new shortcut. If, as shown in this example, you want Zoom
To Selection to be
CTRL+SHIFT+Z instead of the default SHIFT+F2, you press CTRL
and SHIFT and Z at the same time (you don’t type “Shift” or “Ctrl”). If a conflict
appears in the Currently Assigned To field, you can rethink your custom keyboard
combo, or dismiss (overwrite) the default key assignment by just clicking Assign.
Click the Assign button when you’ve got the keyboard key combo of your dreams
entered.
Then click
this button.
Type new
shortcut key on
the keyboard.
You can quickly Zoom To All Objects on or off the document page by double-
clicking the Zoom Tool button in the toolbox.
Using the Pan Tool
The Pan tool—also commonly called the Hand tool—is a convenient alternative to using
document scroll bars; it’s your avatar for your physical hand while in CorelDRAW. The
Hand tool’s keyboard shortcut is
H (for “hand”), and it works exactly as you’d anticipate. To
use it, click-drag in the drawing window, and your view will travel in the same direction.
The principal advantage to using the Hand tool over the document window scroll bar
“thumbs” (that screen element in the center of a scroll bar you use to click-drag) is one of
economy; you don’t have to put in several “mouse miles” to change your view, and the Hand
tool is great for adjusting your document view by a fraction of an inch, with precision.
The Hand tool’s cursor looks like a hand (Corel engineers gave a lot of consideration to
the cursor), and with a click-drag, you can scroll your view in any direction (often called
panning) as you would with a camera. As you do this, the scroll bars and document rulers
move in unison to reflect the new position.
Ill 4-8
Double-click the Pan Tool button in the toolbox to instantly center your page view.
CHAPTER 4: Navigation and Page Setup 99
4
Pan tool
Pan tool cursor
Rulers travel along with Pan tool drags.
5. To delete a shortcut that has already been assigned, click the shortcut in the
Current Shortcut Keys box, and then click the Delete button.
6. Click OK to close the dialog and apply the shortcut key changes.
Several shortcuts are available while using the Pan tool, some of which are for zooming,
not panning. A right-click using the Pan tool results in a Zoom Out command, and a double-
click causes a Zoom In command. You can also use the keyboard to pan the view of your
document while any tool is selected by using these shortcuts:
●
Pan left Press and hold ALT+LEFT ARROW.
●
Pan right Press and hold ALT+RIGHT ARROW.
100 CorelDRAW X5 The Official Guide
Controlling Zoom and Pan Tool Behavior
The Options dialog is where you can customize certain actions when using the Zoom
and Hand tools. Right-clicks, by default, trigger Zoom Out for both the Zoom and
Hand tools. However, you might want to reassign right-clicking for the Hand and
Zoom tools to be more consistent with the right-click behavior—in other words, to
display a pop-up context menu like the other toolbox tools do.
If this is your preference, you can change your right-clicks by opening the Options
dialog (
CTRL+J) and clicking to expand the tree directories under Toolbox | Zoom,
Hand Tool, as shown here. In this dialog, you can set the behavior of the right-clicks,
using either tool to open the pop-up menu instead.
Ill 4-9
●
Pan up Press and hold ALT+UP ARROW.
●
Pan down Press and hold ALT+DOWN ARROW.
Special View Modes
Other types of views are found in CorelDRAW. In addition to viewing quality and
resolution, you might have the need to change the page order in a multi-page document for a
tidier presentation. Hey, you could certainly do with a preview setting that eliminates the
workspace and puts the focus on your artwork!
The following sections explore these features, how to work with them, and how to provide
views of your work you might not even have considered. You’re going to love this stuff.
Page Sorter View
CorelDRAW Page Sorter view (covered in detail in Chapter 6) becomes available as a
special view mode when your document has at least one page; two or more pages will be
more useful, because it’s silly to try to sort one page (and impossible if you have less than
one page). To go into Page Sorter View mode, choose View | Page Sorter View. While
viewing a document in the Page Sorter, you can browse several pages at one time and
manage their properties as a collection instead of thumbing through single pages. While
you’re using this view, your pages and all their contents are displayed in miniature, but no
other view in CorelDRAW can show you a complete document page flow and offer you the
chance to reorder pages and their properties in one fell swoop. The Pick tool is the only
available tool in this view, and the property bar displays several options unique to this
document view. You can reorder pages by dragging them to different locations in the current
order, or right-click specific pages to rename, insert, and delete them (see Figure 4-5).
Full-Screen Preview
To fill the entire screen with a view of your current document page at the current zoom level,
use View | Full-Screen Preview, or press the
F9 shortcut key. This view hides all of the
CorelDRAW interface—including your cursor—and shows only the current view rendered
in Enhanced view mode (the Full-Screen Preview default view). To return your view to
Normal, press any key or click either mouse button.
Depending on any desktop utilities you might have installed, there might be a
conflict between the
F9 shortcut to get to Full-Screen Preview and something such
as a desktop calendar or local weather applet. You can use a number of remedies:
you can define a different keyboard shortcut, use the View menu or the pop-up menu
instead of a keyboard shortcut, or remove the desktop utility that probably doesn’t
tell you the correct weather in Kazakhstan anyway.
CHAPTER 4: Navigation and Page Setup 101
4
While you’re using Full-Screen Preview, the view mode and page border view
appearance is set according to preferences in the Options dialog. To access these options,
choose Tools | Options (
CTRL+J) and click Display under the Workspace category on the left
side of the dialog to access the Display options. Full-Screen Preview options, located in the
lower part of the dialog, let you choose either draft or enhanced (the default) view as the
view mode, and either show or hide the page border.
Previewing Selected Only
The Preview Selected Only command, available from the View menu, lets you preview only
what’s selected on the page before entering this mode. This option works using the Full-
Screen Preview preferences and takes a toggle state either On or Off when selected. There
are two caveats to using this command: if no objects are selected, the Full-Screen Preview
offers a nice, energy-wasting white blank screen; you’ll also get similar all-white views if
the selected object is not in view before entering this mode. The result you get with Preview
Selected Only depends entirely on what’s framed in the document window at what viewing
resolution you have defined before using the command.
Using the View Navigator
The View Navigator is a pop-up viewer that is indispensable for navigating your entire
document page when you’ve zoomed in to 10,000 percent and need to quickly move to a
different design area without zooming out to get your bearings. The View Navigator pop-up
window is at the point where the vertical and horizontal scroll bars meet at the lower-right
corner of the document window. To open the View Navigator pop-up, click-hold the button,
the magnifying glass icon.
102 CorelDRAW X5 The Official Guide
FIGURE 4-5 Page reordering in a multi-page document is as easy as drag and drop.
Page 4 is being scooted in front of Page 3.
Click-holding the icon displays a pop-up thumbnail that represents the outermost region
of the page and the application’s desktop. The preview frame—the tiny rectangle with the
crosshairs through it—within the View Navigator window indicates the viewing limitations
according to your current Zoom settings. Click-drag within the View Navigator pop-up
window to pan around your drawing in the document window; it’s panning by proxy. As you
drag, releasing the mouse button ends the navigation.
In Figure 4-6 you can see the View Navigator put to the test. Let’s say you need to view
or edit one of the gumballs in the machine. At 100 percent viewing resolution this would be
a true hassle; luckily, by zooming in, it’s easy to see the gumballs to such a detailed extent
that you could wipe the foolish grin off the center one with the Shape tool, simply by homing
in on this roguish piece of candy by panning the window using the View Navigator.
CHAPTER 4: Navigation and Page Setup 103
4
FIGURE 4-6 The View Navigator steers you in the right direction for precise editing in very
tight views.
Drag within the View Navigator
preview to pan document view.
Click-hold here to open
the View Navigator.