Hướng dẫn sử dụng Coreldraw x5 - part 46 pdf
Bạn đang xem bản rút gọn của tài liệu. Xem và tải ngay bản đầy đủ của tài liệu tại đây (860.61 KB, 10 trang )
A
shape without a fill on your drawing page is like a brand-new coloring book. To make
a coloring book—and your CorelDRAW artwork—more visually meaningful, you
need to fill your shapes with colors and textures. CorelDRAW has more than a half-dozen
different types of fill you can apply to your shapes, and these types have hundreds of
variations. In computer graphics, you have over 16 million solid shades of color at your
disposal; imagine what you can do with blends of colors, colors in different patterns, and
colored textures! The worst part of filling CorelDRAW objects will be deciding on a style of
fill. The best part, as you explore filling shapes in this chapter, is that it’s very difficult to
color outside of the lines.
Download and extract all the files from the Chapter15.zip archive to follow the
tutorials in this chapter.
Examining the Fill Types
Each type of CorelDRAW fill has its own special characteristics:
●
Uniform fills apply flat, solid color.
●
Fountain fills make a color transition from one color to another, in different
directions—sometimes also called a gradient fill. You can also create a fountain fill
composed of more than two different colors. CorelDRAW ships with a lot of preset
fills that this chapter demonstrates how to pick and apply.
●
PostScript fills are good for repeating patterns. Although PostScript is a printing
technology, you don’t need to print a CorelDRAW document to see a PostScript fill,
and you can indeed export a PostScript filled object to bitmap format, and the fill
will look fine. PostScript fills support transparency and are ideal for exporting to
EPS file format to use in desktop publishing programs. And, naturally, a PostScript
fill is valid for printing to a PostScript printer.
●
Pattern and texture fills can fill shapes with bitmaps, including photographs, and a
large supply of preset bitmaps is included with CorelDRAW.
●
Mesh fills take multicolored fills and present you with the option of “smearing”
colors within the fill, much like finger-painting.
Every fill type is applied in a slightly different way through the use of onscreen tools,
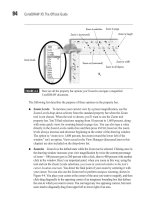
docker windows, or the Interactive fill and Mesh fill tools (see Figure 15-1).
434 CorelDRAW X5 The Official Guide
Using the Color Palette
With color selection, the Color Palette is an excellent starting point, and to apply a uniform
(solid) fill to a selected object, you just select an object with the Pick tool and then left-click
a color on the Color Palette. You can also drag a well (a color swatch) from the Color
Palette, drop it onto a shape (which does not have to be selected), and the object is filled.
Perhaps one of the most interesting features in CorelDRAW is selecting not only a color
from the Color Palette, but also a shade or a tone of that color—in color theory terms, these
are called analogous colors. To pick a shade of a color on the Color Palette, you first select
the object you want to fill, click-hold on a well color, and a small pop-up menu of shades
and tones of that color appears. While holding the mouse button, drag to the exact shade you
want, release the mouse button, and the object is filled. This pop-up menu features shades
CHAPTER 15: Filling Objects 435
15
FIGURE 15-1 Fill your shapes in a composition with exactly the fill type that draws attention
to your design work.
Uniform
Fountain
Full-color pattern
Bitmap pattern
Two-color pattern
Mesh
PostScript
Texture
that vary in hue from top to bottom, and in brightness as you drag your cursor from left to
right. It’s like having 49 possible colors at your cursor tip when you choose one color.
Uniform fills can also be assigned to all objects right from the get-go. With no objects
selected in the drawing window, left-click a color you want to use for all objects, artistic
text, and/or paragraph text from now on. CorelDRAW then displays a dialog, shown next,
that asks what sort of object you want filled when it’s created from now on. You can cancel
out of this operation, but you can choose objects, text, or both.
If you need to set the default fill for all documents you create in the future, go to
Options | Document, where you can check Save Options As Defaults For New
Documents, and then check Styles, which applies the fill you’ve chosen to Default
Graphic (the properties for all new objects).
436 CorelDRAW X5 The Official Guide
Selected shape
Color Palette
Click-hold to choose
analogous color.
From Uniform to Non-Uniform Object Filling
The quick way of applying any of the fill types is by using the Interactive fill tool, shown
here. You’ll find it at the bottom of the toolbox; to quickly select it, press
G. You’ll see a hint
here that the Interactive fill tool is also a selection tool—the cursor is an arrow cursor with a
paint bucket. You don’t need to have the object that you want to fill selected when you use
this tool. You can click an unselected shape with the Interactive fill tool; it becomes selected,
and then a second click-drag on the object by default applies the linear style fountain fill,
making a transition from black to white. You can then change the colors used, or choose a
different fill type from the property bar by clicking the Fill Selector drop-down list.
While you’re using the Interactive fill tool, the property bar displays fill options that
change depending on the type of fill you choose from the selector. If your selected object
features no fill color at all, the selector displays the type as No Fill, and the property bar
displays no options. The selector, shown next, is where you can choose from any of ten fill
types: Uniform Fill, four fountain fill types (Linear, Radial, Conical, and Square), two Color
Pattern fill types (Two Color and Full Color), Bitmap Pattern, Texture Fill, and PostScript
Fill. In this section, you’ll learn to control every fill type using property bar options and the
control handles on the Interactive fill tool.
CHAPTER 15: Filling Objects 437
15
Interactive fill tool
Interactive fill tool cursor
Fill Type selector
The technique you use to set angle and position (among other properties) of fills varies a
little from fill type to fill type, so let’s run through the basics for a moment.
Filling an Object, Setting Fill Properties
1. Select the object to fill, and then choose the Interactive fill tool (G) from the toolbox.
2. If your object already has a fill (excluding a shade of a color well on the Color
Palette), the property bar automatically displays the fill type and the current
properties of that specific fill.
3. Use the Fill Type selector to choose a fill type. As you do this, the object is filled
with the selected style, and the property bar shows options for this style, which is
applied with default color, direction, pattern type, and so on. Your object will also
display control handles for the direct manipulation of the current fill type.
4. Use the property bar to define properties of your fill, which are instantly updated in
the object in the drawing window.
The following section covers the property bar options specific to the fill type when the
Interactive fill tool is selected.
Uniform Color Fill Options on the Property Bar
Uniform fills are like the paint chips at the hardware store; it’s a solid color, no variations,
and a uniform fill floods an object within the boundaries of its outline with the color you
choose. The Color Palette is a fast, easy way to assign a uniform color; however, when
you choose the Interactive fill tool, you have several different color models from which to
choose. See Chapter 17 for details on color theory—if you’re already familiar with the
CMYK printing color model, the intuitive HSB color model, and others, you’ll feel right at
home using the property bar to mix up color values (and better still, entering values a client
might have telephoned to you for that big advertising job).
The following illustration shows the color models you can use the Interactive fill tool to
choose when Uniform Fill is selected from the property bar Fill Type selector. Most of us
prefer to visually mix up a color. So while the property bar displays fill options, click the
Edit Fill button at the far left; this displays a palette in which you drag a marker and move
sliders to specify the color you need, and then click OK to define it.
438 CorelDRAW X5 The Official Guide
HSB and RGB color models occupy the same color space, the extent to which a
color can be expressed onscreen. Therefore, you can arrive at an identical color
using either color mode. This means you can switch color models for a filled object,
and between RGB and HSB there will be no real color change.
Applying a Fountain Fill
Fountain fills can fill objects with a smooth transition between two (or more) colors, and
they come in various styles. Many commercial pieces of artwork are created today that
imitate the traditional airbrush (popular in the mid–20th century) by using fountain fills. You
can apply a fountain fill in different ways, and the following tutorial shows you the quickest,
most artistically satisfying way.
CHAPTER 15: Filling Objects 439
15
Copy Fill Properties
Edit Fill
Uniform Fill Selected
Uniform Fill Type
Selector (Color Models)
Color Values
Palette
Uniform Fill Palette Color
Color Tint (Spot Colors Only)
Hue Slider
Saturation/Brightness Marker
Creating Fountain-Filled Objects
1. Select an object and then choose the Interactive fill tool (G) from the toolbox.
2. Click-drag, beginning at one side of your object and dragging to the opposite side at
any angle; try dragging from 10 o’clock to 4 o’clock, for example. A default linear
fountain fill is created using the object’s current fill color, making a color transition
from the defined color to white, indicated by settings in the property bar. If your
object has no fill, a default black-to-white fountain fill is created.
3. For a different fountain fill type, choose Radial, Conical, or Square from the Fill
Type selector. As you do this, the shape of your fountain fill (and the available
property bar options) changes.
4. Experiment with changing the appearance of the fill by dragging to move the color
markers and midpoint slider control. Notice how the position changes affect your fill.
The midpoint slider is used to influence the point at which the From color and the To
color in the fountain fill are exactly a 50/50 mix of the colors. So if, for example, you
want to create a shaded sphere, you begin with an ellipse object, fountain fill it with
the radial fill type, and then move the midpoint closer to the white marker than to the
black to make a small, subtle, sharp highlight on the object: bingo, you have yourself a
dimensional sphere!
Using these steps, your click-drag action specifies several properties. The first click sets the
From color position, and the drag direction defines the angle. The length of the drag defines the
distance, and the mouse release defines the To color position. A series of interactive markers
shows the position of each of these values. It’s important to understanding how fountain fills are
applied; other fountain fill operations are variations on this theme. The following sections
examine each fountain fill type in detail (see Figure 15-2).
●
Linear This is the default fountain fill style and is most useful for shading
rectangular shapes to suggest lighting on a dimensional plane or 3D object. The
color marker positions mainly control its appearance.
440 CorelDRAW X5 The Official Guide
FIGURE 15-2 A different fountain fill type can bring out the dimensional qualities of almost
any shape.
Linear Radial Conical Square
●
Radial This type makes a color transition outward in a circular style, terrific for
shading round objects and objects you’d like to soften in appearance. During use of
radial fountain fills, the center offset controls where the fill begins.
●
Conical This might not be a fill type you use every day, but if you need to simulate the
look of the playing side of a DVD or an aerial view of a grain silo, Conical produces a
strongly shaded and unique transition between two or more colors. The From color of a
conical fill is the beginning and the end of the conical fill, and the To color shades all the
in-between blend steps. The center control handle can be used to increase the contrast of
the effect by dragging it toward the From color marker along the dotted-line arc of the
control handles; dragging the center toward the To marker creates less contrast and a
milder effect.
●
Square This style produces a look like a four-pointed starburst. The center marker
controls contrast; the To marker sets distance and direction for the fill.
Chapter 22 documents object transparency types. Here’s advance notice if you haven’t
read this chapter yet: Fountain fill styles are also transparency styles—all four types of
fountain fills can make a transition between opaque and transparent. You therefore can build
an elegantly shaded object by, for example, applying a radial fountain fill to an object and
then giving it a linear transparency property.
Controlling Fountain Fills Interactively
The interactive fountain fill markers (hovering on top of an object you’ve drawn), combined
with the property bar, give you control over the look of your fill. Among these, you’ll see
color selectors, a Midpoint option, Angle and Edge Pad options, and a Fountain Step Lock/
Unlock option, shown here:
Many of these fountain fill property bar options correspond to interactive markers
surrounding your object, but the marker positions can be changed to produce different looks,
according to the type of fountain fill. Although the property bar offers precision, dragging
the markers is extremely intuitive and often is a preferred method to make a custom fill. In
Figure 15-3 you can see the different interactive marker positions that appear around each
fountain fill type.
CHAPTER 15: Filling Objects 441
15
Edit Fill Linear Selected Color Selectors
Midpoint
Edge Pad
Angle Fountain Step Lock/Unlock
Copy Fill Properties
Moving any of the markers will change the fill appearance in different ways. The
following explains the purpose of options you’ll see in the property bar while dragging
interactive markers and what the effect is on the fill:
●
Color Markers Use these to set the position and colors in your fountain fill. Each
fountain fill type has to have at least two colors. To change a color, click to select it
and click a color well in your onscreen palette, or drag a color well directly onto a
color marker. To move a marker, click-drag it in any direction, which changes the
properties of the filled object, usually relocating the center of the fountain fill.
●
Midpoint This slider control is available only while a two-color fountain fill is
applied; if you use more than two colors for the fill, the midpoint marker goes away.
The midpoint marker is used to set the point at which the From and To colors are
equal in value. This value is measured in terms of percentage—by default, it’s
50 percent.
442 CorelDRAW X5 The Official Guide
FIGURE 15-3 Interactive markers surround each fountain fill type while you’re using the
Interactive fill tool.
Linear
From color marker
Midpoint slider
To color marker
Radial
Center offset
Angle/Direction
Interactive fill
tool cursor
Square
Conical
●
Angle The Angle value applies to linear fountain fills and is set in degree values
between 360 and –360 (a negative value). Positive angles rotate the fill counterclockwise,
while negative values rotate the fill clockwise.
●
Edge Pad This option sets the amount of contrast between the To and From colors,
expressed as a percentage. The default setting, 0, creates smooth, even blends at the
slowest possible rate. Increasing this setting causes colors to change more abruptly,
as shown next. Edge Pad can be set within a range of 0 to 49 percent, and this can also
be adjusted in Object Properties (
ALT+ENTER) and in the Fountain Fill dialog (F11).
Moving the color markers of a linear fill away from or toward your object’s outline
increases or decreases this value; try dragging the To and From color markers to
positions outside of the object, for example, to decrease the edge pad effect.
●
Center Offsets Radial, conical, or square fountain fills feature this marker; you
change the center position of the fill relative to your object’s center by dragging the
marker. Dragging the center marker of a radial, conical, or square fill away from or
toward your object’s center also increases or decreases the edge pad value.
●
Steps This setting affects both the display and printing of fountain fills. A fountain
fill is actually calculated by blending neighboring bands of color in succession, but
you don’t see this banding effect because so many shades of intermediate colors are
used between the To and From color. The Fountain Steps option is fixed at the
maximum setting of 256 by default, but can be increased to a maximum of 999.
However, you might be looking for a banding effect, to create shirt stripes or other
geometric patterns. To lower this setting, click to unlock the Lock button. Lowered
step values cause the color gradation in your fill to become unsmooth, as shown
CHAPTER 15: Filling Objects 443
15
Edge pad 0
Edge pad 15
Edge pad 30