Hướng dẫn sử dụng Coreldraw x5 - part 49 pdf
Bạn đang xem bản rút gọn của tài liệu. Xem và tải ngay bản đầy đủ của tài liệu tại đây (650.11 KB, 10 trang )
actions to move fill areas are done exactly the same as for Bézier curves. For information on
how to do this, see Chapter 11.
Mesh Fill Options
On the property bar, when the Mesh fill tool is used and an object is selected, you have
control over the following attributes of your mesh-filled object:
●
Resolution of the Patches By default, a new mesh fill is created on an object with
two horizontal and two vertical sets of patches. These patches are linked at the edges
by paths and at their vertices by nodes. You can use the numerical entry fields or the
spin boxes with these fields to increase or decrease the number of columns and rows
of patches. If you right-click a node or a path segment, you have the option to create
a node or an intersection by choosing from the pop-up menu.
●
Add Intersection/Delete Node When you’ve clicked a path segment and a marker
appears, this is your opportunity to add an intersection, either by clicking the Add
Intersection button, or by pressing
+ on the numerical keypad. When you add an
intersection, you add a row or a column to the mesh fill, depending on whether
you’ve added a point to a vertical or a horizontal mesh path segment. You must first
select a node to then delete it, and doing so by clicking the Delete Node button or by
pressing
DELETE on your keyboard removes both the mesh node and its associated
intersecting path segments—reducing the number of columns or rows of mesh
patches. Deleting nodes can yield unanticipated results, so give some thought before
you delete a node.
●
Curve and Node Command Buttons By default, path segments that make up the
mesh fill are curves, bound by nodes that have the smooth property at intersections
and the cusp property along the edges of the object. To change a path segment to a
line, you use the Convert To Line button; click Convert To Curve to create the opposite
property. Nodes can be changed to cusp, smooth, and symmetrical properties by
clicking the associated property bar button; the commands can also be found on the
right-click pop-up menu when your cursor has selected a node.
●
Curve Smoothness Suppose you’ve added far too many nodes to a path segment,
and your mesh fill looks like a bad accident in one area. If you marquee-select the
nodes that bind this path segment, the Curve Smoothness slider and numerical entry
field act like the Node Reduction feature in CorelDRAW. You reduce the number of
superfluous nodes (CorelDRAW decides on the meaning of “superfluous”—you
have no control) by entering a value or using the slider.
464 CorelDRAW X5 The Official Guide
●
Selection Mode By default, you can select nodes in Rectangular mode, which
means you marquee-drag a rectangular shape with your cursor to select nodes, and
then change their properties such as color, position, and transparency. Your other
selection choice is Freehand mode; your cursor behaves like a real-world lasso, and
you are unconstrained by a selection shape for nodes. Additionally, you can
SHIFT-
click and select non-neighboring nodes to edit. When using Freehand mode, patches
cannot be selected—selecting patches by clicking within them is only available in
Rectangular selection mode.
●
Transparency When selecting using Rectangular mode, transparency can be
applied to a patch by clicking the patch once with the Mesh fill tool, and then using
the numerical entry field or the slider to assign from 0 (no transparency) to 100
(completely transparent) to the patch. You can also set a transparency value to a
mesh fill node by selecting it and then using the Transparency controls. Transparency
on a mesh fill has no blending mode like the Transparency tool offers for entire objects—
transparency is applied in Normal mode. However, once your mesh fill object is
completed, you can use the Transparency tool on the toolbox to assign the object
different types and modes of transparency as a single object.
●
Smooth Mesh Color This is a toggle on/off button that can produce smoother
color blends in your fill without changing the position or properties of the mesh
nodes and curve path segments.
●
Color Eyedropper When a patch or node is selected, you can choose a color
anywhere on your Windows desktop by dragging the Color eyedropper over to any
point. You can also sample from objects on your drawing page, but that might not be
as much fun!
●
Color Palette You have a mini color-palette flyout on the property bar with which
you can select colors for selected nodes and patches. Click the flyout button to
access the default color palette, or choose from other preinstalled CorelDRAW
palettes. Clicking a color well on the (regular) Color Palette applies color, too.
●
Copy and Delete Mesh Fill Properties These buttons are common to most all
effects in CorelDRAW; use them to copy a mesh fill to a different object on the
page, or to remove the mesh fill effect from an existing object.
When working with the mesh fill, you’ll get far more predictable results if you apply
colors to the nodes instead of dropping colors onto patches. Also bear in mind that
regardless of how you create a shape, the mesh fill makes the object “soft”—the control
CHAPTER 15: Filling Objects 465
15
nodes that make the closed path of the object are also mesh fill nodes. So, unavoidably, if
you want to move a node you’ve colored in at the edge of the object, you’re also moving the
associated path segment. This is fun and creative stuff, actually, and if you need the fill to be
soft with the object’s original shape intact, you can put your finished object inside a
container by using the Effects | PowerClip feature.
You cannot mesh fill a combined shape; an object made by subtracting a circle from
a rectangle so it looks like an awkward doughnut will not take a mesh fill, although
the property bar will offer you mesh fill options.
The following tutorial guides you through the creation of a mesh fill within a shape that’s
been created for you, with the finished example on the right of the page in Shiny Sphere.cdr.
The goal is to create a mesh fill that gives a simple circle object the appearance of being a
dimensional, highly reflective sphere, complete with a soft cast shadow beneath it.
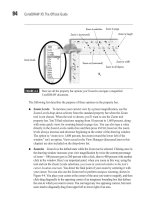
Take a look at Figure 15-11 before you begin these steps; it’s not only a comprehensive
visual guide for the steps to follow, but also is a handy reference to accompany your
independent mesh fill adventures.
466 CorelDRAW X5 The Official Guide
FIGURE 15-11 Mesh fills use control handles very similar in appearance and function to the
paths you draw with the Pen tools and edit with the Shape tool.
Mesh patch
Mesh lines
Mesh points
Drop color
over a point.
Drop color
over a patch.
Ellipse object with
linear transparency
Blending Colors Using the Mesh Fill
1. Open Shiny Sphere.cdr, select the top circle at left, and then choose the Mesh fill
tool. A default mesh fill grid is applied to the object: 2 rows, 2 columns. Increase the
resolution to 4 rows, 4 columns for starters.
2. In a lasso marquee–drag motion, select the horizontal nodes along the center of the
sphere, and then click the black color well on the Color Palette.
3. Marquee-select all the nodes below the horizontal center nodes you selected in step 2,
and then choose a rich brown from either the Color Palette or from the flyout palette
on the property bar.
4. Select only the bottom center node, and then click a lighter brown.
5. Choose the Freehand selection mode from the property bar, then select the five top
nodes that define the top edge of the circle, and then fill them with a purple-blue
medium color. Select the first row, the five nodes below the top circular edge nodes,
and fill them with a light blue.
6. Click the second node in this row, and fill it with a deep gold color to suggest a
sunset on the horizon of the little desert painting you’ve created. Often, traditional
airbrush illustrators have created photorealistic chrome spheres using the reflection
of a desert as the primary visual content. You’ve done this; now it’s time to distort
the desert scene to suggest the dimensionality of a 3D sphere.
7. Select the gold node and drag it down a little.
8. Select, one by one, the nodes that are colored black, and create a slight wavy effect.
9. Select the light brown node at bottom center, and move its control handle up a little.
10. Finesse the color nodes to suit your personal artistic taste. Then select the bottom
oval, apply a white fill, and apply the default 2 by 2 Mesh fill grid.
11. Click the center node with the Mesh fill tool, and then click black on the Color
Palette. You now have a feathered, soft drop shadow that would take two of three
additional steps to get right if you’d used the Drop Shadow tool on the toolbox. The
Drop Shadow tool is often, but not always, the right tool for creating a shadow
effect.
12. With the Pick tool, drag the oval highlight object currently over the completed
example at right; tap the right mouse button before releasing both buttons to drop a
copy on top of your shiny sphere at left.
After a mesh fill has been applied to an object, the object cannot be filled with any
other fill type unless the mesh fill effect has first been cleared. To clear a mesh fill
applied to a selected object, click the Clear Mesh button in the property bar.
CHAPTER 15: Filling Objects 467
15
SamplingandApplyingFillColors
After you’ve experimented and come up with a lot of interesting and valuable fills you’ve
applied to objects, a natural question to ask is: I’ve got this once-in-a-lifetime, truly
excellent color (or texture), and I want to use the fill on other objects. How do I do this?
Version X5 has integrated the color-sampling process and improved it so that a single
tool now can be used to sample a color and apply that color to a different object. Additionally,
when an object fill has more than one color—such as fountain fills—you have the Attributes
eyedropper at hand to sample and duplicate any fill to a new object or group of objects.
To use the Color eyedropper tool:
1. Make sure your view of the page includes both the object that is filled with the color
you want to copy, and the target object. Zoom out or pan your view if necessary.
2. Choose the Color eyedropper tool from its group on the toolbox.
3. Click over the object with the color you want to sample. The cursor changes to a
paint bucket, as does the function of the tool.
4. Click over the object you want to apply the sampled color to. Notice that after you
click, the cursor remains in the paint bucket state. If you want to apply the sampled
color to additional objects, you do it now. However, if you want to pick a different
color sample—starting the process all over again—click the eyedropper icon on the
property bar. The tool is now reset to sample, not apply, color. Applying samples is
not limited to fills: click the paint bucket cursor over the outline of an object, and
you apply the color to the object’s outline.
Additional options with the process of color sampling are on the property bar:
●
Select From Desktop When you click this button, you can sample more than a
CorelDRAW object color. You select any color on your screen. This means, for
example, you can sample the color of the Zoom tool on the toolbox, any color on the
Color Palette, and you can even click CorelDRAW’s minimize/restore button above
the menu bar, move the CorelDRAW window a little, and sample from your
Windows desktop.
●
Selected Color This is not only a good visual reference as you work, but while the
Color eyedropper tool is in use, you also can drag this color well on top of any
object—selected or unselected—and the current selected color is applied to that
object, or to the outline of the object if your aim is precise.
●
Add To Palette If you want to keep using your sampled color long after you’re
done with the Color eyedropper tool, click this button to add the sampled color to
the Document palette, located in Window | Color Palettes | Document Palette.
468 CorelDRAW X5 The Official Guide
●
Sample Size Before clicking to sample, you have the option to sample a single
point—one pixel on your monitor’s screen—or a 2×2 average area, or a 5×5 average
color area. The use and importance of this feature is covered next.
Ill 15-20
The usefulness of sampling colors with a “big” eyedropper will become evident when
you’ve imported a bitmap and want to approximate a color you see in the bitmap for a
border or text in your composition. Figure 15-12 illustrates the use of a large, averaged color
sample. The background of the ceramic moon is dreadful, and a harmonious color value
sampled from the moon sculpture itself would be splendid. But the color at left was taken
using a “point sample,” 1×1 pixel. Bitmap images have pixels that vary from neighboring
pixel to pixel, especially with JPEGs that by their nature have noise—similar to film grain,
random distribution of color pixels that don’t belong in image areas. So the 1×1 pixel
Eyedropper tool sample is a dud, even after three tries. The 2×2 averaged sample (at center)
did better, but at the right, when the same area in the circle is sampled using the 5×5 setting,
a color has been sampled correctly for artistic purposes, and a nice average of a 25-pixel
area yields a suitable color for the background on the moon.
SamplingAboveandBeyondUniformFills
You will love to work with the more complex fills in CorelDRAW, and naturally, you’ll want
to apply one you’ve deliberately created or even stumbled upon to other objects. Multi-color
fills fit into a category called Styles, and to copy them, you need to use the Color eyedropper’s
cousin tool, the Attributes eyedropper. To sample and apply fills such as fountains, texture
fills, and all the others, choose the Attributes eyedropper from the toolbox, and then click
CHAPTER 15: Filling Objects 469
15
Eyedropper
tool
Paint Bucket tool
Choose color
from any point
on screen.
Point
2×2
5×5
the Properties button and choose Fill. You can use the Attributes eyedropper to copy just
about anything an object displays, but for making a rectangle’s fill look like that fountain-
filled circle next to it, for example, you only check Fill before clicking with the tool.
Ill 15-21
Alternatively, you can drag an object using the right mouse button, and drop it on top of
an object to which you’d like to apply any style of fill. The pop-up menu appears when you
release the right mouse button, and you then choose Copy Fill Here. The position of the
source object does not move using this drag technique.
470 CorelDRAW X5 The Official Guide
FIGURE15-12 Increase your Color eyedropper sample size to get a general color instead of
the exact underlying pixel color.
1×1
sample
2×2
sample
Sample area
5×5
sample
Choose the
properties to
sample.
When a shape is selected, double-clicking the Fill box in the status bar opens a
corresponding dialog where you can edit the current fill of the object and also add
it to a Preset list for safekeeping for future needs. This saving option doesn’t apply
to PostScript fills, which cannot be fundamentally edited in CorelDRAW.
If you’ve had your fill, this is okay…so have your objects. You’ve learned in this chapter
how to tap into CorelDRAW fills, and hopefully you’ve also seen how important fills can be
to your drawings. Fills can actually contribute to the visual robustness of a composition
more than the shape of objects. Take a cardboard box, for example. The shape of the box
isn’t that interesting and takes only a few seconds to draw. But the texture of a cardboard
box is where the object gets its character and mood.
Outline properties and attributes are covered in the following chapter. You can do as
much with customizing the thing that goes around an object as with the object itself.
CHAPTER 15: Filling Objects 471
15
This page intentionally left blank
CHAPTER 16
Outline Attributes
473