Hướng dẫn sử dụng Coreldraw x5 - part 50 pdf
Bạn đang xem bản rút gọn của tài liệu. Xem và tải ngay bản đầy đủ của tài liệu tại đây (815.57 KB, 10 trang )
C
hapter 15 covers only half the story about how you can flesh out a visual idea by using
CorelDRAW. Although an object can usually live its life just fine without an outline,
the attributes you can apply to a path can add a touch of refinement to an illustration. The
right outline color can help visually separate different objects. Additionally, you can
simulate calligraphic strokes without using artistic media when you know how to work with
the Outline Pen dialog; you can even make a path a dashed line, complete with arrowheads
for fancy presentations and elegant maps. In fact, an outline, especially an open outline, can
live its life in your work just fine without defining a filled object! You don’t have to draw the
line at fills and effects in your CorelDRAW artwork. This chapter shows you the ins and
outs of properties you apply to your paths, from beginning to end.
Download and extract all the files from the Chapter16.zip archive to follow the
tutorials in this chapter.
Applying Outline Pen Properties
By default, when you create an open or closed path, it’s given a ½-point-wide outline in
black, with no fancy extras. Part of the rationale for this default is that vector paths can’t
really be seen without some sort of width. In contrast, bitmap artwork by definition is made
up of pixels, written to screen and written to file; so when a user draws an outline, it always
has a width (it’s always visible). Happily, vector drawing programs can display a wide range
of path properties, and unlike with bitmap outlines, you can change your mind at any time
and easily alter the property of an outline.
In a number of areas in CorelDRAW, you can apply a property such as color, stroke
width, and other fun stuff to an open or closed path (and even to open paths that don’t touch
each other but that have been unified using the Arrange | Combine command). The following
sections explore your options and point out the smartest and most convenient way to travel
in the document window to quickly arrive at the perfect outline. When an open path or an
object (which necessarily has to be described using a path) is selected on the page, the
property bar offers a lot of options for outline properties. Some shortcuts for performing
simple property adjustments are also covered on the long and winding path through this
chapter.
Outline Pen Options and the Property Bar
Although it doesn’t offer all options for path properties, the property bar is probably the
most convenient route to outline properties. It actively displays a selected path’s current
properties, which you can change when a path is selected. The property bar, shown next
while a path is selected, has width, style, and arrowhead options—you can make an open
path with a head, tail, two heads—it’s up to you. Other options give you control over
wrapping text around an object, showing or hiding a bounding box around a path, and items
not directly related to the look of the outline. Closed paths, naturally, can’t have arrowheads,
474 CorelDRAW X5 The Official Guide
but your options for dashed lines and other attributes are available for rectangles, ellipses, all
the polygon shapes, and for freeform closed curves you’ve drawn by hand.
The following tutorial walks you through the use of the property bar when you draw
a path.
Going Long and Wide
1. Choose any drawing tool—the default Freehand tool is fine—just drag a squiggle
and then press
SPACEBAR to switch to the Pick tool; the path is selected now.
2. On the property bar, choose an outline thickness using the Outline Width selector, or
enter a value and then press
ENTER.
3. For arrowheads (on an open path), click the Start or End Arrowhead picker, and then
choose an arrowhead style from the pop-up. The Start option applies an arrowhead
to the first node of the path; the End option applies it to the last. Therefore, this
might not be the direction in which you want the arrow to point. You just have to
perform a little mental juggling.
4. To apply a dashed or dotted-line pattern to the path, click the Line Style selector, and
then choose from one of the presets. Creating custom dashed patterns is covered
later in this chapter.
CHAPTER 16: Outline Attributes 475
16
Freehand Smoothing
Show/Hide
Bounding Box
Start Arrowhead Picker
Line Style
Selector
End
Arrowhead
Picker
Auto-Close
Curve
Outline
Width
5. Try increasing and decreasing the outline width, and see what happens to dashed
line styles and arrowheads; they scale proportionately to the width of the outline.
As you apply outline properties from the property bar to your object or path, the effect is
immediately visible, making this method both quick and convenient to use.
To quickly set the color of an object’s outline, right-click over any Color Palette
color well when it’s selected.
Using the Outline Tool
The toolbox method is a different way to define the properties of a path. The Outline pen tool
isn’t really a tool; rather it’s a flyout selector of options, shown next. If you’re working on
outlines a lot in a design, the Outline pen tool—like all the toolbox tools—can be floated as a
palette. Just right-click first over the toolbox area and uncheck Lock Toolbars, and then drag
the flyout (by the tread marks at the top of it) into the workspace. At the lower left in the
illustration, you can see access points to the Outline Pen dialog, which offers options not
available on the property bar; to the Outline Color dialog (which is a one-shot deal); and to the
Color docker, which has some options similar to those in the Outline Color dialog, but here the
docker is a persistent element, always available to use. Also, you have ten preset widths for
outlines, and an X, which removes a path’s outline width, making it invisible. If you want
labels on the various commands instead of iconic representations, right-click over an empty
area of the toolbar once it’s floating, and then choose Customize | Outline Flyout Toolbar.
476 CorelDRAW X5 The Official Guide
Opens Outline
Pen dialog
Opens Outline
Color dialog
Opens Color docker
Click-drag to float
Outline tool as a
toolbar.
Unlock to float
any toolbar.
Set display options
for floating toolbar.
Right-click over vacant area to reveal options for toolbar.
Exploring the Outline Pen Dialog
Use the Outline Pen dialog for total control over a single object’s outline or over a selected
group. It includes the same set of options available in the property bar, plus several more.
The Color eyedropper tool can be used to sample and apply outline properties
between objects.
The Outline Pen dialog includes options for specifying outline color, editing arrowhead
and outline styles, and setting nib shape and transformation behavior; this is the only place
in CorelDRAW where you’ll find all these options together. To open the Outline Pen dialog,
shown in Figure 16-1, the quickest way is to double-click the Outline well on the status bar,
but you can also choose the dialog from the Outline flyout (pressing
F12 gets you there, too).
CHAPTER 16: Outline Attributes 477
16
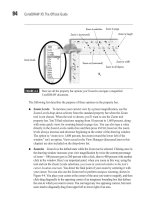
FIGURE 16-1 The Outline Pen dialog has comprehensive options for outline properties.
Double-click here
on the status bar to
open the dialog.
Interactive nib shape control
Setting Outline Color
Using the Color selector in the Outline Pen dialog, you can choose a color for your selected
path(s). Pen color affects only the color of the object’s path; object fills are not changed.
Outline color can be set only to CorelDRAW’s uniform colors from the drop-down palette.
To access every color collection and color model for outlines, click the Other button at the
bottom of the palette. The Outline Color dialog provides access to all CorelDRAW’s color
palettes, including custom swatches and the Color Mixer.
If you want color control and don’t need to fuss with dashed outlines, arrowheads, or
other outline attributes, don’t choose the Outline Pen dialog—click the Outline Color dialog
button on the Outline Flyout in the toolbox. And if you’re not particular about a specific
shade of color, right-click a color well on the Color Palette to set an outline color.
Choosing Outline Styles
For a quick way to apply a dashed- or dotted-line pattern to the path of a selected object, the
Line Style selector offers more than 28 preset variations.
478 CorelDRAW X5 The Official Guide
Click to display the
main color dialog.
Applying an outline style causes a pattern to appear along the entire path, which is a must
for anything you need to visually suggest to the reader that they go running for the scissors:
coupons, tickets, you name it. Styles are repeating patterns of short, long, and a combination
of dashes that apply to the entire path. Line styles can be applied to any open or closed path
object, as well as to compound paths—paths that look like two or more individual paths, but
are bound using the Arrange | Combine command. The quickest way to apply a dashed style is
to use the Pick tool and the property bar Style selector when one or more paths are selected, as
shown here.
CHAPTER 16: Outline Attributes 479
16
Click here to remove
outline properties.
Preset styles
Click here to open
Edit Line Style dialog.
Once you have a nice custom outline set of properties defined and want to apply all
the parameters to a different path, you can copy outline properties of one path to
another by right-clicking and dragging one path over on top of the target path (this
doesn’t move your original path; it’s a special editing technique). Release the
mouse button when a crosshairs cursor appears over the target path. Then choose
Copy Outline Here from the pop-up menu.
Creating and Editing Outline Styles
If you’re looking for a special dashed-line style, one of your own invention, you can always
build it. Choose Other from the Style selector in the property bar while a curve is selected,
or within the Outline Pen dialog click the Edit Style button. Both actions open the Edit Line
Style dialog, shown here:
Creating a custom line style of dots and dashes is a fairly intuitive process, very similar to
drawing a line in a paint program; your cursor serves as both a pencil and an eraser. Click a
black dot to erase it, click a white (space) dot to add to or begin a line. Once you save a style by
clicking Add, it becomes available throughout CorelDRAW wherever outline styles are offered.
Your only limitation—read the legend at the bottom left of the editor—is that you can’t create a
sequence consisting of more than five dashes or dots; two or more single dot marks count as a
single dash. To create and save your own custom outline style, follow these steps.
Drawing a Dotted Line Style
1. Create and/or select a path to serve as a host for your new line style, open the
Outline Pen dialog (
F12), and then click the Edit Style button, or click the Other
button at the bottom of the Style selector on the property bar.
480 CorelDRAW X5 The Official Guide
Click to draw or erase part
of the dot/dash pattern.
Drag to increase blank space
between pattern dots/dashes.
Preview window
Five-dash limit!
2. In the Edit Line Style dialog, you see a horizontal pattern generator featuring a slider
control, a preview window, and a set of command buttons.
3. In the pattern generator, drag the slider left or right to change the style length. Click
(or click-drag to make a long dash segment) on the small squares to the left of the
slider to set the on/off states of the pattern. If you want to erase a segment, you click
or click-drag on the black square(s) you’ve drawn. As you do this, the preview
window shows the new pattern.
4. Click the Add button to add the new style to the list (or click Replace to overwrite
the style currently selected in the Style selector) to return to the Outline Pen dialog.
New styles are added to the bottom of the selector list.
5. Verify that your new line style is available by choosing it in the selector and clicking
OK to apply your new outline style; it will be at the bottom of the drop-down list,
and as with the preset styles, there is no name for custom styles—you search by the
look of the saved thumbnail. The line style you created is now applied to the object.
If the pattern applied to a path doesn’t exactly match its length—for example, the pattern
is longer than the path it’s applied to—you might see a “seam,” especially when applying
outline styles to closed paths (as shown next). You have two ways to cure the problem. One
is to go back to the style editor, and then to increase or decrease the length of the pattern.
This is a trial-and-error edit, but it doesn’t change the path to which the style is applied. The
other method (a desperate measure) is to lengthen the path by using the Shape tool, or to
scale the path by using the Pick tool. In either of these edits, you change your design and not
your custom preset—it’s your call, but editing the style is usually the best way to avoid
seams on a case-by-case basis.
CHAPTER 16: Outline Attributes 481
16
Style length adjusted
Seam visible
Click-drag to scale the saved style.
Setting Outline Arrowheads
Arrowheads are both heads and tails on an open path, and although you have a handsome
collection of preset arrows, they can be almost anything you decide to draw. Most of the
preset styles are arrowheads, but some are symbols that represent a tail. Figure 16-2 shows
several of the styles, and many of the tails match the visual style of the arrowheads. When
applied, arrowheads can be set to appear at the start and end points of open paths, at both
ends, one end, or by default, at neither end.
Here’s a trick to defining the size of an arrowhead or tail proportional to your line. Select
the line, then press
ALT+ENTER to display the Object Properties docker, and then click the
Outline (the pen) tab.
●
If you check the Scale With Image check box, whenever you use the Pick tool to
scale a line with an arrowhead, the line’s width will increase or decrease, but the
arrowhead remains a constant size.
●
If you leave Scale With Image unchecked as a property, the arrowhead scales with
the width of the line when you scale the path using the Pick tool.
If you don’t scale a path but instead change its outline width using the box on the property
bar, no object scaling is really taking place. The path is the same length when you change its
width, and this trick doesn’t apply. This is your ticket to making an arrowhead exactly
proportional to the path’s outline.
482 CorelDRAW X5 The Official Guide
FIGURE 16-2 CorelDRAW includes these arrow styles, and you can design your own. Heads,
you win.
The quickest way to apply an arrowhead is by using the Start and/or End Arrowhead
selectors in the property bar when an open path is selected, as shown here.
Applying an arrowhead to a closed path has no visible effect unless the path is
broken at some point.
Creating Custom Arrowhead Styles
Realistically, CorelDRAW could not have the ideal arrowhead (and tail) for your (and every
other user’s) assignment as a preset, or the preset selector would need a head and a tail
itself—from here to the moon! That’s why you have the Tools | Create | Arrow command—
don’t choose the command yet; you’ll need to draw the arrowhead first, as covered in the
following tutorial. The best arrowhead should be simple in its construction and needs to be a
single or compound path. Fill makes no difference in creating the arrowhead because a
finished and applied custom arrow style gets its color from the outline color you use on the
selected path in your drawing. The orientation of the arrowhead needs to be in landscape,
too, before entering the Create command. In other words, the top of your custom arrowhead
design needs to face right, not face the top of the page.
To create a new arrowhead and save it, follow these next steps. If you’d like a jump-start,
open Shovel.cdr first. It contains the elements needed to make both a head and a tail.
Drawing, Saving, and Editing an Arrowhead Style
1. Give some thought and planning to what would make a good arrowhead and tail.
Shovel.cdr has a drawing of the business and the user ends of a common garden
shovel. This works for designs of gardens (an arrow pointing to “dig here”), treasure
hunts, and certain civil engineering projects. Allowing about 3" for your symbols to
be used as arrowheads seems to work well and gets you around the need to edit the
size later. When you’ve drawn your arrowhead (a tail is optional for this tutorial),
rotate it so its pointing side faces the right of the drawing page.
2. With the shape selected, choose Tools | Create | Arrow.
CHAPTER 16: Outline Attributes 483
16
Arrow start (first
node on path)
Arrow end (last
node on path)