Hướng dẫn sử dụng Coreldraw x5 - part 51 ppt
Bạn đang xem bản rút gọn của tài liệu. Xem và tải ngay bản đầy đủ của tài liệu tại đây (908 KB, 10 trang )
3. Type a name in the upper-left field for future reference. The Create Arrowhead box
gives you the chance to set a size for the arrowhead; by default, it’s the size you’ve
drawn it on the page. Click OK and your arrowhead is saved to the arrowhead
selector list at the bottom of the list. Possibly you’re done now. Let’s check, before
calling it a day, to see how the arrowhead looks when applied to an open path.
4. With the 2-point line tool, click-drag a two-node path. Straight is good for checking
out the arrowhead, but in the future a curved path can be more visually interesting if
it’s capped off with your work.
5. On the property bar with the path selected, choose the 10 pt outline width so you’ll
have a clear view of the arrowhead you defined (or the shovel head if you used the
Shovel.cdr file).
6. On the property bar, choose the arrowhead from the last node drop-down selector, the
one on the right on the property bar. Let’s suppose you’re not 100 percent happy with the
look of the arrowhead; you’ll now access additional options for modifying the saved
arrowhead. With the path selected, double-click the Outline Color icon (either the pen
icon or the color swatch) on the status bar to display the Outline Pen box. Click the
Options button beneath the thumbnail of your arrowhead and then choose Edit.
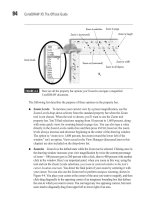
7. Here’s where you can correct a number of problems with your arrowhead; you cannot,
however, edit the path of the arrowhead itself. If, for example, your arrowhead is pointing
the wrong way, you Mirror | Horizontally, as shown in the following illustration. You
also have the option to rotate the arrowhead, for corrective or creative reasons, as well as
484 CorelDRAW X5 The Official Guide
to move the head away from its parent line (the Offset options), and for proportionately
or disproportionately smooshing or stretching the selected arrowhead. If you’ve made a
mistake drawing the arrowhead, you cannot change it in the editor, but instead need to
revise your drawing and then redefine the arrowhead.
8. Click OK to overwrite your saved arrowhead, or rename it to add it to your collection.
The Edit Arrowhead dialog can also be used to modify existing preset arrowheads, but
only to the extent that you’ve just modified your custom arrowhead in step 7. End of
tour!
Here you can see a few uses for a shovel. Don’t hesitate to mix and match outline styles;
in the middle illustration here, a dashed outline style happily coexists with a custom arrowhead.
CHAPTER 16: Outline Attributes 485
16
Move head away
or toward line
Mirror
vertically
Mirror
horizontally
Scale or stretch
Move up or down
relative to line
Live preview
At work
Under construction
Uri Geller was here…
Other Arrowhead Options
While an arrowhead style is applied, other convenient options are available from within the
Outline Pen dialog. Just below each Arrowhead Style selector are two Options buttons.
Click either the start or end buttons to open a drop-down menu that features the following
commands:
●
None Choose this command to clear the arrow style you selected from your path.
This can also be done from the document window using the property bar.
●
Swap This command switches the styles currently selected for the Start and End
arrowheads. This cannot be done, at least not as easily, from the document window.
●
New Choose this command to open the Edit Arrowhead dialog and to create
variation on a default style to add to the existing collection. New does not offer
custom arrowhead creation; you need to use Tools | Create, as you learned earlier, to
make a truly new arrowhead.
●
Delete While an existing style is applied, choosing this command permanently
removes the selected style from the collection.
Setting Corner Shape
Frequently, you’ll create a path whose segments join at a node in a cusp fashion; the
connection is not smooth—for example, a crescent moon shape has a least two “sharp” cusp
connections between path segments. When shapes have discontinuous connections—when a
path abruptly changes direction as it passes through a node—you can set the appearance of
the node connection through the Outline Pen dialog, the only area in CorelDRAW’s
interface that offers these options. Therefore, it’s always a good idea to remember that
double-clicking the Outline box on the status bar is your quickest route to defining how
nodes look as they join two segments. Figure 16-3 shows the visual effect of Square (the
default), Round, and Miter joints on a path that has cusp nodes. Notice that at extremely
sharp node connection angles, the Square joint option produces an area of the outline that
extends way beyond the path, an exaggerated effect you might not always want in a design.
You can use Corner properties creatively to soften the appearance of a node connection
(Round works well) and also to keep a severe cusp angle from exaggerating a connection.
Miter corners can often keep a path more consistent in its width than the default corner can.
Setting Line Cap Shape
Line caps, the beginning and end of an open path, can look like their counterparts, the
corners, covered in the previous section. One of the greatest visual differences you can
create is that the true width of a path is extended using the Round and Extended choices—
the outline width overshoots the true path’s length, proportional to the width you choose for
an outline. Figure 16-4 shows examples of your end cap options.
486 CorelDRAW X5 The Official Guide
CHAPTER 16: Outline Attributes 487
16
FIGURE 16-3 Corners can be set to one of these three styles.
Square (the default)
Round
Miter
FIGURE 16-4 End caps can be set to one of these three styles.
True extent of path (with no outline width)
Square
Round
Extended
Applying line cap options to the end points of an open path affects not only the first and
last nodes’ appearance on an open path, but it also affects dashed and dotted line styles, as
shown in Figure 16-5.
Line cap options control the shape of all end points in an open path simultaneously;
therefore, a compound path receives your choice of end caps at all two, four, six end
points, and so on, depending on the structure of such a compound path. Also, end
caps are not “mix and match”; for example, if you choose Round, both end caps in
a two-node path are rounded—there is no facility in CorelDRAW for a two-node
path that begins Round and ends Square.
Outline Pen Calligraphic Effects
The term calligraphy has come to be accepted today as a handwriting craft, the result of
which is text and ornaments that have a varying width along strokes due to the popular use
of a flat-edged pen nib held at an angle. The same effect can be achieved using the
Calligraphy options in the Outline Pen dialog.
Calligraphic options are applied using a set of options and an interactive preview
window used to define the shape of the nib that affects a path you’ve drawn. Stretch controls
the width of the nib using values between 1 and 100 percent. Angle controls the nib rotation
in 360 degrees (the minimum, –180°, produces the same “12 o’clock” stroke angle as the
maximum, 360°). Click the Default button to reset these parameters to their original state.
Stretch and Angle values work together to achieve the nib shape. Set them numerically by
entering values, or better still, set them interactively, by placing your cursor in the preview
488 CorelDRAW X5 The Official Guide
FIGURE 16-5 Applied line caps will affect the appearance of dash patterns applied to your
outline path.
Square
Round
Extended
True extent of path (with no outline width)
window and then click-dragging to shape the nib. By default, all paths in CorelDRAW are
created using a Stretch value of 100 percent and an Angle value of 0°. As you can see in
Figure 16-6, varying the Stretch and Angle of a calligraphic nib changes the look of an
outline, but the shape you begin with also has an impact on the final look of the design. For
example, these three pairs of interwoven B-spine paths are identical, but the one at left
perhaps is more visually interesting and elegant with its 45° angled nib. The point is that if
you have an object that you think will look more refined and elegant with a calligraphic
stroke, keep changing the angle until you’re happy with the finished artwork.
The Artistic media tool has a Calligraphic style that can be used as a brush; you
just drag on the page, and it immediately produces angled paths. See Chapter 10
for details.
CHAPTER 16: Outline Attributes 489
16
FIGURE 16-6 Calligraphic effects can be used as ornamentations to a piece of work or to
imitate handwritten phrases.
Scaling and Behind Fill Options
Two more options for controlling outline properties available in the Outline Pen dialog are
very important for controlling how outlines display in particular design situations. The
following sections explain how Scale With Image and Behind Fill work.
Scale With Image
Choose Scale With Image to increase or decrease the outline width applied to an open path
or closed object when you scale the object at any time after the outline width has been
applied.
For example, a 2-point outline width applied to a path will become 1 point if the object
is scaled in size by 50 percent. In most illustration work, where drawings commonly change
size before they are complete, choosing this option is a smart move. However, if you leave
the scale constant (leave Scale With Image unchecked), you can duplicate, for example,
50 stars, arrange them on the page at different sizes, and the design looks good because the
outline width is consistent from star to star. The illustration here shows copies of a pretzel
shape reduced with and without the Scale With Image option selected. If this were a drawing
of a salted pretzel, the one in the center—Scale With Image—would be less likely to cause
high blood pressure and other heart risks if eaten by a drawing of a person.
Behind Fill
Behind Fill sets outline properties to print and display in back of the object’s fill. One of the
many practical uses for using Behind Fill is in a sign or other simple illustration where you
need rounded corners along the outline, but sharp and crisp edges along the fill, the important
and recognizable part of many illustrations. Next you can see at left the ubiquitous recycle
symbol with a 16-point rounded-corner outline. The arrows are lost in the design. However,
at right, a 32-point outline is used with Behind Fill checked in the Outline Pen dialog.
Therefore, the same outline width has been achieved (visually); however, because the outline
490 CorelDRAW X5 The Official Guide
Original object
Reduced without the
Scale With Image option
selected
Reduced using Scale
With Image option
is behind the fill, the points on the arrows are undistorted, even in weight, and will print
crisply.
CHAPTER 16: Outline Attributes 491
16
16-point outline in front of
fill; most edges are soft.
32-point outline behind fill;
edges are crisp and detailed.
Setting the Outline for All New Objects
Each time you create a new object, CorelDRAW automatically applies a set of default
outline properties, as follows:
Width = 0.5 point
Color = CMYK black (from Corel’s default custom palette)
Style = Solid line
Corners and Line Caps = Square
Calligraphy: Stretch = 100%, Angle = 0º
Behind Fill, Scale With Image = Off
To change any or all of these default properties, open the Outline Pen dialog (
F12)
while no objects are selected.
By choosing Graphic, Artistic Text, or Paragraph Text, you can control the
defaults for new objects. Unless you have a specific reason for changing the default
outline properties of text objects, it’s wise to accept Graphic as the object types to
apply, and then to click OK to proceed to the Outline Pen dialog to change the outline
pen defaults.
Turning an Outline into an Object
A fancy calligraphic property for an outline, arrowhead, and even for dashed outlines can be
freed from being non-editable outline properties when you convert an outline to an object.
Consider this: an outline is constrained to solid fills, while an object that looks like an
outline, that was originally based on an outline, can have any type of CorelDRAW fill. To
make an outline into a shape, you choose Arrange | Convert Outline To Object—but this will
disturb your workflow less if you perform this on a copy of the path you slaved over! In
Figure 16-7 you can see the command on the Arrange menu (the shortcut is similar to
492 CorelDRAW X5 The Official Guide
FIGURE 16-7 Convert a path to an object, and all outline properties become editable objects.
Convert To Curves; it’s CTRL+SHIFT+Q). This path is fully loaded, using a calligraphic nib, a
dashed line, an arrowhead, and a tail. It is about to become a shape that’s freely editable with
toolbox tools and that will accept all of CorelDRAW’s effects such as contours and fountain
and texture fills; even the Extrude tool can turn this shape into elegant, abstract, bizarre
artwork.
In Figure 16-8 you can see at left that the path of Figure 16-7 is now a shape that will
take, in this example, a linear style fountain fill—in contrast, you can’t fill an open path. See
also in this figure that the arrowhead path that’s now a shape can be extruded. To come full
circle, the new object based on the path can have an outline; in this figure at right a black
outline behind the fill is used artistically to visually separate the linear fill areas.
This chapter has taken you from simply assigning one property to a path, to using
several, more complex properties. As you gather more understanding of options in
CorelDRAW, you add to your personal, creative wealth of design options. Dashed lines,
arrowheads, and calligraphic strokes will come to your rescue during 11
th
-hour assignment
crunches, just as will other features that have been covered in previous chapters. Chapter 17
takes a side-step from object creation to defining a color for that object you just created.
You’ve probably read things on digital color theory, but the following chapter puts theory
into practice.
And practice makes perfect.
CHAPTER 16: Outline Attributes 493
16
FIGURE 16-8 If you need to edit certain areas of a fancy outline, you can do it more easily and
more precisely by first turning the outline into an object.