Hướng dẫn sử dụng Coreldraw x5 - part 62 pdf
Bạn đang xem bản rút gọn của tài liệu. Xem và tải ngay bản đầy đủ của tài liệu tại đây (973.71 KB, 10 trang )
To apply the effect using the Envelope docker, follow these steps.
Creating Envelopes via the Docker
1. Create or import an object, select it, and then open the Envelope docker (CTRL+F7).
2. Click the Add Preset button; notice how the preset selector window fills with
thumbnails of the presets. Choose one (try the heart shape) by clicking the
thumbnail; you can see a dashed outline preview surrounding your object on the
page. You could click Apply to apply the preset, but don’t do that right now.
3. In any direction, drag a node on the envelope bounding box surrounding your object.
Depending on the preset shape, you can also drag a direction handle—straight line
presets don’t have node direction handles, but curved objects such as the heart do.
Notice that the Apply button is now dimmed; when you edit a preset bounding box,
CorelDRAW assumes you’ve accepted the preset shape, so there’s no fussing with
the Apply button.
4. The Reset button does not reset the preset object; instead, it calls the last-used
preset. If you want to clear the envelope now, notice that the property bar features
the Clear Envelope button and other options as long as the docker is onscreen.
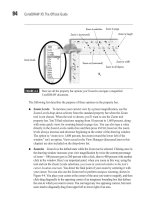
594 CorelDRAW X5 The Official Guide
FIGURE 20-2 The Envelope docker lets you select options before they are applied.
Create From
Preset selector
Mode buttons
Mapping options
Envelope Tool Cursor States
By following either of the previous tutorials, you’ll have noticed your cursor changes its
look, as shown next. These cursor states are visual signals that you’re about to edit the
envelope in different ways, depending on what part of the envelope your cursor is over.
While you’re shaping your envelope, the cursor becomes active. But when your cursor is
held over envelope nodes or segments (the dotted lines surrounding your envelope object),
the Shape tool takes over, letting you change the position and properties of the nodes and
segments by click-dragging (see Figure 20-3).
Ill 20-4
You don’t necessarily have to reach for the Envelope tool to edit an enveloped object.
You can use the Shape tool, and as you can see in the previous illustration, the Envelope
tool’s cursor looks exactly like the Shape tool’s default cursor when it’s over an envelope
segment or node. When you’re repositioning or changing the property of envelope nodes,
CHAPTER 20: Envelope and Distortion Effects 595
20
Envelope tool cursor
Cursor over a nodeCursor over a segment
FIGURE 20-3 The Envelope tool has these three cursor states.
While held over node
Envelope tool
cursor, default state
While held over segment
Group of 419 Objects, No Seeds
your cursor looks like the Shape tool’s reposition cursor—indicating the node can be moved,
and that you can use the property bar’s envelope node tools to convert, for example, a
smooth envelope node to a cusp node. When held over an envelope segment, your cursor
will change into the Shape tool with a tiny curved-line symbol, indicating the segment can
be edited. Using either cursor immediately alters your envelope, but editing envelope curves
can be done only while the Unconstrained Envelope mode is selected.
For speedy envelope editing, use the Pick tool to double-click any object that has an
envelope. The enveloped object is immediately available for editing, and surprise,
the Pick tool is now the Envelope tool. A single click with the Shape tool also opens
an enveloped object for editing.
Choosing an Envelope Mode
The envelope mode you choose has no initial effect on the envelope you apply to an object;
however, as you begin to move envelope nodes, the mode of the envelope offers features or
limitations, depending on what it is you want to accomplish. Depending on the mode, corner
and segment nodes take on different properties, which result in different capabilities to edit
the envelope, as seen here:
Ill 20-5
At any time while editing an envelope, you can change its mode just by clicking a
button on the property bar. This capability gives you control over the overall shape
you’re trying to create. Any previous mode limitation is inherited with existing
nodes, but nodes you’ve not changed inherit the new node property. For example,
suppose your envelope is in Double Arc mode, and you drag a node to make a
swooping arc, and then you click the Straight Line mode button on the property bar.
The arc remains an arc, but all the other nodes can now only be edited as
connectors to straight lines.
596 CorelDRAW X5 The Official Guide
Straight Line
Single Arc Double Arc Unconstrained
These modes have the following effects during shaping operations:
●
Straight Line This mode (the default) causes envelope segments to be straight
lines; in effect, you’re manipulating an eight-point polygon when the envelope is in
Straight Line mode. Dragging an envelope node creates a different polygon object,
and this mode will serve you well for imitating the shape of a traffic sign, a simple
house shape, and other outlines you create with straight line segments. In this case,
all node positioning is constrained to vertical and horizontal position changes.
●
Single Arc This mode sets the resulting envelope segments to curves, sets side
nodes to smooth nodes, and sets corner nodes to cusp nodes; you can’t change the
angle of the cusp for corner nodes directly, but you do change it when you reposition
a side envelope node. When you’re using this mode, dragging corner nodes creates a
curved side on the envelope, while side nodes align with the path of the resulting
curve. Node movement is constrained to vertical and horizontal movement, while
side nodes can be moved independently of corner nodes.
●
Double Arc This mode creates the effect of sine-wave-shaped sides. Behind the
scenes, corner points become cusp nodes, while side nodes become smooth nodes.
However, the curve handles of side nodes remain stationary in relation to the nodes,
causing the segments to take on a double-arc shape. The same vertical and horizontal
constraint restrictions as with the previous modes apply. Side nodes may be moved
independently of corner nodes, but they apply a similar curve effect, as with the
Single Arc mode.
●
Unconstrained The Unconstrained mode gives you complete control over nodes,
segments, and control handles for envelope elements; it’s probably the mode of
choice for ambitious enveloping artists. You can position either side or corner nodes
as if they were ordinary vector path object nodes. In this mode, the Envelope tool
gives you unlimited flexibility (you can severely reshape objects), and nodes can be
dragged in any direction to shape the envelope in any way. Unconstrained mode also
provides the options to add or delete nodes, change any line segment state to straight
or curved, or to change the properties of nodes to Cusp, Smooth, or Symmetrical
using property bar buttons for these tasks.
CHAPTER 20: Envelope and Distortion Effects 597
20
Ill 20-6
Saving and Applying Envelope Presets
The property bar Preset list (shown in Figure 20-4) contains saved presets and options for
applying, adding, and deleting preset envelope objects.
You can add a shape you’ve created as a new envelope object, and delete presets from
the list using the Add Preset (+) and Delete Preset (–) buttons. It’s best to create an envelope
598 CorelDRAW X5 The Official Guide
Straight Line
Single Arc
Double Arc
Unconstrained
FIGURE 20-4 Use the property bar Preset list to access saved presets.
Preset List
Click to add new
envelope shape.
Click to delete
selected preset
in list.
object from one, single path (no sub-paths). An object with a hole in it, for example, will
produce an envelope that’s unusable except for abstract artwork. For hands-on, truly warped
experience, follow these steps.
Creating and Using an Envelope Preset
1. Create a simple closed path you think would make an interesting envelope; an egg
shape would work well, for example.
2. Choose the Envelope tool and notice that the property bar now features envelope
options.
3. To add the shape of your object to the Preset list, click the Add Preset (+) button on
the property bar. The Save As dialog opens with the Save As Type drop-down menu
automatically listing preset files. Enter a name for your new preset. CorelDRAW
will automatically append the name with the .PST file extension; then click Save to
add it to the list.
4. To apply your new preset, create an object (it shouldn’t look like your new preset
envelope) or a group of objects, and then choose your new preset from the list
selector. The new envelope is applied.
5. To delete an envelope shape from the Preset list, make sure no objects are selected
(it helps to switch to the Pick tool and then back to the Envelope tool), and then
choose a saved preset from the list selector.
6. With the preset selected, click the Delete Preset (–) button. Confirm your delete
action in the prompt dialog that appears and your preset is deleted.
Choosing Envelope Mapping Options
You have envelope mapping options both for the Envelope docker and while using the Envelope
tool and property bar options, which offer control over how the shape of an envelope changes
your object’s shape (see Figure 20-5). As you can see, Original and Putty mapping provide
almost identical results for this particular group of objects and the envelope shape used here, but
Horizontal and Vertical Mapping afford the design opportunity to ignore the other envelope axis
(Horizontal Mapping ignores the vertical aspect of the envelope, and vice versa). This is useful
when you want limited distortion of an envelope but don’t have the time (or need!) to create a
unique envelope for several different design purposes.
CHAPTER 20: Envelope and Distortion Effects 599
20
Mapping options give preference to the shape of your original object’s node positions
and path shapes. Four types are available: Putty (the default), Horizontal, Vertical, and
Original, as shown here:
Ill 20-7
The four envelope mapping options, plus a special option for text and another to
preserve lines, are worthy of explanation here:
●
Putty This option (the default) distorts the shape of your object to match the
envelope as closely as possible; the envelope’s nodes are given priority over the
nodes in your object being enveloped. The Putty option maps the envelope shape to
your object and results in a smoothly mapped effect.
●
Horizontal This option maps the lines and node positions in your original object
to match the horizontal shape of the envelope, without significantly altering the
vertical shape of the original object.
600 CorelDRAW X5 The Official Guide
FIGURE 20-5 This object group uses the same envelope but different mapping options.
Original shape
Envelope shape used
Horizontal map
Original map
Putty map
Vertical map
Mapping Options
Keep Lines Option
●
Vertical This option maps the lines and node positions in your original object to
the vertical shape of the envelope, with the horizontal shape mostly ignored.
●
Original This mapping type is similar to Putty. The main difference is that
Original maps only the outer shape of your original object to the envelope shape.
Corner nodes are mapped to the corner nodes of your original object’s shape, while
node positions and line shapes toward the inside of your object are mapped using an
averaging value. The result can be less distortion. If Putty mode is too severe, try
Original.
●
Keep Lines Using this option changes only the node positions in your object to
match the envelope shape being applied, leaving any existing straight lines
unaffected. If your object is already composed only of curved lines, choosing Keep
Lines has no effect, as shown at right in Figure 20-6, which looks like Keep Lines
has been turned off. While Keep Lines is not selected (the default), all node
positions and lines in your original object are reshaped to match the envelope
object—even if this means changing straight lines to curved lines.
●
Text This option becomes available as the only mapping option when a paragraph
text object frame is selected. Text mode applies an envelope to the frame properties
of a paragraph text object; the actual text and line of text are not distorted. This
feature presents a wonderful opportunity to walk through a tutorial.
CHAPTER 20: Envelope and Distortion Effects 601
20
FIGURE 20-6 The Keep Lines option changes node positions but not any straight lines in the
target object to match the envelope shape.
Envelope shape
Original shape
Keep Lines selected Keep Lines not selected
Keep Lines selected, but all
lines are set to be curves
In the next set of steps, you’ll use the Violin.cdr file, which contains a silhouette drawing
of a violin and a block of paragraph text attributed to Wikipedia. Your task is to fit the text
inside the profile of the violin drawing. It’s a class act, and this technique can be used for
scores of designs. Especially music scores.
Creating a Text Envelope
1. In the Violin.cdr document, choose the violin object with the Envelope tool.
2. On the property bar, click the + sign to the right of the Preset list. In the Save As
box, save the custom envelope with an obvious name such as Violin.pst. Click Save
to save and exit the box.
3. Select the block of paragraph text with the Envelope tool. Click the Preset list and
then choose Violin from the list.
Ill 20-8
602 CorelDRAW X5 The Official Guide
4. The edge of the newly enveloped text is going to look a little busy with the text
offset margin and the envelope path around it; no big deal—choose the Pick tool (the
envelope outline disappears), and move the text to fit over the violin drawing.
5. The “fit” is not perfect because the envelope effect is distorting the dimensions of
the paragraph text block (but not the text itself) to match the proportions of the
violin. Click-drag the object selection handles, and adjust the text so it fits neatly
within the violin drawing.
6. With the Text tool, insert your cursor at the beginning of the paragraph, and then press
ENTER to kick the text down so none of it is in the neck of the violin, which looks
awkward, reads terribly, and makes it hard to play the instrument. See Figure 20-7
as a reference for where your composition should be now.
7. Optionally, choose a more elegant typeface than Arial. Select the text with the Pick
tool, and then on the property bar choose a font you have installed. Figure 20-8
shows Bernard Fashion used. End of exercise, pretty fancy graphic use of the
Envelope tool!
CHAPTER 20: Envelope and Distortion Effects 603
20
FIGURE 20-7 Perform a little manual editing to make the envelope text fit within the violin
drawing.
Scale envelope to
fit within violin
Force text lines down using Text tool