Hướng dẫn sử dụng Coreldraw x5 - part 63 pdf
Bạn đang xem bản rút gọn của tài liệu. Xem và tải ngay bản đầy đủ của tài liệu tại đây (885.39 KB, 10 trang )
Constraining Single Arc Envelopes
Modifier keys offer valuable ways to constrain the shaping of an envelope while using
Single Arc mode. By holding key modifiers, you can quickly shape two sides concentrically
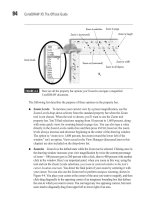
or simultaneously. Hold
SHIFT and drag any side or corner node to have the corresponding
node on the opposite side move in the opposite direction. Hold
CTRL to move the corresponding
node on the opposite side of the shape in the same direction and by an equal distance, as
shown in Figure 20-9.
604 CorelDRAW X5 The Official Guide
FIGURE 20-8 Create an elegant symbiosis of text as a graphic combined with a simple
CorelDRAW drawing.
Using Envelope Shapes Between Objects
You can copy single-path objects—and even other envelopes—that already exist in your
drawing, and use them as envelopes. The commands for these operations are available from
the Effects menu and by using the shortcut buttons in the property bar when the Envelope
tool is selected.
Ill 20-9
Copying Properties from Other Envelopes
If you’ve taken the time to create an envelope effect but you’ll only use it a few times so it’s
not worth creating a preset, you can copy its properties to another object using the Copy
Envelope Properties command. To copy an envelope’s properties, try the following steps.
CHAPTER 20: Envelope and Distortion Effects 605
20
FIGURE 20-9 By holding key modifiers, you can shape two sides either in the same direction
(concentrically) or in opposite directions.
Two sides shaped in equal
but opposite directions
Original object shape
Hold
SHIFT as the modifier
key while dragging.
Two sides shaped to equal
values in the same direction
Hold
CTRL as the modifier
while dragging.
Copy Envelope Properties
Create Envelope From
Clear Envelope
Envelopes Based on Existing Envelopes
1. Select the object you wish to apply the envelope shape to, and choose the Envelope tool.
2. Click the Copy Envelope Properties button in the property bar. Your cursor will
change to a targeting cursor.
3. Click to target the object with the applied envelope effect you wish to copy. The
envelope effect is immediately copied and applied to the new object, as shown here:
Ill 20-10
If the envelope effect you need to copy from is on a different page of your document,
try dragging a copy of the object onto the desktop (the pasteboard outside the
document page). You can copy envelope shapes from the desktop.
Creating Envelopes from Objects
Creating envelope shapes from existing objects is another common operation that enables
you to create and apply new envelope shapes based on the targeted object’s shape. The steps
are shown left to right here:
Ill 20-11
606 CorelDRAW X5 The Official Guide
Original object
Envelope shape targeted
New object with envelope applied
Envelope positioned
(drag control node a little)
Envelope shape
copied from object
Shape with envelope
based on object
Unlike using the Copy Envelope Properties feature, copying a shape to apply to a different
object as an envelope requires a little additional step. First, you target the object to be enveloped
using the Envelope tool. Click the Create Envelope From button on the property bar, click
the source object, and then a preview of the envelope shape appears around the target object.
It doesn’t actually transform until you drag one of the control nodes just a little, or click an
envelope path segment; then the target object transforms.
Clearing an Envelope Shape
Removing an envelope effect from an object is a quick operation. If you applied envelope
effects in succession, all shaping can be removed at once. To remove an envelope effect,
select the object bound to the envelope effect, and choose the Envelope tool. Click the Clear
Envelope button.
The Clear Envelope command is also available by choosing Effects | Clear Envelope.
Copying Envelopes with the Attributes Eyedropper Tool
You can copy applied effects (including envelopes) from one single object (not grouped
objects) to another by using the Attributes eyedropper tool. To do this, have both the objects
in view. Got ’em? Follow these steps:
1. Choose the Attributes eyedropper tool from the toolbox.
2. On the property bar, click the Effects button, select the Envelope check box in the
list, and then click OK.
3. Click the object currently applied with the envelope effect you want to copy using
the Attributes eyedropper tool cursor to sample its properties.
CHAPTER 20: Envelope and Distortion Effects 607
20
Ill 20-12
4. Click the object you want to apply the effect to.
You can apply several instances of an envelope, an envelope enveloping an
envelope, and so on, if you need a truly gnarly effect. After you’ve sampled the
envelope, click the cursor over the target object three or four times until your
laughter subsides.
Mastering Distortion Effects
Distortion effects apply complex math to the curve paths that make up your object. But
artists don’t need to know what’s under the hood in order to take advantage of these
wonderfully intricate equations and to produce outstanding and very naturalistic artwork.
608 CorelDRAW X5 The Official Guide
The Distort tool and options are also dynamic, which means they create distortion without
ruining your original. Distortion properties can be edited at any time. Your custom distortions
can be saved as presets, and they can be cleared from your object, just like with envelopes.
Distortion effects also change your object without affecting its other properties such as
outline width and fill. Using distortion, the curve values and node properties are dramatically
changed, and the more complex your object is to begin with, the more dramatic the distortion
effect will be. Adobe Illustrator users will feel right at home; although distortions are similar
to Punk & Bloat, they go beyond this effect in variety and complexity, and when you’re using
CorelDRAW distortions, you can restore your objects at any time. Distortion effects are great
for a number of illustration challenges, including simulating organic-type effects, as shown
in Figure 20-10. Believe it or not, the simple star shape at top left was used to generate the
primitive cave scrawling. You can create flower shapes, zippers, swirly galaxies in space—not
even the sky’s the limit.
CHAPTER 20: Envelope and Distortion Effects 609
20
FIGURE 20-10 These primitive drawings were created by applying the Distort tool effects.
Using the Distort Tool and the Property Bar
Apply your distortions using the Distort tool, shown next, which is found in the toolbox
grouped with other effects tools and is used together with these property bar options.
Ill 20-13
You’ll notice three distortion modes: Push And Pull, Zipper, and Twister. With each
mode, a different set of parameters is available. Amplitude and Frequency values can be
varied in combination with certain other options (covered next) controlled interactively or by
setting values on the property bar. Let’s first look at the property bar when one of the modes,
Zipper distortion, is chosen. All three modes offer slightly different options; by reviewing
Zipper mode, you’ll get a handle on many of the options.
Ill 20-14
610 CorelDRAW X5 The Official Guide
Distort tool and cursor
Property bar options for distortion
Preset Controls
Push/Pull
Center
Distortion
Copy Distortion
Properties
Zipper
Twister
Amplitude
Frequency
Add New
Distortion
Random
Distortion
Smooth
Distortion
Local
Distortion
Convert
To Curves
Clear
Distortion
(This originally
was a circle.)
Choosing Distortion Modes
If you’ve tried using this effect, even just a little, you probably have a newfound
appreciation for “steering” this effect—it’s akin to slipping into a Ferrari right after your dad
took the training wheels off your bike. However, chin up, examples and explanations for this
powerhouse of an effect follow, and as you read on (and get hands-on), the Distort tool will
grow on you, and the intimidation factor will dwindle.
During a distortion session, interactive markers provide much of the control over this
effect. Interactive markers vary by the mode selected. The distort modes are covered in the
sections to follow in digestible, easy-to-assimilate, fun-size servings.
Push and Pull Distortion
Push and pull distortions can inflate or deflate the slope of your object’s curves by
amplitude. The amplitude value affects the extent of the effect, sloping the curves of paths
from an object’s original path from shallow at low settings to severe at high settings.
Amplitude can be set from 200 to –200 percent. Negative values cause the effect to
distort the path away from the center origin of the object, which creates the “push” condition
of the distortion. Negative values (which you can also define interactively with the Distort
tool—it’s fun and creatively therapeutic) can be used to illustrate flower petals, a cartoon
splash into a pond, a thought balloon—all beginning with a rectangle object. Positive
amplitude values cause the effect to be distorted toward the object’s center origin, the “pull”
condition. Again, if you use a rectangle as the target object, you can almost instantly produce
anything from a diner sign from the 1950s, to a sleek, aerodynamic auto or airplane, to a nice
3D visualization of a TV tube viewed in perspective. The amplitude of 0 has no distortion.
Figure 20-11 shows the effects of both negative and positive Push and Pull amplitude settings.
CHAPTER 20: Envelope and Distortion Effects 611
20
FIGURE 20-11 Amplitude can be set from 200 to –200 percent. But a little goes a long way!
Push and pull at
positive amplitude
Original rectangle
Push and pull at
negative amplitude
Zipper Distortion
Zipper mode distorts the paths in your object to resemble a zigzag or stitching pattern. Here,
amplitude can be set between 0 and 100 percent and can be used together with a frequency
value and options for Random, Smooth, or Local distortion, as shown here:
Ill 20-15
Interactive markers are made up of an outer marker controlling the amplitude and a
slider controlling frequency, which enable you to set the number of zigzags within a given
distance. Both can be set within a range of 0 to 100 percent. You can see the dramatic effects
of various amplitude and frequency values while applying a zipper distortion in the next
illustration. When beginning to work with the distortion effects, you might prefer to use only
the property bar to define an effect, but as you grow more comfortable with distortion, you’ll
surely want hands-on control by dragging the control handles directly with your cursor.
Ill 20-16
After the effect has been created, you can slant the zipper line by dragging the Start
handle left or right, as shown here:
Ill 20-17
612 CorelDRAW X5 The Official Guide
Zipper Mode
Amplitude
Frequency
Smooth Distortion
Random Distortion
Local Distortion
Amplitude: 29
Frequency: 19
Amplitude: 38
Frequency: 35
Amplitude: 47
Frequency: 55
Distort effect controls
Start handle
Slider controls
frequency
End direction
handle controls
amplitude
Move Start handle left or right.
You can invert the direction of the zigzags on a line or closed shape by repositioning
the control handles for the effect. For example, begin by placing the Start and End
handles so they bisect the line that is affected. Then arrange the handles so both the
Start and End handles are above the line; notice where the peaks and valleys are on
the line. Now move the Start and End handles so they’re below the affected line.
You’ll see that where there were peaks there are now valleys, and vice versa.
In addition to amplitude and frequency, three additional options are available for setting
the shape and size of the zigzags. Each can be toggled on or off, so you can mix and match
to create the following effects:
●
Random Choosing the Random option causes the zigzag Zipper distortion on your
object’s path to vary randomly between the current Amplitude values and zero. This
creates the appearance of nonrepeating frequency and varied wave size, creating an
uncontrolled distortion appearance. In this illustration you can see two examples of
Random set at 25 and then at 74. Notice where the interactive frequency marker is
on the controls just above each object. You can slide this marker instead of entering
values on the property bar.
Ill 20-18
●
Smooth While the Smooth option is selected, the cusps of the zigzag Zipper
distortion become rounded, instead of the default sharp corners normally seen. This
is a great option if you need to simulate sound-wave frequencies and equipment
monitors in hospitals. The next illustration shows constant (Random is toggled off)
Amplitude and variations in Frequency when the Smooth option is active.
CHAPTER 20: Envelope and Distortion Effects 613
20