Hướng dẫn sử dụng Coreldraw x5 - part 68 docx
Bạn đang xem bản rút gọn của tài liệu. Xem và tải ngay bản đầy đủ của tài liệu tại đây (749.9 KB, 10 trang )
Fill Color
If you want to wow your audience, definitely play with Fill Color to create significant
changes along the steps of a contour. If an object doesn’t have a fill, although you can set a
contour color, the contour will not have a fill. This creates an interesting effect if you have
outline width and colors applied to the base object, but with no fill and no outline set for the
base object to which you want to apply a contour, it’s an exercise in artistic futility. To set
the fill color, click the Fill Color selector and choose a color.
Although base objects cannot have a transparency effect in place when you use the
Contour tool, you can do some interesting things if you first create a contour, break
it apart (
CTRL+K), and then apply the transparency effect to the group of objects
that used to be a dynamically editable contour. Try using Uniform transparency at
about 90% in Xor mode on a group of 10 to 20 objects. Without a lot of preplanning,
you can easily generate a color palette simply by experimenting.
Creating Special Effects with Contours
Because contour intermediate steps travel concentrically from the control object to the end
of the effect, you can accomplish certain things that would take hours or perhaps not be
possible using other tools and effects. For example, a blend effect is simply the wrong tool
choice when you want interior shading in an object, because when you scale an irregularly
shaped object (such as the letter Q), it scales disproportionately. As a result, when you
blend, say, a Q to a smaller Q you’ve centered inside the larger Q, the intermediate blend
objects scale different areas disproportionately. Therefore, a key to creating smoothly shaded
objects is to use a contour effect with many steps and a small Contour Offset value. Here’s
an example recipe: with the Artistic text tool, type the letter Q (uppercase), choose a bold
font such as Futura, use black as the Fill Color, and make it about 200 points in height. With
the Contour tool, choose Inside Contour on the property bar, set the Contour Offset to about
0.001", create about 150 steps, and choose white as the fill color. The result is a very
smoothly shaded piece of artwork that will print beautifully with no banding, because 150
intermediate steps from black to white within relatively small objects is just about the upper
limit for laser printers and most inkjet printers.
Grayscale images—those composed only of shades of black—are usually written to
an image file format such as BMP and TIFF as 8-bit-per-pixel images. Eight bits of
brightness values yield 256 possible shades from black to white, and this number is
a good one to remember when you want to create smooth transitions with the blend
and contour effects. In theory, you should see no banding in contour steps if you
use 254 steps between a white and a black object of small size on your page. The
greater the distance between blend and contour effect objects, the greater the
chance you’ll need to increase the number of steps, but 254 is a good bench value
to begin your work with if a smooth transition is your goal.
654 CorelDRAW X5 The Official Guide
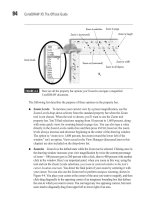
However, a smooth contour transition might not always be your artistic goal; by using
no fill but only an outline width on objects, a small number of steps, and a relatively high
Contour Offset value, you can indeed design topographic maps, magnetic fields, and other
illustrations in the technical vein. In Figure 21-29 you can see an object with the top edge
suggesting a landscape—created by using the Roughen brush. The contour objects are white
lines, they have a high Contour Offset value so they’re clearly visible, and then the Effects |
Add Perspective command was used to suggest contour effects that have depth in the illustration.
The text also has a contour effect; a Linear transparency was then added from top to bottom.
Fountain Fill Color
Contour effects also support the use of certain fountain fills in linear, radial, conical, and
square modes. If you’ve applied a fountain fill to your original object, the color fill properties
of the contour group are also applied with the same fill type. If you’ve contoured an object that
has a fountain fill, use the property bar to set the last color in the Contour fountain fill; if the
fountain fill uses multiple colors, the Contour fountain fill ignores the transition colors. If an
object doesn’t include a fountain fill, the color selector on the property bar is unavailable.
CHAPTER 21: Blends and Contours 655
21
FIGURE 21-29 Make smoothly shaded contour effects or make the effect obvious; the
technique you choose depends on the illustration assignment.
Copying and Cloning Contour Effects
You can also copy and clone contour effects to other objects, just as with blends as discussed
earlier. To perform either operation, the effect you want to copy or clone must be in view on
your screen at the same time as the object to which you want to copy or clone the effect. To
copy an existing contour effect to your selected object while using the Contour tool, first
click a target object to which you want to copy the effect. Then click the Copy Contour
button on the property bar, and use the targeting cursor to click an existing contour effect.
You can also use the Attributes eyedropper tool when you’ve checked the Blend entry in the
Effects drop-down list on the property bar. While using the Pick tool, select the target object
first, and then choose Effects | Copy Effect | Contour From, and use the same targeting
operation. To clone a contour effect to a selected object, use the Pick tool and choose Effects
| Clone Effect | Contour From, and target the existing effect.
Controlling Contour Acceleration
Just like blends, Contour Acceleration options have the effect of either increasing or
decreasing the rate at which the contour group objects change shape (and color) as they
progress between the control object and the final object. You can choose Object and Color
Acceleration options on the property bar when a contour effect object is selected in the
drawing window. When a default contour is applied, both these settings are at a default
midpoint—the contour objects change in color and size evenly. Change both acceleration
rates simultaneously (the default) while the two options are linked, or change them
individually by clicking the unlink acceleration (lock icon) button, shown here.
Ill 21-13
To access acceleration options, click the Object And Color Acceleration button in the
property bar, and adjust the slider controls and/or choose the unlink acceleration button.
Moving sliders to the left of the center position reduces (or slows) the acceleration rate
between the control object and the final contour in the effect. Moving sliders right increases
the acceleration. While the two acceleration options are unlinked, changing the object
acceleration affects only the progression of shapes in the contour group. Figure 21-30 shows
the effects of increasing and decreasing acceleration.
When the Object Acceleration slider is unlinked, changing the Color Acceleration
affects only the change in progression of the fill and outline colors between the control
656 CorelDRAW X5 The Official Guide
Click to unlink Object and
Color Acceleration sliders.
object and the final contour in the effect, leaving the object shape acceleration unchanged.
Moving the sliders (or interactive markers) left or right increases or decreases acceleration
between the control object and the final contour. Figure 21-31 shows the results of changing
the Color Acceleration rates while unlinked from the Object Acceleration values.
CHAPTER 21: Blends and Contours 657
21
FIGURE 21-30 Acceleration rates can dramatically change the look of an object that has a
contour effect.
Object Acceleration increased,
slider moved right of center.
Object Acceleration decreased,
slider moved left of center.
FIGURE 21-31 Acceleration rates are unlinked; you can increase and decrease the
illustration’s contrast by changing only the Color Acceleration.
12 contour effect steps;
default Color Acceleration
The same 12 contour steps;
Color Acceleration increased,
slider moved right of center
The same 12 steps; Color
Acceleration decreased,
slider moved left of center
Changing the Color Acceleration also affects the color properties applied to outline
paths of objects.
Using Contour Presets
Up to this point, you’ve learned about the effects of changing contour direction, steps,
offsets, color rotation, and pen and fill colors of applied contour effects. Next, it’s only
natural to save your efforts as presets to apply to other existing contours using the Presets
options, as shown here:
Ill 21-14
Contour presets are used in the same manner as other preset effects. Contour presets can
be saved and quickly reapplied to different objects.
Using the Contour Docker
Although the Contour tool is the most intuitive way of applying contours, you can still apply
them using the old Contour docker as an alternative.
To open the Contour docker, shown next, choose Effects | Contour, or choose Window |
Dockers | Contour (
CTRL+F9). The Contour docker is organized into three areas accessed by
clicking buttons for Steps, Color, and Acceleration. The docker’s options are organized a
little differently than on the property bar, but the same options are found here. One advantage
to using the docker is that as with the Blend docker, you can choose all your options before
applying them.
658 CorelDRAW X5 The Official Guide
Contour preset list
Click to add selected
contour effect as preset.
Click to delete selected
contour preset from list.
Ill 21-15
In this chapter you’ve seen where to find the options for controlling and customizing
blends and contours, so you know where things are, but as with operating heavy machinery:
●
You don’t take prescription medicines an hour before beginning.
●
You turn the key and the real fun begins!
Dig into blend and contour effects; add shading to simple objects to make workaday
illustration work an inspiring endeavor and to reap the reward of the automation that’s
possible within CorelDRAW. You can knock off 20 signs an hour using these effects instead
of only two or three. Don’t forget, either, that you can break these effects into groups
(
CTRL+K), ungroup the objects (CTRL+U), and rearrange the objects to suit your specific
assignment. Blends and contours are one of the best ways to generate scores of similarly
shaped objects, so fill your page with tiny drawings to make patterns, charts, you name it.
Chapter 22 continues with a survey of CorelDRAW effects, turning now to applying
photographic qualities to your drawings through transparency, shadows, glows, and lens
effects. Bring along some drawings you want to spruce up, and also bring your thinking cap.
Specifically, your lens cap.
You can groan now…
CHAPTER 21: Blends and Contours 659
21
Steps
Color
Acceleration
This page intentionally left blank
CHAPTER 22
Lens Effects,
Transparency, Shadows,
Glows, and Bevels
661
W
hen you need something more than distortions, blends, and contours, but your
design doesn’t require a full-blown 3D extrude look, elements of photorealism can
push a design in your intended direction. This chapter takes a look at automated—and a
few manual—techniques you can use to add shadows, an engraved look, and reflections
and highlights to a composition. You’ll also learn to use the Lens docker, a device for
color correcting both vector and bitmap artwork. Many looks you’d like to achieve that
use transparency, or a distorted, colored look through a virtual camera lens are easily
accomplished with lens effects. The only hard part is deciding what type of effect works
best in your illustration!
Download and extract all the files from the Chapter22.zip archive to follow the
tutorials in this chapter.
What’s Behind a Lens Effect
Looking at your drawing with a lens effect object resting above it is like looking through a
window or a magnifying glass. What you see through the lens effect object is influenced by
the properties of the glass. For example, tinted glass in the real world makes objects in the
distance appear darker—this phenomenon can be easily simulated by using the Color limit
lens applied to a 50% black object.
The remarkable thing about lens effects is that this feature doesn’t care whether a lens
effect object is over a vector drawing or a bitmap—you’ll get the same results. One of the
more popular uses of this feature is to partially overlap a shape possessing a lens effect over
a drawing area, to see affected and original areas at once. In addition to putting a lens effect
shape over a drawing area, you can freeze the lens object, capturing whatever’s underneath
the lens, and then move the lens object around, retaining the original view within the object.
Using the Lens Docker
Later in this chapter the Transparency tool is covered; this tool can create wonderful shading
effects, and its function slightly overlaps some of the lens effects features. Let’s start with
the easier of the two effects, which is called in sections to follow simply the lens.
The only way to apply a lens in CorelDRAW is through the Lens docker, opened by
choosing Effects | Lens (
ALT+F3). Figure 22-1 shows the Lens docker, whose options change
depending on the function you choose. The way to operate the Lens docker is to first place
an object—which becomes the lens object—over a different object (or several objects, vector
or imported bitmaps), pick a lens type from the drop-down menu, and then choose among
different property options.
When an object is selected, the Lens docker preview window shows a thumbnail of what
you’re about to apply; if no objects are targeted for the effect, the preview window features a
graphic of a circle over a rectangle. Options are covered in following sections, but for now,
let’s take the Lens docker out for a trial spin.
662 CorelDRAW X5 The Official Guide
Selecting the Lock button on the Lens docker causes lens effects to be applied
immediately with no need to click the Apply button.
Working with a Lens Effect
1. Create a rectangle and then with the Interactive fill tool, click-drag to create a
default linear fountain fill from black to white. This rectangle will serve for this
demonstration; you’ll most certainly get better effects using artwork of your own.
2. Create an ellipse and then with the Pick tool arrange the ellipse so it partially
overlaps the rectangle, so you can better see the creative possibilities of applying a
lens to the ellipse object.
3. With the ellipse selected, open the Lens docker (ALT+F3).
4. Choose Custom Color Map from the docker’s selector drop-down list. Choose a
deep blue from the From mini-palette, and then choose a bright green from the To
mini-palette.
5. Click the Apply button. The lens effect has remapped deeper shades in the rectangle
to blues and remapped lighter shades to greens. But areas of the rectangle not
covered by the ellipse are still a black to white fountain fill.
CHAPTER 22: Lens Effects, Transparency, Shadows, Glows, and Bevels 663
22
FIGURE 22-1 The Lens docker is where you customize effects to create a specific type of lens
you need.
Preview window
Lens selector
Lens options
Viewpoint options
Lock button
Click to apply selected lens