Hướng dẫn sử dụng Coreldraw x5 - part 70 ppt
Bạn đang xem bản rút gọn của tài liệu. Xem và tải ngay bản đầy đủ của tài liệu tại đây (896.42 KB, 10 trang )
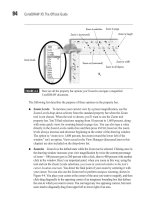
6. Move the polygon around if you like. Notice also that by applying a 2-point outline
to the frozen lens object, background areas such as the grid the spanner is resting on
become visible. Everything under the lens is now part of a group of vector objects—
you can press
CTRL+U now to ungroup the objects and individually recolor them if
you like.
Ill 22-2
Changing a Lens Viewpoint
The Viewpoint option offers the chance to move a lens object but also to retain the view of
the objects the lens was originally over. The Lens Viewpoint option lets you move a lens and
keep the view inside the lens constant—like freezing a lens—but this option keeps the effect
dynamic. When you check Viewpoint on the Lens docker, an Edit button appears. You then
click-drag interactively to reposition the viewpoint of the lens effect either by using your
cursor (indicated onscreen by an X) or by entering numeric values in the X and Y page
position boxes.
674 CorelDRAW X5 The Official Guide
Ill 22-3
The view seen through a lens object is dependent on object order on a layer—all
objects layered below the lens object appear in the lens. When the Viewpoint is
repositioned, you may find that an object might not appear visible. Arranging
objects in back of the lens object causes them to be affected; arranging them in
front of the lens object prevents the lens effect from changing them.
The default viewpoint position of a lens effect is always the center of your object, but
you can move it anywhere you like. After moving it, click the Edit button and then the
Apply button on the Lens docker to set the new position. The Viewpoint option does not use
the auto-apply lock feature.
CHAPTER 22: Lens Effects, Transparency, Shadows, Glows, and Bevels 675
22
Lens object with
Invert applied
New viewpoint
marker position
Numeric entry boxes for
viewpoint page position
Edit/End button
Using the Remove Face Option
Remove Face is available for only a few types of lens effects and lets you specify whether
other objects and the page background participate in the effect. By default, whenever a lens
effect is applied, the background—your page, which is usually white—is involved in the effect.
However, if the lens you are using alters colors—such as Custom color map—and you
don’t want your background to be changed within the view seen through the lens object,
choosing the Remove Face option leaves the background unaltered.
Clearing Things Up with the Transparency Tool
Transparency is an effect CorelDRAW users have leveraged for many years to illustrate
scenes that have a very photorealistic look. The Transparency tool is quite different in use
and in the effect you achieve than the Transparency lens. You have directions for transparency
such as linear and radial, and also various operators (styles of transparency) available from
the property bar to set how a partially transparent object interacts with objects below it. Any
“look” from stained glass to a bleached-out overexposure is possible to create using the
different operators.
One thing is good to keep in mind when working with transparency in a design: this is
the way you blend colors between objects. That’s it; your work doesn’t benefit from a totally
transparent object—there has to be some influence from the object to which you apply
transparency, and it’s usually color. Therefore, an alternative way to think about transparency
is to think about color blending.
One of the keys to accomplishing amazing artwork using the Transparency tool is the fill
that a semitransparent object has; in addition to uniform fills, fountain and pattern fills can
also take on transparency. You put fills and transparency together, and you’re talking seriously
sophisticated compositions! Another key lies in how you approach a drawing in which you
plan to feature partially transparent objects. To illustrate a real-world object such as a piece
of jewelry, transparency plays a part—the gem in the jewelry, for example—but there will
certainly also be nontransparent objects in such a drawing, so don’t overindulge in transparency
when only certain parts of an illustration make the best use of this effect. In the next
illustration, you can see what is today a fairly common button for a web page; it suggests
glass. At left you can see a Wireframe view; not a lot of objects went into a fairly convincing
drawing of a glass button. Combining use of the Transparency tool with your own designer’s
eye, you can illustrate gases, smoke, fog, mist, and steam; you can also add reflections and
highlights to your work to add detail, interest…and a touch of glass.
676 CorelDRAW X5 The Official Guide
Ill 22-4
Using the Transparency Tool and Property Bar
The transparency effects discussed next are applied using the Transparency tool located in
the toolbox grouped with other interactive tools, shown here:
Ill 22-5
When creating a transparency, you can set whether the fill and outline properties of
objects are included in a transparency effect. Choose All, Fill, or Outline using
property bar options.
While the Transparency tool is chosen, the property bar displays all options to control
the transparency effect. These options, as shown in Figure 22-7, are used together with any
interactive markers surrounding the target object.
Often, the most rewarding way to discover and gain control over a feature in CorelDRAW
or any program is to dive straight in. The following tutorial might seem a little challenging
because an explanation of the transparency options is provided on the fly, sort of like getting
directions while you’re driving, but you might want the power of transparencies at hand right
now, as we all do with valuable stuff! Follow along here to create a fairly realistic composition
of a child’s marble; transparency will take care of the shading and the highlights. You can
check out the Marble.cdr document to see and take apart the components at any time.
CHAPTER 22: Lens Effects, Transparency, Shadows, Glows, and Bevels 677
22
Transparency tool
White fill, linear
transparency,
Normal mode
White filled group,
uniform transparency,
Add mode
Linear
fountain fill
Creating a Dimensional Drawing Through Transparency
1. Create a circle (choose the Ellipse tool and then hold CTRL while you drag). Give it
a bitmap pattern fill by first choosing the Interactive fill tool; choose Texture Fill
from the Fill Type selector on the property bar, choose Samples from the Texture
Library drop-down, and then choose the third (pinkish) pattern from the drop-down
on the property bar.
2. Press CTRL+C and then CTRL+V to put a duplicate of the circle directly above the
original. Click the black color well on the Color Palette to give this duplicate a
uniform black fill.
3. Choose the Transparency tool. Choose Radial as the Transparency type from the
property bar, and then choose If Darker from the Transparency operator list on the
property bar.
4. Click-drag the interactive marker, the black one that shows the start of the radial
transparency, and move it just a little toward 10 o’clock. Then click-drag the end
marker (the white one) toward 4 o’clock until the shading of this semitransparent
678 CorelDRAW X5 The Official Guide
FIGURE 22-7 Use the property bar to customize a transparency object.
Click to edit a transparency fill.
Transparency Type (identical to fill types)
Transparency Operation (merge modes)
Angle and Edge Pad
Transparency
Midpoint
Apply Transparency to fill, outline, or both.
Freeze Transparency
Copy Transparency Properties
Clear
Transparency
object lends to the underlying bitmap-filled object the appearance of light coming
into the scene from 10 o’clock. This is a classic key lighting effect used by
photographers, so the composition should look a little photorealistic now. Refer to
Figure 22-8, because you were promised directions while you’re driving, and this
figure is a roadmap!
5. Create a small white circle, about 1/10th the size of the circle. Fill it with white and
then choose the Transparency tool.
6. Set the transparency type to Radial for the circle, and leave the Transparency
Operator merge mode at the default of Normal.
7. By default, the Radial type of transparency produces the opposite effect than the one
desired here: this object should serve as a highlight on the child’s marble; on the
Color Palette, drag the black color well onto the end marker of the interactive
transparency, and then drag white to the start marker.
8. Drag the end marker to just inside the circle object; doing this ensures that the object
is 100% transparent at its edges, creating a perfect highlight object. Put it at the
upper left of the marble drawing, and consider this a frenetic tutorial well done!
Setting Transparency Properties
If you have experience with CorelDRAW’s Interactive fill tool, you’re 99 percent of the way
to mastering the transparency fill types with the Transparency tool. Because transparency
isn’t the same as an object’s fill, the following sections take you through some unique
properties. You’ll find wonderful design potentials you can leverage by choosing your
transparency type according to what you need to design.
CHAPTER 22: Lens Effects, Transparency, Shadows, Glows, and Bevels 679
22
FIGURE 22-8 Use the Transparency tool to create shading for simple objects that you want to
look dimensional.
Step 4Step 1 Result of
steps 1–4
Step 7 Finished marble
illustration
Uniform Transparency
Uniform transparency is the default for objects to which you assign transparency; the object
will feature a flat and even transparency value. The way this semitransparent object blends
with underlying objects is completely predictable. For example, if you assign a red rectangle
and then a blue rectangle with 50% (the default transparency amount) and overlap them,
yep, you’ll see violet in the intersection.
The Uniform transparency type has no control markers over the object as other
types do.
Fountain Fill Transparencies
Transparent objects that use any of the fountain fill direction types are an exceptionally
powerful tool for illustration, as you’ll see in a moment. What governs the degree of
transparency at the start and end points are the control markers, not only their position
relative to the object underneath, but also the brightness value of the markers. Fountain fill
transparencies are driven by any of 256 shades, from black to white. Let’s use the Linear
transparency type; if you understand this type, all the others (Radial, Conical, and so on)
will become obvious. When you click-drag using the Linear transparency on an object, the
start marker is white, indicating full opacity, and the end marker is black, indicating no
opacity at all.
Here’s Trick No. 1 in creating an elegant fountain fill transparency: you can change the
degree of opacity at the start and end points by using two methods, or a combination of the
two:
●
Reposition the start and end markers. If you position the markers way outside of the
object, the transition between full and no opacity will be gradual, and the outermost
parts of the transparent object will be neither completely opaque nor completely
transparent.
●
Change the brightness; the markers can have any of 256 shades of black. Let’s say
you have the start and end markers exactly where you want them; you like the angle
of the fountain fill transparency. But you don’t want the end (the black marker) to be
100 percent transparent. You click-drag a deep shade of black from the Color Palette
and then drop it onto the black end marker. The end of the transparency then
becomes mostly but not 100 percent transparent.
Trick No. 2 is to choose the transparency object’s color to influence (usually to tint) the
objects below the transparency object. Figure 22-9 shows an example: black paragraph text
is on the bottom of the drawing page. On top of it is a rectangle. At left, the rectangle is filled
with white, and a Linear fountain fill transparency is click-dragged from top to bottom. The
text appears to be coming out of a fog. In the center, a 50% black fill is then applied to the
rectangle, and a different visual effect is achieved—the paragraph text still looks like it’s in
680 CorelDRAW X5 The Official Guide
a haze, but more of it is legible toward the top. At right, black is the fill for the rectangle,
and now the top of the text is as illegible as in the white rectangle example, but a different
artistic sense of drama has been achieved. You now know two different methods for shading
with transparency fills of the fountain type: change the control markers and change the color
of the transparency object.
Property Bar Options for Transparency Effects
Some CorelDRAW users prefer the hands-on controls of interactive markers, while others
choose the precision offered by the property bar’s numeric entry fields and sliders; let’s look
at what is available on the property bar when the Transparency tool is chosen and a target
object is selected. In Figure 22-7 you saw the Midpoint slider, and the Angle and Edge Pad
fields called out; here’s what they do.
If no object is selected and you want to make any object partially transparent, the
Transparency tool is a selection tool in addition to controlling the interactive markers.
With the tool selected, click once to select the object to which you want to apply
transparency, and then click-drag to add and set the control markers.
●
Midpoint slider This slider controls where the 50% point in a transparency is
located. It does not indicate where an object is 50% transparency, but instead sets a
relative 50% break point, because as mentioned earlier, you can set the start and end
markers to any brightness value you like.
CHAPTER 22: Lens Effects, Transparency, Shadows, Glows, and Bevels 681
22
FIGURE 22-9 Use the marker positions, the marker brightness values, and the color of a
transparency object to create interesting effects.
Linear Transparency
Start control
marker (white)
Midpoint
End control
marker (black)
White transparent object
50% black
transparent object
Black transparent object
Black text
underneath
●
Angle When you click-drag, for example, a Linear transparency, you might not get
the angle exactly the way you’d like it. Use this box to set an exact angle for the
transition. Setting 90º runs a Linear fountain fill from transparent at top to opaque at
bottom, and the angle measurement decreases as you travel clockwise.
●
Edge Pad Increase or decrease the “speed,” the contrast of the fountain transparency.
The highest value is 49, at which the transition is so abrupt you could shave yourself
with the edge between the start and end opacity amounts.
By default, when you hold
CTRL and drag a control marker for a fountain type
transparency, you constrain the angle you’re setting in 15-degree increments. You
can also straighten a crooked fountain transparency you’ve manually defined by
CTRL+click-dragging.
Here is a practical example of a Linear transparency used in an illustration to imitate the
“glass icon” reflective look. In this illustration, the folder design has been copied and then
mirrored horizontally. Then the Linear transparency is applied to the duplicate group of
objects, from almost 100% opaque where it meets the original, to 100% transparent at the
bottom. Transparency is good not only for simulating glass but also for simulating reflective
objects.
Ill 22-6
682 CorelDRAW X5 The Official Guide
Additional Fountain Transparency Types
You also have Radial, Conical, and Square fountain transparency types at hand when you design
something you need to look more dimensional. The Radial type transparency effect is fantastic
for making spectacular highlights—brilliant but soft-edged highlights you commonly see when
sunlight hits a highly polished metal or smooth plastic object. A Conical transparency is good to
use when you need a pie wedge–shaped area, and this, too, is good for simulating highlights and
reflections. The Square transparency type might not prove useful on a day-to-day basis, but it’s
very easy to create soft-edged highlights to use as windowpanes and other right-angle geometric
areas you want to visually emphasize.
Before covering the bitmap type fills—listed below the fountain transparency types
on the property bar drop-down list—let’s take a detour in this documentation to explain
transparency operations. Also called “merge modes” and “blend modes,” operations have
an additional effect on all objects that have a transparency effect. Operations can get you
out of a design predicament when a transparent object doesn’t seamlessly blend with objects
below it.
Using Transparency Operations (Merge Modes)
The property bar has a list of modes for you to set how your transparency colors interact with
the colors of underlying objects. These options further the visual complexity of semitransparent
objects, and their use is for professional-level illustration work. For example, a red plastic
drinking glass on a yellow tablecloth will show some orange through it due to the nature of colors
that mix as light passes through the glass. However, the shadow cast by the nontransparent areas
of the glass will not be the same shade of orange as the light we see through the glass, because
light in the real world is subtractive, and the shadow in such a scene would be a deep, muddy
orange, almost brown. But you don’t have to calculate light properties or material properties
when you illustrate if you understand what the transparency operations do and then choose the
operation appropriate for your illustration.
The following definitions of merge modes describe the effect you can expect. Let’s say
source is the top object that takes the transparency effect, the target is one or more objects
below the transparency object that are overlapped by the transparency object, and the result
is the color you see in your drawing in the overlapping areas.
●
Normal Normal merge mode is the default whenever a new transparency effect is
applied to an object. Choosing Normal at 50% opacity usually produces predictable
color blends between the source and target objects; for example, a pure yellow
object at 50% Normal opacity over a pure red object yields orange as a result in
overlapping areas. Similarly and in traditional physical painting, a white source
object produces a tint result over a pure color object (a pastel color), while a black
source object produces a shade of the target object’s color (if you’re shopping for
house paints, the salesperson will love this jargon).
CHAPTER 22: Lens Effects, Transparency, Shadows, Glows, and Bevels 683
22