Hướng dẫn sử dụng Coreldraw x5 - part 77 ppt
Bạn đang xem bản rút gọn của tài liệu. Xem và tải ngay bản đầy đủ của tài liệu tại đây (1.13 MB, 10 trang )
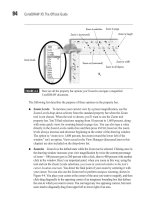
If you’d like to confirm that the editing you performed is nondestructive, take the Shape
tool and marquee-select several control nodes. Then drag them away from the center of the
photo, as shown here. Then press
CTRL+Z to undo this nondestructive and unwanted edit!
Ill 24-4
Boolean Operations as a Trimming Technique
It takes an equal amount of effort, but it might be easier to visualize the nondestructive
photo-trimming process by drawing the outline of the image object you want to isolate and
then to use the shaping commands to slice out the area you want to use. If you have Bach
trimmed now, you don’t have to follow this tutorial, but do read the steps, because you might
find this technique easier than editing with the control nodes.
Background Removal, Technique 2
1. Using the Pen tool with which you’re the most comfortable and experienced, draw a
silhouette around the object you want to isolate in the photo, as shown in Figure 24-3.
It usually helps if you choose a contrasting outline color as you progress; you right-
click, in this example, black on the Color Palette after you’ve begun tracing. Choosing
outline and fill colors after you’ve begun drawing a shape avoids triggering the
attention box asking whether all new objects should get a black outline.
2. After you’ve closed the shape, choose Arrange | Shaping | Shaping to display the docker
for performing an Intersect Boolean operation. You could use the property bar shaping
buttons to perform this, but the property bar shaping buttons by default leave a copy of
the target and source objects after the operation, a minor hassle to clean up later.
3. Select the object you just drew. Choose Intersect from the drop-down selector, and
then make sure both of the Leave Original boxes are unchecked. Click Intersect
With, click the region of the photograph that is outside of the black outline you just
drew, and you’re home free, as shown in Figure 24-4.
744 CorelDRAW X5 The Official Guide
CHAPTER 24: Advanced Photography Techniques with CorelDRAW 745
24
FIGURE 24-3 Draw an outline that tightly matches the shape of the object you want to trim.
FIGURE 24-4 Use the Intersect shaping command to remove all regions of the photo outside
of the shape you drew.
Compositions with Mixed Media
Creating the poster is going to be fun—you’re going to go beyond arranging and moving
both bitmap and vector objects to laying out a finished art composition. What you’ll see in
the Concert poster.cdr file are two image objects: the background night image is locked on
the bottom layer, and the gold title is an alpha-channel masked image, something covered a
little later in this chapter.
Work through the following steps to copy your Bach trimming work to the concert
poster document (an unlocked layer is active, so duplicating takes only one step). Then
you’ll add a vector shape to the composition to create an air of elegance…it’s a piece of
chorale sheet music, actually, not an air.
Composing a Design Using Vector and Image Shapes
1. Open Concert poster.cdr, and then choose Window | Tile Vertically so you have a
view of both your Bach work and the Concert poster.cdr file.
2. Hold CTRL and then drag your trimmed bust of Bach into the Concert poster window,
as shown in Figure 24-5. This duplicates your work; it doesn’t move it. You can save
and then close your Bach image as a CDR file now.
3. Click the Import button on the property bar, and then choose the Bach 4 part Chorale.cdr
file from your hard drive. Click Import; your cursor is now loaded with the imported
file. You can click anywhere to place it at its original size, but for this example,
click-drag beginning about ¾" from the left edge of the page until the legend at the
bottom right of the cursor reads about “w: 7.5 in.”
Ill 24-5
746 CorelDRAW X5 The Official Guide
4. With the musical notes selected, click the white color well on the Color Palette.
5. Choose Window | Dockers | Object Manager. Click-drag the title “Group of 100
Objects” (the musical notes), and then release the mouse button when the title is
below the “JS Bach.tif” object. You should now see the musical notes group of
objects on the page behind J.S.
6. Let’s make the music sort of swell behind its composer. Choose the Envelope tool
from the Blend group on the toolbox. You’re working in Putty mode by default, a
good place to start; now, let’s customize the envelope for a specific distortion. With
the Envelope tool, marquee-select the top and bottom center control nodes; while
holding
SHIFT, marquee-select the left and right middle nodes. Then click the Delete
Nodes button on the property bar; see top left, Figure 24-6.
CHAPTER 24: Advanced Photography Techniques with CorelDRAW 747
24
FIGURE 24-5 Duplicate your work into the Concert poster.cdr window.
Hold CTRL and drag.
7. Click the left side of the Envelope bounding box, and then right-click and choose To
Line from the pop-up menu. Then perform the same edit on the right side. The top
and bottom default property for Putty mode envelopes is curved segments—they
need no editing. See middle left in Figure 24-6.
8. With the Shape tool, one at a time click the control nodes that bound the musical
notes, and then drag the top ones up a little and the bottom ones down a little. Then
click-drag the bottom line up, and the top line down. Use your artistic eye and
Figure 24-6 to guide you. Bach’s compositions are stirring; the musical notes should
visually reflect this.
9. A time and place for this concert would help sell it; read Chapter 14 if you haven’t
done so already for good text-composition techniques. As you can see in Figure 24-7,
the completed poster looks handsome, and most of its visual success is because you
now know how to isolate an important subject from a fairly boring background.
748 CorelDRAW X5 The Official Guide
FIGURE 24-6 Shape the music so it appears to extend around the bust toward the audience, as
music really does…
Delete Nodes
Convert To Line
Working with Alpha Channels and Image Transparency
The following sections explain how some professionals trim subjects out of their image
backgrounds, why certain file types are imported with transparency, and what transparency
really means in your CorelDRAW work. There are more features than you might imagine for
CHAPTER 24: Advanced Photography Techniques with CorelDRAW 749
24
FIGURE 24-7 When you can move image objects around on a page as easily as vector shapes,
new design opportunities open up to you.
working with bitmaps directly in CorelDRAW; for exceptionally tricky image-editing
assignments, Chapters 25 and 26 document Corel PHOTO-PAINT.
Using CorelDRAW’s Bitmap Color Mask
On the property bar, whenever a bitmap image is selected, you have the Bitmap Color Mask
docker button on the property bar. This docker can help mask areas of a placed bitmap,
although it’s a less robust feature than found in PHOTO-PAINT. Here’s the deal: if you have,
for example, a scene that has someone who isn’t wearing any green, and they’re surrounded
by green, you can remove the green background by hiding this color value. Whenever you
have an image with a background whose color is not remotely similar to colors in the
foreground person or object in the photo, the Bitmap Color Mask docker can successfully
hide the background, too. What the Bitmap Color Mask docker cannot do is distinguish
between subtle variations in differing hues. For example, if you have a maroon background
with a pink foreground object you want clipped out, no can do. Maroon contains heavy
concentrations of tone in its red color channel, and so does pink, although to a lesser extent.
The Bitmap Color Mask docker looks at colors in channels in an image; unless you’re trying
to mask a GIF indexed color image (a file structure that doesn’t use color channels, but
instead uses a color index), your smartest move is to use PHOTO-PAINT or to manually
trim the image using the methods described earlier.
However, lots of professionals receive “object against pure color” photos every day—
and now you will, too, to experiment with in the following tutorial. This tutorial shows how
to auto-mask images such as Beachball.tif for easy compositing work in CorelDRAW.
Removing a Color from Around a Subject
1. Import the Beach.png image to a new document. This is the background for the
composition.
2. Import the Beachball.tif image and then place it anywhere you like for the moment.
As shown in Figure 24-8, the green area around the beach ball sort of messes up its
integration into the beach scene.
3. With the beach ball image selected, click the Bitmap Color Mask button on the
property bar.
4. Click the check box to the left of the first black color swatch. This is the first color
you’ll mask in the beach ball image.
5. Choose the Color Selector button (Eyedropper tool), and then click over the green
area on the beach ball image. Set the Tolerance to about 40%, and then click Apply.
The green has become masked—invisible—and you can now use the Pick tool to
move and scale the beach ball so it becomes part of the background scene.
750 CorelDRAW X5 The Official Guide
6. Let’s try a little more scene integration by adding a slight shadow behind the ball. This
also demonstrates how the image mask allows CorelDRAW effects to be placed behind
it. Choose the Drop Shadow tool from the Blend group of tools, and then click-drag
down and a little to the right on the beach ball. As you can see in Figure 24-9, the
beach ball looks like it’s part of the scene. As a little independent experiment (with
creative mayhem), try clicking the second check box, and then with the Eyedropper
tool, click over a red area of the image and see what disappears. To undo this move,
all you need to do is uncheck the red swatch’s check box on the docker and then
click Apply.
Check out Chapter 22 for detailed information on working with the Drop
Shadow tool.
CHAPTER 24: Advanced Photography Techniques with CorelDRAW 751
24
FIGURE 24-8 An image without a transparent background can’t be successfully melded into
a composition.
Hide/Show
Colors
Color Selector
Edit Color
Save Mask
Open Mask
Tolerance
Remove
Mask
Bitmap Color Mask
Working with Partial Transparency
Both alpha channel transparency and image layer transparency offer more than simply
100 percent opaque or 100 percent transparent areas. With 24-bit images, you can have
256 levels of opacity in any area of the image, and this leads to some fascinating visual
effects you can create. You’ll work shortly with an image that has semitransparent areas, but
right now it’s time to learn how to build semitransparent areas into an image that has none
but should have them. Bob’s Beer, a fictitious micro-brewery, has an image of a bottle in
PNG file format that is surrounded by transparency. Let’s say Bob wants the bottle to sit
in front of a background that has his name repeated far too many times. Visually, his name
should partially show through the neck of the bottle where there’s only tinted glass and
no beer.
752 CorelDRAW X5 The Official Guide
FIGURE 24-9 Use the Tolerance slider on the Bitmap Color Mask docker to increase the mask
of the color you chose.
The following tutorial shows you how to trim away the top quarter of the bottle, the most
transparent part. Then you’ll see how to make this area only partially opaque so some of the
background shows through. And to top it off, you’ll see how to build a shadow that’s cast
from the bottle onto the “ground” in the composition.
Creating a Photorealistic Glass Effect
1. Open Bob’s Background.cdr, and then click the Import button and choose Bob’s
Beer.png; it’s a domestic beer, but you’ll import it anyway. Click Import and then
with the loaded cursor, click-diagonal drag until the bottle is placed in the image as
shown here.
Ill 24-6
2. With a Pen tool (the Bézier pen works fine in this example), create a shape that fits
in the top part of the glass, from the fill line to the bottle’s lip, staying slightly inside
the neck of the beer bottle so the edge is not part of the trimming operation you’ll
perform in a moment. You should fill the object after creating it to better see what
you’re doing in the following steps—any color is fine.
3. Select the shape but not the bottle. Choose Arrange | Shaping | Shaping to display
the Shaping docker. Choose Intersect from the selector drop-down list, and then
check Leave Original Target Object(s), but don’t check Leave Original Source
Object(s). Click the Intersect With button, and then click the bottle. The object is
CHAPTER 24: Advanced Photography Techniques with CorelDRAW 753
24