Hướng dẫn sử dụng Coreldraw x5 - part 80 ppt
Bạn đang xem bản rút gọn của tài liệu. Xem và tải ngay bản đầy đủ của tài liệu tại đây (1.13 MB, 10 trang )
Image Resolution
Any PHOTO-PAINT document’s resolution can be great for web graphics but not so good
for printing. The web display and print quality differ because of the finite number of pixels
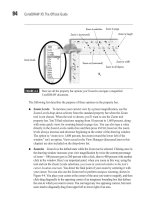
in the resolution-dependent, bitmap image. Figure 25-1 shows at left a CorelDRAW
illustration of a child’s paint box. In this book the drawing looks crisp around the edges, and
smooth in its transitions from neighboring tones. It was a graphic suitable for printing as a
bitmap because it was exported at a high resolution (300 dots per inch) for printing in this
book. However, at right is an illustration of the same paint box, with the imaginary bitmap
grid shown, but it was exported at desktop icon size (about 48×48 pixels), and the loss of
image detail is evident at its resolution of 72 pixels per inch.
Resolution, Pixel Count, and Printing
It’s a frequently asked question whose answer is imprecise: what is the resolution I need for
a photograph to make a good print?
Scanning a physical photograph doesn’t provide the best sampling of color pixels to
produce a terrific photograph, but it does ensure that you have a sufficient number of pixels
(an image’s pixel count) to print the scanned photo.
The most direct way to acquire a photo and manipulate it in PHOTO-PAINT is by using
a digital camera. Today’s digital cameras are capable of taking full-frame pictures that can
be printed to inkjets printers at 12"×18" in high quality. Digital cameras measure the number
of pixels in width and height of the picture’s frame in megapixels (MP): a million pixels
774 CorelDRAW X5 The Official Guide
FIGURE 25-1 The number of pixels in a bitmap, combined with the image’s resolution,
determines whether an image is suitable for printing.
High-resolution bitmap
Low-resolution bitmap
Pixel (color placeholder)
equal a megapixel. For example, the Nikon D90 can take 12.3 MP—its sensor array captures
4,288 pixels along one dimension and 2,848 pixels along the other. Thus, 4,288×2,848 =
12.2 (plus a fractional amount) megapixels.
Depending on the make and model of your digital camera (price plays a deciding factor
here), you can take images that vary in maximum print size. The following table provides
the maximum printable dimensions for different megapixel-capable cameras:
Camera Max. Print Size
12.3 MP 12"h×18"w
10.1 MP 10.8"h×16.2"w
9 MP 10.2"h×15.3"w
6 MP 8.3"h×12.5"w
These are not hard-and-fast dimensions, but for two reasons are guidelines for print output:
●
The dots that inkjet printers render are imprecise. They are more like splats than dots
because the print head sprays color onto the page.
● There is some flexibility when printing to home inkjet printers because image
dimensions are inversely proportional to image resolution.
Manufacturers of inkjet printers, makers of inks, and other printing experts agree that the
ideal resolution for printing—720 dots per inch—requires about 1/3 this number, in pixels
per inch, for the image to be printed. The math goes like this: most affordable inkjet printers
offer a high-quality resolution of about 720 dpi. The documentation might claim that the
printer offers “enhanced resolution of 1,440 dpi,” but usually this enhancement is only
rendered in one direction, height or width, depending on your print layout. The true
resolution is always the lower number when two are offered in the inkjet printer’s
documentation. Thus, 720 / 3 is 240 (dpi).
A pixel is not the same unit of color measurement as a printed dot. Dots per inch (dpi) is
the measurement of the fixed resolution of an image as printed to a physical page, and a
dot on a page can be physically measured if you have a very small ruler. The resolution
of an image as measured on your monitor is expressed in pixels per inch (ppi), and
as you’ll learn in this chapter, the dimensions of a bitmap image can be changed by
changing the resolution. However, many software manufacturers, including Corel Corp.,
use ppi and dpi interchangeably. Similarly, the term “dpi” is used in this chapter to
express pixels per inch to avoid the discrepancy between terminology used in digital
photography and the labels of certain options in PHOTO-PAINT’s dialog boxes.
CHAPTER 25: An Introduction to PHOTO-PAINT 775
25
The good news is that you can change the resolution of an image, thereby changing its
real-world dimensions, without changing the pixel count—which tends to sharpen an image
when it’s made smaller, but blurs it when enlarged. For example, a photo that is 3"×3" at 300
pixels per inch has exactly the same number of pixels as the image at 6"×6" at a resolution of
150 ppi. Both images have the same number of pixels, but the print dimensions and
resolution have been changed.
Let’s walk through an example on how to determine a photo’s resolution, and then adjust
it for printing.
Resizing a Photograph
1. In PHOTO-PAINT open CRW_6115.jpg, a photo that has been (mal)adjusted to
demonstrate a technique in this chapter.
2. Let’s say that you need to print this photo at inkjet high quality. This means at least
240 dots per inch (dpi) are required. To check the resolution of the current foreground
document, use the Object Pick tool to right-click the document, and then choose
Document Properties from the context menu.
To display rulers around the edges of a document, press
CTRL+SHIFT+R (View |
Rulers
). To hide rulers, press CTRL+SHIFT+R again to toggle them off. If the rulers
don’t display the units you need, right-click either ruler and then choose Ruler
Setup from the context menu.
3. Well, oops. This photo is a nice 8"×11", but it’s of insufficient resolution to print at
the required 240 dpi, as shown in Figure 25-2. It can print with high quality and
great image fidelity, but the physical output dimensions need to be decreased to
increase the resolution.
4. Right-click the photo and then choose Resample from the context menu. The
Resample (Image menu item) box does more than resample an image; it can also
resize it, and the two terms are very different. Resize is the action of decreasing or
increasing image resolution, affecting image dimensions inversely, and the result is
an image that has the same number of pixels. Resampling (covered in this chapter)
involves changing the number of pixels in the image. Original pixel colors are
moved around the grid, some are duplicated, some removed, and the resulting color
pixels are a new color based on an average of neighboring original color pixels.
Resampling changes original image data and occasionally blurs or creates unwanted
harsh edges in image areas.
5. Check the Maintain Original Size box, make sure the Maintain Aspect Ratio box is
checked, and then type 7 in the Height field. Because the photo was doctored for this
example, the photo is now a perfect 7"×5", smaller than its original dimensions. As
you can see, as the dimensions decreased, the resolution increased and is now more
776 CorelDRAW X5 The Official Guide
than adequate in resolution for inkjet printing. Save the file if you like owls, and then
print it to see what image resolution does for digital images: it improves them.
Ill 25-2
CHAPTER 25: An Introduction to PHOTO-PAINT 777
25
FIGURE 25-2 Pictures that need to be printed demand a higher resolution than 144 dots
per inch.
Maintain Original Size keeps file
size and pixel count the same.
778 CorelDRAW X5 The Official Guide
Scanning Photos into PHOTO-PAINT
You might want to acquire an image by scanning instead of using a digital camera for
two common reasons:
●
The picture wasn’t originally taken with a digital camera. There were very few
digital cameras in 1924, so your great grandmother’s photo probably exists
only as a print, or if you’re extremely lucky, as a film negative.
●
The picture is a drawing. You want to use Corel PowerTRACE to clean up a
logo or other graphic.
In either event, scanning images is very simple using PHOTO-PAINT as the host
for the resulting bitmap. Follow these steps:
1. Make sure the scanner is plugged in, turned on, and connected to your
computer directly or through a network. Don’t laugh; these are the first things
the manufacturer’s tech support asks you at $5 a minute.
2. Make sure your computer recognizes the scanner. Your scanner came with an
installation disk that has drivers Windows needs to read to be able to create a
handshake between the two pieces of hardware. Go to the manufacturer’s
website, and download and then install the most current drivers if you put the
install disk in a safe place you’ve forgotten.
3. Make sure the imaging surface (the platen) on the scanner is clean. Place your
image on the platen, making sure the image isn’t crooked within the rectangular
edges of the platen, and then launch PHOTO-PAINT.
4. Choose File | Acquire Image | Select Source. Choose your device from the list
and then click Select. If you have several devices hooked up to your computer
via USB, Firewire, or other connection protocol, choose your scanner. It’s
possible that an entry that begins with “WIA” (Windows Interface
Application) is a scanning choice. Don’t choose the WIA connection if you
can make a different choice; WIA is a generic driver and as such can only
access the most basic of features on your scanner.
5. Choose File | Acquire Image | Acquire. The UI for your scanner will appear on
top of PHOTO-PAINT’s UI. Different scanners have different interfaces, but
the common elements are a preview window in which you can crop the image
you want scanned to a bitmap file, and dimensions and resolution fields.
Usually, you click the Preview button to refresh the preview, updating your
view to the scanner’s current contents on its platen.
CHAPTER 25: An Introduction to PHOTO-PAINT 779
25
6. Choose your color mode for scanning. RGB is generally the best choice
because you can always convert an acquired image to grayscale or other color
mode directly in PHOTO-PAINT. Only choose Grayscale if you’re scanning a
black-and-white photo—aged photos that look like a black-and-white photo
can contain valuable image data in sepia areas, so color-scan heirloom photos.
If given the option to scan in “bitmap,” “fax,” or “1 bit per pixel,” don’t. This
mode should be reserved for documents, faxes, and other material that requires
absolutely no image fidelity.
7. Use the interface controls to drag an area of the platen that contains your
document. Don’t crop too closely to what you want scanned.
8. Set the scanning percentage to 1:1 (100%) so that a scanned inch actually
equals an inch at the resolution you’ll set in step 10.
9. Check the height and width of the highlighted, cropped area on the platen.
Many scanners do not offer onscreen rulers; height and width fields should be
onscreen, as shown in Figure 25-3. If you need to increase the dimensions,
adjust the value in the Percentage field.
10. Set the resolution of the scan. As mentioned earlier in this chapter, if your
intended output is 1:1 scale and the printer is a personal inkjet, set the scanning
resolution to 240 ppi (often labeled “dpi”). However, if your scan is destined for
a desktop publishing document done at a commercial printer, set the resolution
to at least 266 ppi. Many commercials printers will ask for 300 ppi.
11. Click Scan and wait a little as the samples of the image are streamed to your
computer.
12. When the scan is completed, your scanner’s interface disappears and
“Untitled-1.cpt” appears in PHOTO-PAINT’s workspace. Save the image to
hard disk (
CTRL+S); in the Save an Image to Disk dialog, name the file and
choose a file type from the Save As Type drop-down list. PHOTO-PAINT’s
native *.CPT file format is fine, except in business situations where you need
to share documents. The CPT file format can only be opened on CorelDRAW
and PHOTO-PAINT. TIFF and PNG file formats are almost universally
understood by applications other than Corel’s—the TIFF format can retain
image resolution information, PNG as written by PHOTO-PAINT saves files
at the default screen resolution of 72 ppi, but the files are often smaller than
uncompressed TIFFs. Be careful when choosing to save a picture as a JPEG—
it compresses images by discarding visual detail it thinks is unimportant (but
you might not).
Some in the imaging community disagree about whether screen resolution should
be measured at 72 pixels per inch or 96, the standard that Microsoft put forth with
Windows 95. The answer is that when you’re measuring pixels for screen display,
resolution makes absolutely no difference. Screen resolution, regardless of how
you measure it, is of a fixed size, so a 300-pixel-wide bitmap might look larger or
smaller depending on the screen resolution you use for display, but nothing changes
the number of pixels in width, nor the total pixel count of a bitmap when you display it
on your monitor.
780 CorelDRAW X5 The Official Guide
FIGURE 25-3 A good size for a scanned image you want to print or retouch should rival the
saved file size of photos taken with digital cameras, anywhere from 6MB to
20MB.
If you have an older scanner whose drivers do not work with Vista or Windows 7,
check out VueScan, a stand-alone scanning software at www.hamrick.com. It runs
as an application separate from Windows and separate from PHOTO-PAINT. It will
usually restore the use of a scanner you bought even two decades ago that you
couldn’t get to work with your new computer.
Resampling and Resizing Photos
At times you absolutely have to upscale a photo; you might not have a better image, and you
can’t retake the scene or portrait. When you increase the number of pixels in a photo, you’re
not increasing image detail—all the details in the scene were captured when you took the
photo. PHOTO-PAINT adds pixels by duplicating existing pixel colors and then averaging
the colors a little to make a smooth photo transition between neighboring pixels in the
resampled photo if you leave Anti-alias checked in the Resample box.
How much larger you can make a photo before the individual pixels become apparent
depends a lot on the visual content of the photo. Pictures of intricate machinery and images
of lots of different-colored small objects such as leaves do not “upsample” nearly as well as,
say, a photo of soft clouds on an overcast day. If you need to make a photo 150% of its
original size, usually you can get away with this with no additional steps. However, if, for
example, you need to print a picture from the Web that’s only 300 pixels wide, you have two
things going for you in this endeavor:
●
Inkjet printers tend to smooth out small rough areas in a digital image, because ink
spreads on the printed page, blending flaws together. Don’t count on this factor; it’s
an assistant, but a small one.
●
PHOTO-PAINT can sharpen edges in the resampled photo while keeping large areas
of similar colors smooth in appearance.
PHOTO-PAINT has several sharpening filters under Effects | Sharpen. PHOTO-
PAINT’s Help system provides a good general explanation of the sharpen filters;
launch any of them and then click Help in the filter box. Generally, when in doubt,
choose Unsharp Mask to add some crispness to resampled photos. Good base point
settings to work from and then tune are Percentage: 100, Radius: 1 to 3, and
Threshold: 10. They provide very good sharpening without an overwhelming
number of options you need to learn. Click the Preview button in filter boxes to see
what the filter will look like before applying it.
Figure 25-4 shows a small JPEG photograph; let’s pretend for the purposes of working
through a tutorial that you own this condo and want to time-share it. And you want to print
postcard-size images to hand out in addition to your website’s image.
CHAPTER 25: An Introduction to PHOTO-PAINT 781
25
The Zoom tool (Z) lets you get in very close to an image area to view and edit.
However, if you’re not familiar with resolution-dependent bitmap editing, a
zoomed-in view of a photo might look coarse, and your instinct might be to soften
the image. Periodically check the document title bar: after the name of the file,
there’s an “@” symbol followed by your current viewing resolution. If the zoom
factor is greater than 100%, this document is not displaying as your audience will
see it. To quickly zoom a document to 1:1, 100% viewing resolution, double-click
the Zoom tool on the toolbox.
The following steps are a worst-case scenario—you will almost certainly be able to
enlarge photos to become printworthy by resampling up to 150% or so, and not with the
gross sort of enlargement and image corrections featured in these steps. However, as you’ll
soon see, the High Pass effect you’ll use does indeed enhance a copy of the small JPEG
photo to a usable state.
Making a Thumbnail Image Suitable for Printing
1. Open Hollywood-5203.jpg in PHOTO-PAINT. With the Object Pick tool, right-click
over the image, and then choose Resample from the context menu.
782 CorelDRAW X5 The Official Guide
FIGURE 25-4 Unless some corrective steps are taken, this small photo would print with huge,
clearly visible color pixels.
350 pixels wide Zoom to 800%
2. In the Width field, type 7, and then click an insertion point in the Resolution |
Horizontal field. Make sure the Maintain Aspect Ratio and Anti-alias check boxes
are checked, and then type 240 in the box. Click OK to resample the photo.
Ill 25-3
3. At 100% viewing resolution, clearly the photo needs a little edge-sharpening without
sharpening the larger smooth areas of the photo. Press
CTRL+F7 if the Objects docker
isn’t docked to the window or isn’t visible. You’re going to duplicate this image and
put the copy on top of the original. This is an unusual thing to do, and to be able to
do, but PHOTO-PAINT has advanced image-editing features that let you change and
merge image areas (called objects) so the pixels in objects can have different colors
but are identically aligned to the imaginary grid in the document.
4. With the Object Pick tool, drag the thumbnail labeled “Background” to on top of the
New Object button on the Object docker, and then release the mouse button. Doing
this duplicates the image, creating the new object directly on top of the original.
CHAPTER 25: An Introduction to PHOTO-PAINT 783
25