Hướng dẫn sử dụng Coreldraw x5 - part 82 doc
Bạn đang xem bản rút gọn của tài liệu. Xem và tải ngay bản đầy đủ của tài liệu tại đây (1.14 MB, 10 trang )
5. Right-click inside the dashed indicator lines for the mask area, and then choose Object:
Copy Selection from the context menu. On the Object docker, you’ll now see a new
thumbnail at the top of the list of objects, titled “Object 2”; see Figure 25-9.
Pressing
CTRL+R removes a mask in a document window. This is equivalent to a
Select | None command in other programs. To hide the marquee lines running
around a masked area of an object—and you’re only hiding, you’re not deselecting
but only hiding an onscreen element—press
CTRL+H to alternately Hide and
Restore the marquee.
6. Click the Object 1 entry on the Objects list to make it the current editing object.
Then, choose Object | Flip Horizontally. And yes, it will look strange to have
“Julian” floating above the other kid’s chest!
7. Click the Object 2 entry on the Objects docker, choose Lightness from the Merge
Mode drop-down list—a good mode for making underlying areas fade away only if
the top affecting object has lighter corresponding pixels—and then move the object
over Julian’s chest at image left with the Object Pick tool.
794 CorelDRAW X5 The Official Guide
FIGURE 25-8 Once a photo is an object, you can perform many PHOTO-PAINT feats not
possible with a standard JPEG or other image file.
Click to turn a Background
into an object.
8. Evaluate the composition for a moment. What needs to be done now is to remove
some of the backwards text on Object 1 to keep it from showing through. A straight
paint color won’t do the job, because the image area has varying tones of color from
the texture of the T-shirt. Choose the Clone tool from the group that contains the
Red-Eye Removal tool.
9. The Clone tool picks up an image area you define by right-clicking and then applies
the image area to a different area when you drag, based on the diameter and feather
amount (softness or soft-edge in other bitmap programs) you set for the tool. On the
property bar, choose Medium Soft Clone from the drop-down list.
CHAPTER 25: An Introduction to PHOTO-PAINT 795
25
FIGURE 25-9 Copy the image area that you don’t want to flip to a new object in
the document.
Feather amount
10. Hide Object 2 by clicking the visibility (the eye) icon to the left of its thumbnail.
11. Right-click with the Clone tool just below the name on Julian’s T-shirt. You’re
choosing a sampling area that’s close in tone and color to the area you want to hide.
12. Drag, ever-so-slowly, slightly, and carefully over the backward lettering on the
T-shirt, to get a feel for the Clone tool. When you release the mouse button, the
sampling point for the Clone tool snaps back to its original position. Therefore,
release the mouse button when you see that the traveling sampling point is getting
mighty close to an undesired area for sampling. Work from the outside inward,
resampling frequently to match the original tones of the light shirt. Periodically,
unhide Object 2 to see how much work you need to do, and what areas are not
necessary to clone away.
796 CorelDRAW X5 The Official Guide
FIGURE 25-10 Use the Clone tool to visually integrate the areas in Objects 2 and 1.
Clone tool
Right-click to set sample point then stroke over area to be retouched.
Hide object
Active object
13. When you think you’re finished cloning, restore the visibility of Object 2. You might
be done, but you might want to refine the edges of Object 2 with the Eraser tool. If
so…
14. Choose the Eraser tool, and then on the property bar, choose a soft tip from the
Presets drop-down list, and set the size to about 35 pixels in diameter.
15. Zoom into the editing area, and then drag over any areas whose brightness doesn’t
match the edge of the object. Figure 25-11 shows the work in progress, and the
illusion looks pretty convincing.
16. Optionally, you can standardize this image’s data by combining all objects—as you
did in the Hollywood condo example. Right-click over either object title on the
Object docker, and then choose Combine | Combine All Objects With Background.
CHAPTER 25: An Introduction to PHOTO-PAINT 797
25
FIGURE 25-11 Erase areas whose tone and color don’t match the edges of the object.
Eraser tool
Lightness merge
mode
Ill 25-10
Consider what you’ve learned in this chapter: you now know how to repeat actions on an
entire folder of images, you can scale, crop, and flip pictures, and you have a basic handle on
all the sophisticated editing you can perform using transparency, objects, and merge modes.
But the biggest payoff is an ironic one: a good photo retoucher’s work should go unnoticed!
Now bring what you’ve learned into Chapter 26, for more invisible mending and a
technique or two that will definitely get your work noticed. Special effects and advanced
retouching techniques lie ahead.
798 CorelDRAW X5 The Official Guide
CHAPTER 26
PHOTO-PAINT Effects
and Advanced Editing
799
C
hapter 25 got you off the ground with some basic photo-editing techniques; this chapter
approaches a lot more ambitious editing of images, yet stays within the realm of common
tasks for professionals you’ve seen and would like to re-create. Removing backgrounds,
combining areas of different photos into a seamless composition, and creating animated
GIFs are on the menu today. Along the way, you’ll discover and learn to use some of the
most important tools and features in PHOTO-PAINT, and by the end of this chapter, you’ll
be able to do a lot more than simply re-create the images in the following tutorials. You’ll
make the techniques, and anything you work on in the future, truly your own.
Download and extract all the files from the Chapter26.zip archive to follow the
tutorials in this chapter. This folder has a Gallery subfolder with finished examples
of the tutorial files for this chapter.
Turning a Snapshot into a Photograph
If you’ve ever worked in a large manufacturing company as a designer, you already know
that whoever takes the picture of a new product has tunnel vision: they pay attention to focus,
and perhaps even lighting the product—but pay no attention to a cluttered, inappropriate
background! And your boss is no help because he’s conditioned by watching YouTube to
think that, “Oh, you can just Photoshop this, can’t you? Takes two secs!”
Nope: you own Corel PHOTO-PAINT and you’re going to learn how to PHOTO-PAINT
this sorry photograph into something that looks terrific in that brochure that was due yesterday.
Objects and the Path Tool
Open Labeling machine.cpt in PHOTO-PAINT now: clearly, all that’s missing is a coffee
cup and a deck of playing cards to totally ruin the visual importance of the Market Up®
8500 labeling machine. When photographing product, you either highlight it within a
compatible setting (in this example, perhaps next to retail packages or a shopping cart),
or you go very minimalist and shoot against a pastel seamless paper. The purpose of this
section is to show how you use PHOTO-PAINT to lift only the labeling machine off the
background, and then replace the background with something stylish yet neutral in content
so the machine is the hero of the photo.
Because the silhouette of a machine, or a box, or anything with clearly defined geometry
is a hard edge, the best and quickest tool to use in PHOTO-PAINT for extracting the image
area is the Path tool. The Path tool operates almost identically to the Bezier pen tool in
CorelDRAW. When you use the tool, the property bar has options that you’ll feel right at
home with, and paths you draw have special properties in this bitmap-editing program. Paths
you create can:
800 CorelDRAW X5 The Official Guide
●
Stroke a Path Once a path is selected, you can choose any of the brush tools
(Paint, Effect, Image Sprayer, and even the Eraser tool), and then choose Object |
Edit Path | Brushstroke from Path. If you’re new to PHOTO-PAINT, this action is
fraught with peril, so don’t just leap into using this command. You probably want to
create a new object upon which to stroke the path before doing anything permanent
to a photo: choose Window | Dockers | Objects, and then click the New Object
button. Also make sure that the size of the brush and the preset for the brush along
with the color (if any) is the one you want. By stroking a path onto an object—paths
do not belong to any specific object—you’re free to experiment and can delete the
object if you mess up.
In addition to the Objects Docker button you’ll use in this chapter’s tutorials, the
New Object command is also in the Object | Create main menu.
●
Mask from Path This is the command you’ll use in the steps to follow. You can
make a mask—a selected area of an object or the background of a photo—based
on the shape of a path. The mask allows edits only within the interior of the shape;
you can fill (see the next item here) and also delete the interior of an object, leaving
transparency. If you want to work on the exterior areas defined by a mask, press
CTRL+SHIFT+I to invert the areas so the exterior is subject to changes while the
interior of the object is protected from changes.
●
Fill a Path You can fill the interior of a path by first defining a mask based on the
shape of the path; to do this, with the Path tool selected on the toolbox (so you can
see options on the property bar), click the Mask From Path button, and then mosey
on over to Edit | Fill. In the Edit Fill & Transparency box, click the type of fill you
want, and then click Edit to use and customize the presets available.
Regardless of how you create a mask, to remove it, the keyboard shortcut is
CTRL+R.
Here’s the game plan: in the following steps, you convert the image background to an
object. Then use the Path tool to work around the edge of the labeling machine, closing the
path around the machine; create a mask from the path; use the Object | Create | Object: Copy
(or Cut) Selection; and then delete the original background. Let’s begin.
Using Paths as Masks
1. Open Labeling machine.cpt in PHOTO-PAINT. Then choose Window | Dockers |
Objects (
CTRL+F7 is the shortcut).
CHAPTER 26: PHOTO-PAINT Effects and Advanced Editing 801
26
2. Click the Background icon to the right of the Background item on the Objects docker
list. This is a shortcut to Object | Create | From Background, and the title of the
image is now “Object 1.”
3. Drag the document window edge outward a little. You’ll notice a white area surrounding
the image—this is the background to the document, and Object 1 is now floating
above it. If you like, increase the size of the thumbnail for Object 1 by dragging the
slider to the bottom right of the Objects docker to the right.
Ill 26-1
4. Press ALT+F10 to display the Paths docker. You’re going to draw a path around the
labeling machine now.
5. Choose the Path tool from the group of shape tools in the toolbox. Before you begin,
if you’re not experienced with CorelDRAW’s Shape and Bezier tools, the Path tool
is used both to draw paths and to edit them. Figure 26-1 shows what the property bar
in PHOTO-PAINT looks like when the Path tool is active. The callouts in this figure
pertain only to this chapter’s example. The other tools have familiar icons that perform
the same functions as those on the property bar in CorelDRAW when the pen tools
are used.
802 CorelDRAW X5 The Official Guide
Document Background
Entire photo is a floating object. Click to turn a Background into an object.
Thumbnail size
6. Traveling clockwise, click to place a control point toward the top left of the outline
of the labeling machine; you can start anywhere you like along the edge, but this
tutorial would become a little oblique if we didn’t use a common reference point.
7. The next node to be placed is at the end of a curve: to build a curved path between
node 1 and node 2, click-drag after you define the point, exactly as you would using
the Bezier tool in CorelDRAW.
8. At some point you might need to zoom or pan your view of the document. If you
choose to press
H as a shortcut to the Pan tool, then press ENTER to return to the last-
used tool; there’s a good chance you won’t be able to extend the path you’re drawing
because you’ve switched tools. Make sure to click the last node on your path—the
cursor features a “+” sign, which means it’s good to extend the path now. The
illustration here shows the three cursor states for the Path tool. As you pan your view
and change tools, do not try to extend the path when your cursor looks like the
CHAPTER 26: PHOTO-PAINT Effects and Advanced Editing 803
26
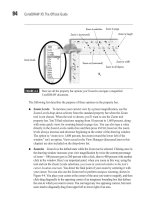
FIGURE 26-1 The features on the property bar when the Path tool is chosen help refine the
paths you create.
Shape Bezier Freehand
Path
tool
Mask From Path