Hướng dẫn sử dụng Coreldraw x5 - part 88 ppt
Bạn đang xem bản rút gọn của tài liệu. Xem và tải ngay bản đầy đủ của tài liệu tại đây (899.24 KB, 10 trang )
2. Click to select the options you want to save with your new style, enter a unique
name for your style, and then click Save to store the settings, after which they are
available from the Print Style drop-down list.
Saving a Print File
Print To File goes back to the days of DOS, and today you’d be hard-pressed to use this
option more than twice in your career. However, Print To File is supported in CorelDRAW,
and you might want to generate this huge, text-based PostScript file for a couple of reasons:
●
If you’re handing the document over to a third party to print because you don’t have
a specific printer hooked up to your computer, and you don’t want them editing the
document in any way. Print To File files are text-based printing instructions; they
contain no graphics as graphics, so they are nearly impossible to edit using a graphics
application.
●
If (and this is a big “if”) someone has specifically requested a Print To File
document because they like the intellectual challenge of decoding the PostScript
printing instructions to reconstruct the graphic using Ghostscript or a similar
PostScript deciphering program.
Throughout the history of PC printing, printing to file has served a valuable purpose.
It enables someone who doesn’t own CorelDRAW to print your CorelDRAW file; a dozen
years ago, high-resolution printers such as Linotronic image-setting devices were the only
game in town when you wanted coffee table–book printing quality. If a service bureau that
owned the device didn’t own CorelDRAW, you printed to file. Today there are alternatives to
making a CorelDRAW document portable for a service bureau to render, but if Print To File
is a client’s mandate, here are the steps to use:
1. Choose the Print To File check box in the General tab of the Print dialog, and then
choose from four options in the adjacent flyout menu. Choose For Mac if the file is
to be printed from a Macintosh system. Choose Single File (the default), Pages To
Separate Files, or Plates To Separate Files to set how the files are prepared. Single
File creates one, usually huge, print file for the entire printout. Pages To Separate
Files creates separate files for each page. The Plates To Separate Files option creates
a single file to represent each page and each of the color separations you’ve chosen
to print if your printing destination is to CMYK process color printing.
2. Click Print to start creating the print files, and the Print To File dialog will open,
where you choose a destination for the PRN file.
854 CorelDRAW X5 The Official Guide
Even if you’ve specified a PRN file type in the Save As Type drop-down list, a file
with the extension .PS (example: MyFile.ps) will be generated if you’ve designated
a PostScript printer as your default computer. However, if your computer’s printer
is non-PostScript—and inkjet printers are non-PostScript—the file extension written
will be .PRN as expected.
You then copy the PRN file to removable media, and take it to the party who will print
the file; alternatively, many service bureaus offer FTP (file transfer protocol) upload sites
for getting files to them. Traditionally, before artists use Print To File, they have a target
device’s print driver installed—this is done just like you install a printer in Windows, except
you’re only installing a device driver and not the physical printer itself. Service bureaus
like to provide you with their print drivers because if you write a Print To File using an
incompatible driver, you’re left with a job the service bureau can’t print, and you’ve wasted
time and hard disk space.
Also, if the CorelDRAW file you print to file contains fonts, you either need to convert
all text to curves (which significantly increases the saved PRN file’s size), or you need to
include the typefaces on the disk you give to the service bureau, which is a thorny legal
issue. Users give service bureaus digital typefaces all the time, but according to most font
licenses, this isn’t legal. On the other hand, you cannot depend on a service bureau or
commercial press house to have exactly the same font as the one you used—if a high-
resolution printer reads a Print To File and cannot find the typeface on its operating system,
chances are you’ll get a beautiful high-resolution print that uses Courier instead of your
typeface.
In short, before you send out work for printing:
●
Find a service bureau that owns CorelDRAW and save yourself some headaches.
●
Failing that, find a service bureau that accepts Acrobat PDF documents (more on
this later in this chapter).
●
Export a copy of your CorelDRAW to Illustrator file format. It might not export
perfectly, and certain CorelDRAW-specific effects will not translate, but Windows
and especially Macintosh service bureaus are likely to own a copy of Illustrator.
●
Use Print To File.
Using the Color Tab Settings
In version X5, users of previous versions will find additional options for printing that have
been moved from other tabs to streamline the printing process. The following sections
document color-related operations.
CHAPTER 27: Printing: Professional Output 855
27
Print Composite/Print Separations
At the top of this tab is the area where you choose to print color separations (covered later in
this chapter) or to print a composite—which is the standard way most users print color
documents to a home inkjet printer. If you choose separations, the Print Composite tab in the
Print box changes to Print Separations options and vice versa.
Document/Proof Settings
Clicking either of these buttons determines whether your print uses your current document
color settings—found under Tools | Color Management—or disregards color settings you’ve
made in the file, by using the settings you pick in the Print box here.
Color Conversions Performed By
This drop-down list provides you a way to convert the color space of the document using
CorelDRAW’s features or lets your printer handle the conversion from your monitor’s color
space to the slightly smaller and duller color space of physical pigments. If you’re undecided,
it’s a safe bet to let CorelDRAW handle the conversion if your printer is an inkjet and not a
PostScript printer. If you choose Device Independent PostScript File, it will display on the
Color tab. However, this is not a Color Conversion option—the option is missing on the
tab—if you’ve defined another printer, even a PostScript printer. Basically you have two
options: use CorelDRAW’s engine, or use the printer’s print driver.
Output Colors As
When you’re printing to a personal, non-PostScript device such as an inkjet, your options
are only RGB and Grayscale, which is fair enough: laser printers can only reproduce
grayscale halftones, and inkjets usually use the RGB color space to then convert colors to
the color space of CMYK. When a PostScript device is defined, your options are:
●
Native CorelDRAW handles the reconciliation between any different color models
you’ve used when filling objects and the colors in any imported bitmaps image.
●
RGB The file is sent to the printer using the RGB color model. This is an
appropriate option to use when you’re printing a composite image (not separations)
and you’re lucky enough to own a color PostScript printer.
●
CMYK This is a good mode to use when you want to proof your work and get a
good idea of what your colors will print like when sending a file to a commercial
printer (composite printing). Similarly, if you’re printing separations, CorelDRAW
forces all colors in your document into the CMYK color space using the rendering
intent you’ve selected (covered next).
856 CorelDRAW X5 The Official Guide
●
Grayscale Choosing this mode sends all color information to the printer as
percentages of black. When choosing this option, you will also see a Convert Spot
Colors To Grayscale option, something you might not want to choose if you want a
plate to print of your spot colors.
●
Convert Spot Colors to CMYK If for some reason your budget doesn’t allow a
spot color, clicking this check box will force any spot color plates to be rendered as
CMYK process color equivalents. Forget about color fidelity and accuracy, but the
option is available.
Correct Colors Using
When printing to a non-PostScript device, you have the option to choose to correct colors to
the color profile of a specific printer, or to choose from the list of available ICC color
profiles installed on your computer.
You might be surprised at the lush colors you’ll render to a home inkjet printer by
choosing sRGB IE6C 1966-2.1 as the color correction option instead of relying on
your printer’s color correction. sRGB is a widely used color space for today’s
consumer-level scanners and printing devices.
When you’ve defined a PostScript printer as your target device, you can choose from
several presets defined from many different image-setting manufacturers, or choose a
predefined color space, the same ones as if you were using a non-PostScript printer.
Rendering Intent
You have four options for how CorelDRAW handles the conversion of color space to
another. In a nutshell:
●
Perceptual and Relative produce the best color conversions for digital photographs.
●
Saturation preserves highly saturated color areas, at the expense of rendering photos
like comic book art. Use this conversion type for business graphics such as charts
and detergent labels.
●
Absolute Colormetric maintains the original white point of the composition, but
shifts hues in photographs in an unrealistic way.
Choosing a Layout
Options on the Layout tab give you the control to set how the page is laid out on the printing
material you’ve loaded into your rendering device. Although the options are set to defaults
for the most common print tasks, you can customize options in each area.
CHAPTER 27: Printing: Professional Output 857
27
Setting Image Position and Size
Image Position And Size options control the position of the layout of each page. These
settings will override settings you’ve defined in Printer Properties (your system’s printing
preferences, which aren’t related to CorelDRAW). The following options are available:
●
As In Document This option (the default) leaves the current layout unchanged.
●
Fit To Page Choose this to enlarge or reduce your page layout to fit exactly within
the printable area for your selected output material size. Understand that choosing
this option immediately ruins as a print any precise measurements you’ve created in
your file. For example, if you’ve labored on a fancy spine design for a presentation
booklet that’s 12" high, CorelDRAW will scale the design for print to the maximum
dimension of your media, such as an 8½×11" sheet of paper. If you run into this
problem, hang on and check out the Print Tiled Pages option covered shortly.
●
Reposition Images To Choose this option to change the position of images as they
print relative to how they’re arranged on your CorelDRAW page. By default, images
are automatically positioned to Center Of Page on your printing material. However,
you can align images to the top, left, right, and bottom corners of the printing
material page size—a very convenient way to save paper and to make trimming a
printed piece easier. Using this option, you can also individually specify the position
of images on each page of a multi-page document differently by choosing a
document page number from the Settings For Page menu. Use the Position, Size,
and Scale Factor boxes to enter specific values. Unlocking the horizontal/vertical
lock by clicking the nearby lock icon gives you the opportunity to set the horizontal
and/or vertical Scale Factor separately for non-proportional scaling, although you
might not want a distorted print.
●
Imposition Layout Imposition is the orientation and position of multiple pages to
create a book signature—pages are ordered and rotated so that a commercial press
can print a large page, and then the pages can be trimmed and bound so the book
looks like a finished product. If you intend to print to high-resolution output, this
option must be set exactly according to the specifications given to you by the
printing service or other vendor you are using. It’s always wise to talk with press
operators (or their boss) before an expensive print job, because the owners of the
press know the characteristics of it better than you do. Clicking the Edit button
opens a preview feature, where you can customize the imposition requirements; you
can rotate pages, move gutters, and even reorder pages at the last minute. However,
Imposition Layout is also an important feature even if you’re at home printing a
single copy of a booklet from your inkjet printer. Next you can see a layout defined
from a four-page CorelDRAW document; a template was not used to set up the file,
and yet by choosing from the Imposition Layout drop-down, you ensure that the
pages will indeed be printed in book fashion.
858 CorelDRAW X5 The Official Guide
Ill 27-4
Tiling Your Printed Document
Often you’ll need to print a piece that is much larger than the maximum output size of a
personal printer: a bake sale banner, for example, or other display that exceeds even the
output dimensions of today’s wide-format inkjet printers. This need calls for using the Print
Tiled Pages option. After printing, get a utility blade, a metal ruler, some adhesive, and a
cutting surface, and you’re in business. The options for setting how each tile is printed are
as follows:
●
Print Tiled Pages Choose this option to print pages in portions. Once selected, the
# (Number) Of Tiles, Tiling Marks (you want to use Tile Overlap if you use this, to
avoid showing the marks in your finished project), and Tile Overlap options are
available. The # Of Tiles option lets you print your document in vertical or horizontal
tiles, up to 24 portions for each. Setting the Tile Overlap option gives you control
over how much image portion is repeated around the edges of each tile, based on
unit measure or a percentage of the original page width. By default, Tile Overlap is
set to 0 inches.
●
Tiling Marks Choose this to have crop-style marks print around your tiles,
making it easier to realign the tile pages when you put the tiles together.
●
Tile Overlap This option adds an extra printed portion around each tile to make
it easier to align the tiles for your large sign. Overlap can be set from 0 through
2.125 inches.
CHAPTER 27: Printing: Professional Output 859
27
●
% of Page Width Use this to specify the tile overlap as a percentage of the page
size between 0 and 25 percent.
●
Bleed Limit Choosing this check box lets you use a portion of the area surrounding
your document page. For example, if certain objects overlap the page border of a
document, this option lets you print a portion outside the limits of the page. Bleed
Limit can be set within a range of 0 to 40 inches, the default of which is a standard
0.125 inch.
The illustration here shows dashed lines (which would not be in the finished banner)
where the single sheets tile in the bake sale banner, only one of scores of needs for tiling
a print when your budget prohibits extra-extra-large-format prints.
Ill 27-5
Printing Separations
If you know what color separations are and you work at a commercial printer, this next
section is for you. If you hire a commercial printer when you have a color job and only have
a working understanding of process color and separations, read on to learn a little more, but
860 CorelDRAW X5 The Official Guide
don’t provide a commercial press operator with your own color separations! CorelDRAW
creates terrific color separation work, but you really need to output to a high-resolution
(expensive, you don’t buy them at a department store) image-setting device that can render
to film or another reproduction medium. You need to know as much about the printing
characteristics of a printer as you do about color separations to prepare your own job for
printing presses—for example, trapping margin of error, undercolor removal, ink characteristics,
and other factors. You probably wouldn’t practice brain surgery on yourself—similarly,
don’t do your own separations (“seps”) if you’re inexperienced in the field of standard web-
offset printing.
If you’re a silk screener or know a commercial press inside-out, when Print Separations
is selected in the Color tab of the Print dialog, you have control over how each ink color
prints; see Figure 27-3.
CHAPTER 27: Printing: Professional Output 861
27
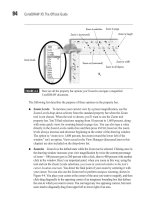
FIGURE 27-3 Use the Separations tab options to specify ink colors and trapping preferences.
Choosing Separation Options
If you’ve first chosen Print Separations on the Color tab, you’ll now see the Separations tab
in the dialog. Here is the rundown on your color separation options as shown in the dialog in
Figure 27-3:
●
Print Separations in Color This option is available only if the printer you’ve
defined is a color printer such as a personal inkjet, which prints a simulation of a
coated printing plate, each plate reproduced in its respective color. This option is
sometimes used for printing progressive proofs, checking registration, and checking
color accuracy. Understand that if you use this option on a personal inkjet printer,
you’ll print several pages, each containing a single color; this could use a lot of ink,
particularly if your CorelDRAW is dense with colored objects! Printing separations
in color results in a good test for separations, but it’s nothing you would want to
frame and hang in the den later.
●
Convert Spot Colors To This option has been moved to the Color tab in version
X5. Choosing this option is often a wise choice in non-color-critical printing, when
you can’t afford to print a fifth plate using a spot color. This option converts non-
CMYK colors such as fixed-palette, spot-ink colored objects to the closest process
color equivalent when printing. You can usually get away with this if your spot color
is not a special ink, such as a metallic. Letting CorelDRAW convert a metallic,
fluorescent, or other specialty spot ink to process will dull the final print job; the
results will look amateurish at best.
●
Show Empty Plates While unchecked (the default), this option causes pages
without any objects to be skipped during printing to avoid printing blank pages. To
include the blank pages, check this option. This can save you time, for example, if
you have a spot color on only one page but not on others in a multi-page document.
Frequency and Angle and Overprint Options
When separations are selected to print, the ink colors used in your document are listed at the
bottom of the Separations tab. Each ink includes options for choosing if and how they will
be printed. You’ll see a series of columns that show how each ink color is set to print, with
its color reference, ink color name, screen frequency, screen angle, and overprint options.
The inks will ultimately print in order from top to bottom as you see them on the list.
First, don’t change the frequency or line angle unless you’re a professional—the default
values are standard among the printing community. To change the Frequency and/or Angle
of a specific ink color, first check the Use Advanced Settings check box, then click directly
on the value, and then enter a new value. To change overprinting properties of a specific
ink color, click directly on the Overprint symbols for text and/or graphic objects to toggle
862 CorelDRAW X5 The Official Guide
their state. As a visual reminder the Overprint symbols turn darker when set to overprint.
The following list explains what each of these options controls:
●
Order Use the selector for each ink to set the order in which separations are
printed based on the number of available ink colors.
●
Frequency This option sets the output resolution in lines per inch (lpi); high-
resolution image setters that speak PostScript organize dots for printing into lines.
A typical line frequency for high-quality printing is 133 lpi, which results in color
process prints of 2,500 dots per inch and higher. In comparison, a home laser printer,
the 1,200 dpi variety, is only capable of rendering 80 lines per inch—you would not
get magazine-quality prints using 80 lpi for color separations. Screen frequency
values are automatically set to the default values of the image setter or printer
selected on the General tab. Screen frequency values are also controlled by settings
in the Advanced Separations Settings dialog.
●
Angle This option sets the angle at which the rows of resolution dots align. When
separating process color inks, the following standard default screen angles are set
automatically: Cyan = 15°, Magenta = 75°, Yellow = 0°, and Black = 45°. When
separating fixed palette ink colors such as Pantone, TOYO, DIC, and so on, all
colors are set to the default 45° value. You occasionally need to check the Issues tab
when custom inks are used for spot-color plates to ensure that the spot plate is not at
the same or even similar angle to the process plate screen angles. Change the angle
if necessary; an incompatible spot-color screen angle can result in moiré patterning
in your print, an effect similar to laying a screen window on top of another one at a
certain angle.
●
Overprint Click directly on the symbols for text (the A symbol) and/or objects
(the page symbol) to set whether text and/or objects for each ink are printed. Both
states toggle on or off when clicked, and a gray overscore above the icons confirms
your alterations.
If you’ve used even one spot-ink color in your document—or perhaps more than just
one—these inks will separate at the default 45°. Consult with your print vendor for
the correct screening angles for overlapping fixed-palette, spot-ink colors.
The Use Advanced Settings option is always dimmed unless you have a PostScript
printer selected. When it’s enabled, advanced settings will override settings in the
Separations tab. Clicking the Advanced button displays the Advanced Separations Settings
dialog, shown next.
CHAPTER 27: Printing: Professional Output 863
27