101 QUICK AND EASY SECRETS FOR USING YOUR DIGITAL PHOTOGRAPHS- P6 pptx
Bạn đang xem bản rút gọn của tài liệu. Xem và tải ngay bản đầy đủ của tài liệu tại đây (387.94 KB, 5 trang )
Organizing Photos on Your Computer
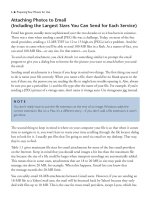
The first thing you have to do before you organize your photos on your computer is get them
there. For methods of transferring your photos from one electronic device to another, see the
“Using a Memory Card Reader to Transfer Photos” section later in this chapter. After you get
your photos on your computer, you have to rename them and then back them up.
You’ll probably want to keep all of your original pictures in one folder on your computer.
If you’re using a PC, that folder is called My Pictures. On a Mac it’s called Pictures.
Each time you download pictures from your camera to your computer, you can opt to create a
folder inside your Pictures or My Pictures folder with the name of the place where the pictures
were taken. For example, I took a Caribbean cruise in 2008. I took pictures at each port I visited.
When I got back from the port, I downloaded my pictures into a folder named Caribbean inside
my folder for 2008 (which is in my Pictures folder). I added a folder inside the Caribbean folder
and downloaded the images into it for each port I visited. When I got home, my pictures were
organized as shown in Figure 1.7.
Preparing Your Photos for Use ■ 11
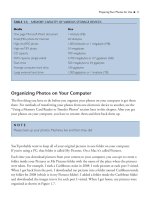
TABLE 1.3 MEMORY CAPACITY OF VARIOUS STORAGE DEVICES
Media Size
One page Microsoft Word document 1 kilobyte (KB)
Small JPEG photo for Internet 20 kilobytes
High-res JPEG photo 1,000 kilobytes or 1 megabyte (MB)
High-res TIFF photo 24 megabytes
CD capacity 700 megabytes
DVD capacity (single-sided) 4,700 megabytes or 4.7 gigabytes (GB)
Flash drive 500 megabytes to 64 gigabytes
Average computer hard drive 100 gigabytes
Large external hard drive 1,000 gigabytes or 1 terabyte (TB)
NOTE
Please back up your photos. Machines live and then they die!
Windows Vista and XP let you rename files with a common name and sequential numbers by
batch-renaming files. In Mac OS X, you can rename files using the Automator application.
To rename files in Windows, navigate to the folder with the files you want to rename in My
Computer, select the files (select the first file, hold down the Shift key, and then click on the
last file) and choose File > Rename. Type in a new name for the first file in the folder and press
Enter. To undo the change, press Ctrl+V.
To rename files on a Mac, you use the Automator (see Figure 1.8), which is a bit trickier, but
once you get the hang of it, it’s a cinch. First you open the Automator. A window will come up,
giving you several options. Choose Custom. You’ll now see the window in which you build a
workflow. (It sounds dreadfully painful, but it’s actually fun after you see how it works.) There’s
a huge selection of commands from which to choose. You are going to pick three, one by one,
and click and drag each from the right side of the window to the blank space on the left side of
the window. The first one you’ll choose is Get Specified Finder Items. The second is Sort Finder
Items, and the third is Rename Finder Items.
Next, click on Add in Get Specified Finder Items. A navigation menu will come up, in which you
navigate to the images whose filenames you want to change. While holding down the Shift key,
click on the first and last files. Click on Add. Select the same settings for each action as you see
in Figure 1.8 except for New Name. For New Name, type in the name you want for the file list.
12 ■ Preparing Your Photos for Use
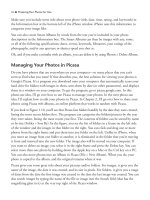
Figure 1.7 The organization of my Caribbean cruise images.
In Figure 1.8 I chose St_Lucia because that’s the port I visited on the Caribbean cruise. Finally,
click Run at the top of the window. Your files’ names will now be changed.
Preparing Your Photos for Use ■ 13
Figure 1.8 This is how your workflow should look to change filenames on a Mac.
WHAT ABOUT STORING PRINTS?
If you want to make it in the on-the-ground photography world, you’re going to need to know
how to both store and present your print photographs. First, let’s begin with the question of
what is the best way to store your photos.This question can be dicey when it comes to the
technology that is used today for photo storage.The best way to keep your photos for gener-
ations is to have them printed (see “Outsourcing Your Printing” in Chapter 4) or to print them
yourself. (For printing tips, see the ideas in Chapter 4.)
NOTE
Other programs, such as Picasa, also let you rename files quickly and easily. (See the “Managing
Your Photos in Picasa” section.)
Managing Your Photos in iPhoto
When I use iPhoto, the first thing I want to do is import my image files to my iPhoto library.
Because I’ve already put my images in the Pictures file of my Mac, iPhoto can take those pictures
and put them in its Library if I select File > Import to Library.
When you move pictures from your computer (not your camera) into iPhoto, iPhoto will make
a copy and a thumbnail of the picture. The copy and thumbnail will be put into an iPhoto
Library. The original will remain where you put it on your computer. When you download
images into iPhoto from your camera, the photos go directly into the iPhoto Library with no
copies anywhere else on your computer.
14 ■ Preparing Your Photos for Use
Safeguarding prints so they last more than a lifetime is more than just throwing them into a
shoebox and shuffling though them when you want to use some. Cardboard boxes contain
acid and lignin (a complex polymer), which can cause your photos to yellow and deteriorate
over time. If you do choose a box, there are acid- and lignin-free boxes you can buy online.
There are compartmentalized boxes so that you can divide up your photos by category. Get
Smart Products has boxes of various sizes up to 22×30 inches.
You have to be careful when you store prints in photo albums and binders, too.The best
albums to get are ring-binder notebooks with archival-quality polypropylene photo pages.
Last, but most important, are the presentation tools you’ll need to show off your photographs
to galleries and other venues.There are presentation portfolio cases and portfolio books for
displaying your photos that you can buy on the Internet. (One such place is portfolios-and-art-
cases.com.) Each portfolio usually comes with 10 individual page archival protectors, which can
hold 20 photographs (one photograph on each side).You can also buy extra page protectors
if you need more.
NOTE
You can also download your pictures directly from your camera into iPhoto.
NOTE
When you’re importing folders into iPhoto, iPhoto will make an album with the same file-
name as the folder on your computer.
Creating a new album is a snap. You can create one by clicking on the + sign on the bottom of
the window or by selecting File > New Folder. Once you create a new album, you can click and
drag pictures from the right side of the window onto the album icon on the left side of the
window. When you do this, iPhoto will duplicate a new thumbnail of the picture so it shows
up in the new album. The thumbnail of the original will remain in place.
The next thing you’ll want to know about iPhoto is what the Smart Albums are all about.
Suppose I have a group of random images that I pulled from my external hard drive that are
not organized. I want them organized by the year I took them. Since most of them (all the ones
I downloaded from my camera) are dated with internal scripts, iPhoto will be able to arrange
them by date. To do this, I need to use a Smart Album.
Say, for example, I want to find all the images from 2008. I’d make a Smart Album (File > New
Smart Album) whose search criterion is a date that is after 12/31/2007 and before 1/1/2009.
Figure 1.9 shows the dialog box with this info. All files with a capture date (digital cameras) or a
created date (scanned) in that year will be in the 2008 folder after I click OK in the New Smart
Album box.
Preparing Your Photos for Use ■ 15
Figure 1.9 You can create an album for any time period in iPhoto.