101 QUICK AND EASY SECRETS FOR USING YOUR DIGITAL PHOTOGRAPHS- P7 ppt
Bạn đang xem bản rút gọn của tài liệu. Xem và tải ngay bản đầy đủ của tài liệu tại đây (401.95 KB, 5 trang )
Make sure you include some info about your photo (title, date, time, rating, and keywords) in
the Information box at the bottom left of the iPhoto window. iPhoto uses this information to
categorize your image files.
You can also create Smart Albums by words from the text you’ve included in your photo
descriptions in the Information box. The Smart Albums can then be images with any, some,
or all of the following specifications: dates, events, keywords, filenames, your ratings of the
photographs, and/or any aperture or shutter speed you shot at.
Oh, and if you make a mistake with an album, you can delete it by using Photos > Delete Album.
Managing Your Photos in Picasa
Do you have photos that are everywhere on your computer—so many places that you can’t
seem to find what you want? If that describes you, the best solution for viewing your photos is
Google’s Picasa. It’s a program you download onto your computer that automatically scans your
hard drive for folders with images in them, sorts them by date (or other parameters), and displays
them in a window on your computer. To get the program, go to picasa.google.com. In this
photo-use idea, I’ll go over how to use Picasa to manage your photos. In the next photo-use
idea, I’ll explain how to edit your photos in Picasa. In Chapter 2, I’ll go over how to share your
photos using Picasa web albums, an online platform that works in tandem with Picasa.
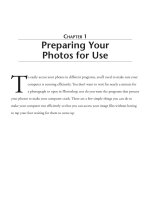
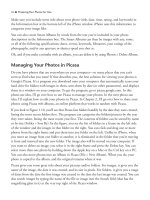
If you look at Figure 1.10, you’ll see that Picasa lists folders handily by the date they were created,
listing the most recent folders first. The program can categorize the folders/pictures by the year
they were taken, listing the most recent year first. The contents of folders can be sorted by name
or by size (Folder > Sort By). In the figure, you see the list of folders in a frame on the left side
of the window and the images in that folder on the right. You can click and drag one or more
photos from the right frame and put them into any folder on the left. Unlike in iPhoto, when
you move an image from one folder to another, it is eliminated in the folder that you’re moving
it from and inserted into the new folder. The image also will be moved on your computer. If
you want to delete an image, you select it in the right frame and press the Delete key. You can
select more than one photo by holding down the Apple key on a Mac or the Ctrl key on a PC.
You can also move photos into an Album in Picasa (File > New Album). When you do, your
photo is copied to the album, and the original remains where it was.
Picasa gives you some great info about your pictures and/or folders. For images, it gives you the
name of the image, the date it was created, and its size in pixels. For folders, it gives you a range
of dates from the date the first image was created to the date the last image was created. You can
also search images by typing the name of the file or image into the Search field (that has the
magnifying glass in it) at the very top right of the Picasa window.
16 ■ Preparing Your Photos for Use
Picasa has a face recognition system where the program can find all the pictures of people you
have in a folder. If a folder has images of people in it, a face button will appear among the other
buttons right under the picture of the folder and the folder name. When you click on the face,
all of the images with faces on them will appear.
There’s a lot more Picasa can do, too, especially when you include its online partner, Picasa Web
Albums. You’ll notice a Sync to Web button (under where it says Save to Disk) in Picasa in the
top-right part of the window. When you click that, everything you do will be put online into
Picasa Web Albums as you do it. To get set up with Picasa Web Albums, see Chapter 2,
“Sharing Your Photos Online.”
Preparing Your Photos for Use ■ 17
Figure 1.10 Click and drag a photo from the left frame into a folder on the right.
NOTE
You can export copies of a picture (this converts all copies to JPEGs with a choice of
resolutions) to other folders on your computer using the Export button at the bottom of
the window.You have the option of putting a watermark on the photo when you do this.
Finally, you can create collages and slideshows with images from any one folder. To make a
collage, see Chapter 3. To create and save a slideshow movie, see Chapter 12, “Working with
Slideshows.” If you’re in a hurry, move your cursor over the rest of the buttons under the folder
name to get a description of what the button will do. Then you can get started with slideshows
and collages.
Using Image Processing Programs to Tweak Your Photos
There are dozens of image processing programs in which you can tweak your photographs to
make them look better or change them altogether. There are many options for minor tweaks
within the platforms of online photo hosting sites. And you can purchase more sophisticated
image processing programs. The most popular are Photoshop and Photoshop Elements. Finally,
there is one high-end program you can download from the Internet for free, called GIMP.
Flickr
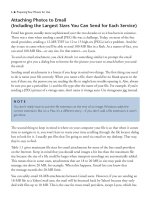
On Flickr, there is an Edit option in a list of options that spreads across the top of each photo.
The first time you click on it, you find out that Flickr has partnered with Picnik so that Flickr
users can edit their photos online. Once you go through the hoops of approving the Flickr/Picnik
agreement, you’re on your way to using some nifty editing tools. Figure 1.11 shows the tools
you can use to tweak your photos.
18 ■ Preparing Your Photos for Use
Figure 1.11 Flickr has teamed up with Picnik to let you edit your photos online.
Picasa
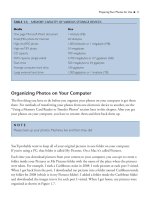
When you double-click on a photo in Picasa, a window appears with a host of editing options
(see Figure 1.12). There are three tabs you can choose from for your editing options—Basic
Fixes, Tuning, and Effects. When you click on the Basic Fixes tab, there are numerous buttons
—some of which take you to new menus for the adjustments—to crop, straighten, adjust red
eye, adjust auto contrast/color, and retouch. In the Tuning tab, there are sliders you can use to
adjust the fill light, highlights, shadows, and color temperature, as well as a color picker, which
changes the colors of your image when you click on it. Finally, there’s the Effects tab, where you
can apply a variety of effects, from sharpening your photo to giving it a sepia tone.
Photoshop/Photoshop Elements
Photoshop and Elements (for short) have to be the two most popular image processing programs
around. If you’re using these programs, it’s likely you have a dSLR (digital Single Lens Reflex)
camera, and you are taking pictures in Camera Raw format. Camera Raw is a different format
from JPEG and TIFF in that it stores extra information about the picture. The format allows
you to “develop” the file before you open it in Photoshop or Elements. That is, you tweak
the image in a kind of pre-processing before you put it in either Photoshop or Elements.
Preparing Your Photos for Use ■ 19
Figure 1.12 Picasa has a variety of editing options.
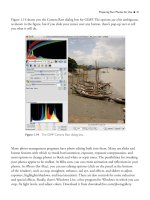
Most of the time, you’ll find that tweaking using the sliders in the Camera Raw dialog box is all
you have to do to process the image. Figure 1.13 shows you what the Camera Raw dialog box
looks like. Another good thing about Camera Raw is that you can always revert the image back
to the way it was, because you really never save the file outright (like you would a JPEG or
TIFF file)—you just save all the data that was used to take the picture.
GIMP
The best thing about GIMP is that it’s free. How cool is that? You can download it at
www.gimp.org/downloads. It’s not a bad program, either. It can do most things Photoshop
can do, but the interface is a bit more complex than that of either Photoshop or Elements.
20 ■ Preparing Your Photos for Use
Figure 1.13 The Camera Raw window in Photoshop.
NOTE
If you don’t need custom CMYK separations, 16-bit support, animation, slice exports, and
other high-end options that perhaps you haven’t even heard of, go with Photoshop Elements
instead of Photoshop. It will probably have everything you need for your post-processing
needs (including the Camera Raw window). It’s cheaper, too. Elements is about $99, and
Photoshop is about $650.