101 QUICK AND EASY SECRETS FOR USING YOUR DIGITAL PHOTOGRAPHS- P10 pptx
Bạn đang xem bản rút gọn của tài liệu. Xem và tải ngay bản đầy đủ của tài liệu tại đây (319.67 KB, 5 trang )
Sharing Using Picasa and Picasa Web Albums
In Chapter 1 we talked about managing your photos on your computer using Picasa. Google has
another program—Picasa Web Albums—that lets you share your photos online. Once you’re
signed into Google, you can send your photos by email from Picasa or from Picasa Web Albums.
The program works with both Picasa and iPhoto. In order to share photos online with Picasa
Web Albums, you have to create a Google account. To do that, go to www.picasaweb.google.com.
You’ll see a place to register on the right side of the window, where there’s a button to create an
account.
I can remember my surprise the first time I opened Picasa Web Albums. As a member of Blogger
(a blog-building site that you must register with Google to use), my images from my blog were
already put into Picasa Web Albums without my being aware of it. More about blogging in
Chapter 6, “Photo Blog Heaven.”
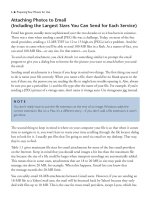
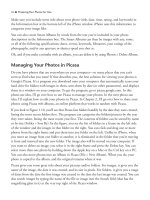
The first thing you want to remember when using Picasa Web Albums is that clicking on the
tab My Photos (see the top of the window shown in Figure 2.2) will take you to your albums
that are online.
Sharing Your Photos Online ■ 31
Figure 2.2 Picasa Web Albums can locate all the people in your pictures and show them to you so
you can name them.
If you have pictures on your computer that you want to put into Picasa Web Albums, you can
do it automatically from Picasa using the Sync to Web feature in the manner described in the
“Managing Your Photos in Picasa” section in Chapter 1. If you want to do it manually, you
must have Picasa installed on your computer. In that program, you click on the Upload button
that appears at the bottom of the window after you open the program. The Upload to Web
Albums window will appear, where you can select options from two drop-down menus.
On the Your Photos homepage are image links to all your albums. When you click on an
album, you see the pictures that are in it; when you click on one of those pictures, you see
the picture enlarged. You can perform actions on the page where the pictures in an album are
displayed or where an individual picture is displayed. If you want to delete a Picasa Web Album,
you click on the album on your homepage (you’ll have all the pictures in the album shown) and
choose Edit > Delete Album to get rid of all the pictures in it. To email a link to the pictures in
the album to someone, you click on the button that says Share and fill in the email address that
you want the link sent to in the email that appears. To delete or send a picture, click on one of
the pictures shown in the album. You’ll get a window with the enlarged picture inside. Choose
Edit > Delete to get rid of the picture. Choose Share to email the image.
To set up Picasa Web Albums’ face-recognition technology and to share the people the technol-
ogy finds, click on Settings. Scroll down to where it says Turn Name Tags On. Also, make sure
the Hide Name Tags in My Public Albums by Default option is not checked. Then click on
Save Settings. Now, if you click on the People tab on the homepage, Picasa will locate all the
pictures of people in your albums. From there, you can name the people who are in the pictures
and send those people emails of the pictures.
Posting and Sharing at Shutterfly
In terms of storing your photos, Shutterfly has got to be one of the best photo hosting sites
around because there are no restrictions on the amount or size of the photos you upload.
Shutterfly makes its money by selling calendars, cards, photo books, and other items that contain
your pictures in their online store. First, you have to sign up at the site. It’s easy—just enter
your name, email address, and password, and then you confirm by an email that is sent to you.
After you sign in, the site is neatly laid out with the main links running across the homepage of
the site. Clicking on My Shutterfly will always bring you back to your homepage.
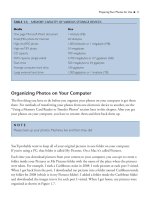
The first thing you probably want to do in Shutterfly is upload pictures. To do this, just click
on My Pictures. If you have all the photos you want to upload in one folder on your computer,
you can navigate to it after clicking on the Upload button. If you want all the files in a folder to
be uploaded to Shutterfly, hold the Shift key and click on the first and then the last file to select
them all. Figure 2.3 shows the Upload Pictures window.
32 ■ Sharing Your Photos Online
When I tested Shutterfly, I found that it takes about five minutes to upload 30 MB worth of
files. Not bad for 11 high-res photos!
After you upload, the album appears in the interactive window on the My Pictures page with
the date it was uploaded. Double-click on the album, and you’ll get all your pictures displayed
in the interactive window (see Figure 2.4). You can move any of them around (or delete them)
by moving your cursor over them and clicking on the downward-pointing arrow to the right of
the filename. (A drop-down menu gives you an assortment of choices for what you want to do
with the file/album/picture.) You can also move any of your pictures around by clicking and
dragging them where you want (even into the folders in the left frame). Finally, if you click on
the picture name, you can input info such as a description of the image.
To email pictures, just select the ones you want and click on the Share button. You get two
options after clicking the Share button—Email These Pictures and Add to My Share Site.
If you choose to email them, an email comes up for you to send them to whomever you want.
If you choose Add to Share Site, you’ll have to have one built (which Shutterfly lets you do).
When you’re finished emailing, you’ll find that you can post the images to a number of social
networking sites, blogger sites, and sites such as www.Digg.com and www.StumbleUpon.com.
Sharing Your Photos Online ■ 33
Figure 2.3 You can upload multiple files in Shutterfly.
Posting and Sharing at Photobucket
You could call Photobucket the Hollywood of image hosting sites. The first things you might
see when you get to the site are the latest pics of Hollywood stars and ads promoting their
movies. It’s easy to register, though—no need for email confirmation.
One of the nicest things about Photobucket is that it gives you a URL for every photo (and for
albums) you post, so you can copy the URL to other programs. It even gives you HTML code
so you can put your picture into blog templates. (You’ll learn more about blogs in Chapter 6.)
34 ■ Sharing Your Photos Online
Figure 2.4 The View and Organize window of Shutterfly.
NOTE
After you register at Photobucket, you are taken through several windows of special offers.
You must scroll down and click on the Skip button to remove the window.
Also, on your Main Album page (My Albums tab), you have options to share your albums on
Facebook, MySpace, and Blogger (among other sites). When you share an album, it will appear
on the site as a slideshow. How cool is that?
To upload images, you just click on the Choose Files button, below where it says Upload
Images & Video. There’s a drop-down menu next to where it says Reduce To that lists sizes
from tiny to 1 MB. Photobucket automatically changes the size of your file when uploading—
as close as possible to the specs you provide. If you want to upload more than one image, hold
down the Shift key to upload contiguous images; hold down the Command (Mac) or Ctrl
(Windows) key for non-contiguous images.
Just in case if you were wondering where your pictures went, wonder no more. They’re added at
the bottom of the Main Album webpage window when the upload is complete.
After you upload, you’ll get a window where you can type in titles, descriptions, and tags. You
can do that right away or go back to it later by clicking the sliding cursor over Albums &
Upload and clicking on Tags.
Every new album you create is listed and linked to the pictures inside it on the left side of the
Main Album, under the heading Albums. (If you can’t see it, click on the arrow next to the
word to make the drop-down menu appear.) You can add new albums where it says Add a New
Album on the left side of the window. You can see these options in the left side of the window
shown in Figure 2.5.
Sharing Your Photos Online ■ 35
NOTE
As soon as you click Select in the Upload navigation window from which you choose images,
your files are uploaded. No ifs, ands, or buts about it.
NOTE
The Main Album webpage is also referred to by your username and Main. Click on any of
those linked words, and you’ll be brought to the Main Album webpage. On most other sites,
the Main Album would be called the homepage.