101 QUICK AND EASY SECRETS FOR USING YOUR DIGITAL PHOTOGRAPHS- P12 pps
Bạn đang xem bản rút gọn của tài liệu. Xem và tải ngay bản đầy đủ của tài liệu tại đây (411.07 KB, 5 trang )
What MySpace does next is a lot of fun. First, at the top of the page, you have an opportunity
to take a photo of yourself using your computer’s webcam. Just follow the prompts. As far as
uploading pictures, you’re presented with a navigation toolbar on the left and an interactive
place to choose your photos by their thumbnails on the right.
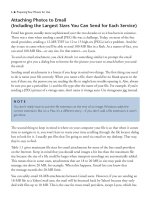
To select the photos you want to upload, just navigate to them on the left side of the window
and select them on the right. You can choose to put them in an album you already have (using
the drop-down menu at the bottom left of the page), or you can create a new one by typing a
name for it in the space just to the left of the Upload button. Figure 2.9 shows what all this
looks like.
When you’re finished uploading photos, there’s a place where you can add captions and tags to
them. Tags here are different than what they were for other sites. In MySpace, you tag people
in photos by which friends they are in the friends you have listed, so when you scroll over the
picture of the person in the photo, it’s identified with a pop-up of a person’s name.
Sharing Your Photos Online ■ 41
Figure 2.9 MySpace’s interactive navigation to upload photos.
NOTE
MySpace limits photo sizes to less than 5 MB each.
To view and share your photos, click on Profile > My Photos. After you click on an album, the
photos in that album will show up. This is where you have the opportunity to send the album
to faraway places. Just click on Click Here to Share This Album with Friends. To send an
individual photo by email, click on the image you want, scroll down to below the image on
the page that comes up, and click Email to a Friend. You can also click on Share, which lets
you send the photo off to Facebook and other places such as www.Digg.com, which is a social
content site where people vote your photo thumbs up or down—called digging it.
Creating a Facebook Photo Album
Facebook is extremely popular. It’s a place where adults (of late, it has become extremely popular
with the over-50 set) can go back to their youth by reuniting with people they haven’t seen in a
long, long time.
When you sign up for Facebook, you’re taken to a homepage. This is the page where you get
information about what your friends are doing (after you get a couple of friends, that is). This
is where you can see the most recent pictures your friends have taken.
If you don’t join a group, you’ll only see profiles and pictures of the people you’ve made friends
with. Once you’ve joined and have a few friends, you’ll get lots of news and images from your
social group. By joining a photography group (type photography in the search space in the
upper-right corner of the Facebook window), you can upload pictures that members of the
photography group can see. (Some groups have more than 50,000 members.) To see the groups
you’ve joined, navigate to Profile and then click on the Info tab.
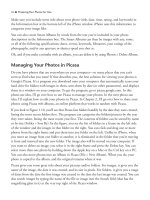
To get to your Photos page on Facebook, navigate to Profile, then click on the Photos tab in
the window that comes up. To upload photos to an album, click on Create a Photo Album on
the right side of the Photos page. Facebook will ask you for the name of the album and the
location of where the images were taken. It will also give you a drop-down menu of choices
for how private you want the photos to be. Make your selection and then click Create Album.
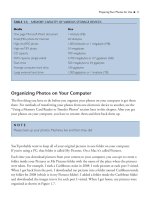
An interactive navigation menu will come up in the window, with your folders on the left and
the images that are inside them on the right. You navigate to the folder you want and then
choose from its contents on the right. Figure 2.10 shows an example. In the figure, you can see
42 ■ Sharing Your Photos Online
NOTE
Sites such as Digg and Shoutwire let you submit articles and photos, and people vote on
whether or not they like them.The ones that get the most votes rise to the top of the heap.
I’ve named the album Matt Bamberg Photography, because it’s a sample of my photography
that I want people to see. It also says the max upload is 60 photos. So now I click on the
Upload button. When the upload process is finished, you’ll get a note that your photos have
been uploaded.
In the next window your unpublished photos are displayed. Here you can provide tags for
them, as you can on MySpace, selecting a person in an image by clicking on that person in the
image and entering his or her name. You can also delete photos here. You’ll always be able to
come back to this—the Edit Photos page—by clicking on the first tab of the row at the top of
the window. When you’re ready to publish, click Publish Now. The other tabs across the top
of the window let you add more photos (taking you back to the interactive navigation), organize
your photos (which gives you an interactive window to click and drag your photos around), edit
the name of your album, and delete the album.
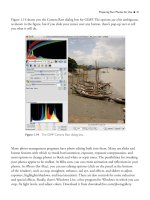
The last thing that happens to your photos is automatic. They get shared on the homepages
of all your friends. They’ll also be posted on the wall of your Profile page. Your wall includes
everything you’ve done, including your conversations with others. Figure 2.11 shows the
announcement that I’ve posted new photos.
Sharing Your Photos Online ■ 43
Figure 2.10 Interactive navigation to your computer in Facebook lets you click on a
photo to upload.
Wait—there are a couple more things you can do with an individual photo by clicking on one
in an album. In another window, the photo comes up enlarged, with a couple new options of
what to do with it. Options are listed below the photo in the lower-right side of the window.
Click on the Send button, and you can send this photo to your buddies by email. Click on the
arrows, and you can rotate it. The rest of the options listed are ones you can also do when the
photo is in an album (and were discussed earlier). Finally, there’s your profile picture. To change
it or add one, click on the picture on the homepage. (If you don’t have one, click on the icon for
it.) You’ll have two choices on the left side of the new window that comes up—Upload a Picture
or Take a Picture. When you click Upload a Picture, you’ll be prompted to browse for your
photo. Locate the photo and click Open, and voila—your image will be on the Facebook page.
44 ■ Sharing Your Photos Online
Figure 2.11 An announcement is made to your friends that photos have been posted.
NOTE
Note that, much like MySpace, Facebook is constantly changing and updating their interface.
If the steps in this section don’t work quite as explained, it’s likely that Facebook has once
again updated the application.
Sharing Your Photos Online ■ 45