101 QUICK AND EASY SECRETS FOR USING YOUR DIGITAL PHOTOGRAPHS- P15 pptx
Bạn đang xem bản rút gọn của tài liệu. Xem và tải ngay bản đầy đủ của tài liệu tại đây (625.32 KB, 5 trang )
Finally, another one of the great aspects of this site is that you have the option to share the
family tree at dozens of sites, including Facebook and Twitter.
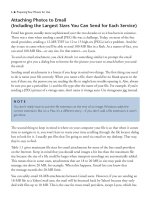
Making a Photo Webpage
If you go to Weebly.com, you can make a photo webpage easily (see the sample in Figure 3.8)
with a very user-friendly platform. You just use drag-and-drop commands on the site. After you
sign up for Weebly and get into the website editing platform, you’ll find under the Elements
tab of the window a set of options that run across the top of the page—Paragraph with Title,
Paragraph with Picture, Picture, Title, Paragraph, and other options. All you do is click and
drag the option down into the interactive frame below the options. Once you click in the
working box that is made after you’ve clicked and dragged down the option, a menu bar of
new options associated with that box will come up. (For text, it’s word processing options; for
images, it’s upload, border, position, and link.)
There’s another set of options that are listed for Elements in the top-left corner of the window.
If you want a gallery of pictures on a new Picture page (for a new page, click on the Pages tab),
click on Multimedia and click and drag the Photo Gallery icon onto the frame under the
Elements options. Click on Upload New Images at the top of the page in the menu bar that
appears, and your images will be brought into the webpage. You can click and drag the images
around and/or delete them by clicking on the red X in the right-hand corner of the image. You
can change the columns and spacing between the photos using the drop-down numbers at the
top of the frame.
Once you publish, you have the option to let friends and followers on Facebook and Twitter
know you have a new website. Finally, you also have the option to import a Flickr photo
slideshow of your Flickr photos.
56 ■ Sharing Your Photos with Family and Friends
NOTE
One drawback of TribalPages.com is that when you go to your family’s website, only the dead
people show up.They don’t show living people “for privacy reasons.”You have to sign in to see
them.
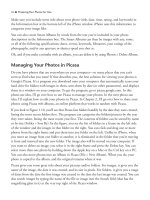
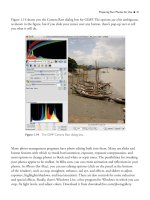
Making a Photo Collage
At some point in your online life, you’ll probably want to make a photo collage to share with
family and friends. These days, the quickest and easiest way to create a photo collage is to use
Picasa (see Figure 3.9). You can use Photoshop or Elements to do this, but the process is
complex with the use of many layers. Granted, if you know Photoshop or Elements, you have
many more options for making a collage. You can feather images in Photoshop and Elements,
for example, and you can’t in Picasa. However, as mentioned, Picasa provides a quick and easy
way to create a photo collage, so that’s what I’ll discuss in this section.
In Picasa, select Create Photo Collage under the folder that contains the pictures you want in
the collage. You can also individually select the pictures that you want in the collage and select
Create > Collage. Once you opt to create the collage, a new interactive window will come up,
where you can click and drag, rotate, or resize any of your images after they are selected. Now
you can start playing around with the images to create a collage.
Sharing Your Photos with Family and Friends ■ 57
Figure 3.8 Making a photo website is a cinch on Weebly.
One more feature worth being aware of is the View and Edit button—the last of three buttons
under the interactive window. If you select and click on an image after clicking on the View and
Edit button, the Library Tab becomes the editing platform for your image. To get back to your
collage after you edit, just click on the Collage tab at the top of the window.
At the top of the interactive window, there are four other important options: Select All, Select
None, Remove, and Set as Background. The Set as Background option is really cool—it takes a
selected picture and makes it the background of your collage.
58 ■ Sharing Your Photos with Family and Friends
Figure 3.9 Photo collage made in Picasa.
NOTE
You’ll notice three tabs at the top of the page: Library, Collage, and Import.You can toggle back
and forth between any of the three tabs—a feature that is useful when you go to edit your
pictures while you make your collage.
Wait…there’s more. The last thing to note is a set of options in the Settings frame to the left of
the interactive window where you play around with your images. From top to bottom in this
frame, you have the following set of options: a choice of options in a drop-down menu for
organizing your collage, a choice of picture borders (when you choose an option other than
Picture Pile, you’ll get a Grid Spacer slider to work with), background options, a drop-down
menu of page format options, a choice of landscape or portrait mode, shadow and caption
choices, and options to get your collage created or reset the images. Figure 3.10 shows all the
options when Picasa is set to Mosaic mode.
The last thing you do is click on Create Collage, one of four buttons at the bottom of the left
frame of Picasa’s window. Your image will be saved as a JPEG image in the Collages album of
Picasa.
Sharing Your Photos with Family and Friends ■ 59
Figure 3.10 Mosaic option in Picasa’s Collage Maker.