101 QUICK AND EASY SECRETS FOR USING YOUR DIGITAL PHOTOGRAPHS- P33 pptx
Bạn đang xem bản rút gọn của tài liệu. Xem và tải ngay bản đầy đủ của tài liệu tại đây (531.09 KB, 5 trang )
Creating Custom Postage Stamps with
Your Photos at Stamps.com
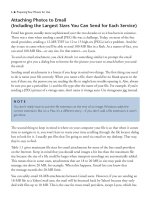
When you arrive at the window after clicking PhotoStamps at the bottom of the stamps.com
window, you can personalize your stamps with one of your own photos. Just click on Create
PhotoStamps, and you’ll be taken to a dialog box where you browse for the picture you want on
your computer. After you’ve found the photo you want, you click Choose and then click Next.
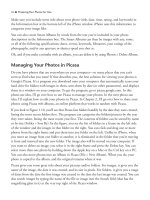
In the next window, you’ll see your image on a stamp (see Figure 9.7). It is here where you can
customize your stamp (edit it) using drop-down menus for border, color (of the number value
of the postage), and postage price. You can also rotate and/or zoom into your photo. When
you’re finished customizing, click Continue. In the next window, your cart (your invoice) for
20 stamps (1 sheet worth) for $18.99 comes up. Click on Check Out Now to pay (or to register
if you didn’t when you got to the site; registration requires that you give your home address).
When you’re finished making your stamp template and you’ve chosen which shipping option
you want, the stamps are sent to you by mail.
146 ■ Personal Accessories
Figure 9.7 Put an image of yourself on a stamp.
Personal Accessories ■ 147CHAPTER 10
Getting Published
T
here are many venues for having your photos published these days. Did you
know that there are probably thousands of websites that could use your pictures?
There are magazines and newspapers all over the world that devote a page (or
pages) to amateur photographer photos. They also accept submissions from new freelance
photographers (though you usually have to submit a portfolio and get it approved first).
Then there are your own blogs and websites. There are easy things you can do to get search
engines to list your photos to result in more hits (visitors) to them—things as simple as
naming your photo files a certain way. If you’re selling your photos, the more people who
see them, the more who are likely to buy them. Publishing ideas are detailed in this chapter,
with many novel ideas you can use right now.
Making Your Photos Web Ready
In the “Resizing Your Photos for Different Uses” section in Chapter 1, the resolution for
web-ready photos is discussed, as well as how to resize them in Photoshop (or Elements) to
make them web ready. After you resize an image, there are a number of things you can do
to make it look good on the web.
If you shoot in Raw format, it’s best to tweak your image as much as possible when you are
viewing it in the Raw window. (See the “Using Image Processing Programs to Tweak Your
Photos” section in Chapter 1.) However, you won’t be able to resize it at that point because the
Raw window contains no options to do that. It does, however, have options for cropping and
rotating your photos. After you’re finished tweaking in that window, you click on Open Image,
and your image appears in a new window where you can tweak using the tools of Photoshop’s
main program, including the Resize option.
Once your photo is open in the new window, or if you’ve opened your image as a JPEG or
TIFF file, you’re ready to start post-processing to prepare your image for the web. If you’ve
already edited your photo in Raw, you shouldn’t have to do much tweaking of color, brightness,
and exposure before you resize for the web.
Now, if you’re opening an existing JPEG or TIFF file, you’ll have to tweak using Photoshop’s
(or Elements’) tools. If your image is fairly decent (meaning it’s well exposed), you probably
won’t have to do much.
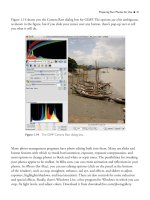
The first thing I do after opening an image and resizing it is make adjustments in the levels
(Image > Levels). I can make the image have more contrast and/or make it brighter or darker
using these options. Figure 10.1 shows the histogram, which you tweak by moving the right,
middle, and left sliders. To get the image ready for the web, this particular picture has to be
lighter. I made adjustments to do that by clicking and dragging the slider on the right to the
left at the beginning of the histogram (see Figure 10.2). If I wanted to make the image darker
(bring out the shadows), I’d click and drag the left slider to the right. The middle slider also can
be adjusted, usually to the left to add tones in the midrange.
If the image doesn’t look good (if it’s soft or has too many blown highlights) after I’ve made
adjustments in levels, I usually toss it and find a better one.
The last thing you want to do is save your photo for the web. To do that, navigate to File >
Save for Web & Devices. Check Optimized and then pay attention to the Quality setting.
When you move the Quality slider, check the size of the file (in KB) at the bottom left of
the window. You’ll notice that the file size gets smaller with diminishing quality. If you’re
working in an online platform that gives you a choice of photo sizes, that number matters.
150 ■ Getting Published