101 QUICK AND EASY SECRETS FOR USING YOUR DIGITAL PHOTOGRAPHS- P39 doc
Bạn đang xem bản rút gọn của tài liệu. Xem và tải ngay bản đầy đủ của tài liệu tại đây (552.47 KB, 5 trang )
CHAPTER 12
Working with
Slideshows
E
veryone loves a good slideshow, so why not get into the business of making them?
You can, you know, by using your images and music. There are several ways you
can do this, from making a slideshow using an online platform, to making one
with software that comes with most computers (Macs or PCs). Not only can you make
slideshows, you can also share them on YouTube, your blog, Facebook, and MySpace.
Each platform has a different set of options to put together your slideshow. On many you
can add transitions; on some you can add text on top of your images. Finally, if you opt to
show one of these slideshows at home on your TV set, it’s easy to connect your computer
to it so that you can show it to your friends and family.
Making a Movie from Your Images Using iMovie
For you Mac users, there is software that comes with your computer that allows you to make a
slideshow with your images, set it to music, and save it as a movie file or upload it directly to
YouTube.
To do this, find iMovie in your Applications folder, open it, and navigate to File > New Project.
Click and drag your images from the appropriate folder into the area where it says Drag Media
Here to Create a New Project. When you are dragging images, a light-green line will let you
know where they are going. After you’re finished dragging your images, you can change the
order by clicking and dragging them around. To view your show, click on the Play button at
the bottom of the thumbnail display.
To change the timing of the slideshow, drag the cursor over the first slide and click on the timer
icon that comes up. Input the duration for each slide in the dialog box that comes up.
To add music, click on the musical note icon. The music files that you have on iTunes will
come up. Click and drag the song you want up to the first photo thumbnail in your iMovie.
You’ll then see the name of your music file in a green strip below your thumbnail images.
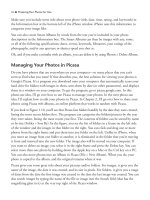
To add text to your first slide (make a title slide), click on the T icon. A choice of text options
will appear for the layout of your text. They will include images, but those images are only
samples. They will not be used when your text comes up in your project. To add text to your
first slide, just click and drag one of the text sample frames on top of your first slide. You’ll see
a text frame appear above the frame for your image. In the viewer portion of the window, select
the text by clicking and dragging over it and then type in the text you want. Figure 12.1 shows
you what your window will look like when you type in your text.
178 ■ Working with Slidehows
NOTE
To delete, make a selection and navigate to Delete > Selection.
NOTE
To control the amount of time the music fades in at the beginning of your show and fades out
at the end, click on the speaker icon and adjust the Fade In and Out sliders, respectively.
To save the movie as a .m4v file, navigate to Share > Export Movie. To save the movie as a .mov
file (one that can be read in Windows using QuickTime), navigate to Share > Export Using
Quicktime.
Making a Movie from Your Images Using
Windows Movie Maker
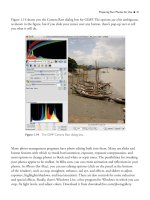
Movie Maker comes free with Windows Vista. It has all the nuts and bolts to make great
slideshows with your images (see Figure 12.2).
To make a movie, navigate to Start, then type Movie Maker in the Search box, then click
Windows Movie Maker when it comes up under Programs.
Click on Pictures under the Import heading. If you put the pictures you want for the slideshow
in your Pictures folder, you should see them in the window (Import Media Items) that comes
up. If you don’t, navigate to them. Select the pictures you want in your slideshow; use the Shift
key to select multiple files. Click on Import when you’re finished.
Working with Slideshows ■ 179
Figure 12.1 You can add text to your slideshows with iMovie.
Your pictures should now be visible in the Task and Content pane (the frame in the middle of
the window). Make sure Timeline is selected from the drop-down menu in the frame at the
bottom of the window. Click and drag your pictures to the video part of the timeline. If you
make a mistake, right-click and select Remove. You can change the order of the pictures once
they are on the storyboard. You can also preview your show by pressing the right arrow button
below the Preview window. Finally, you can change the time each slide shows on the screen by
navigating to Tools > Options. In the Options window that comes up, click on the Advanced
tab and change the time in the input box.
To add music, click Audio or Music and navigate to the music files on your computer and then
click Import. Click and drag the music file you want into the audio part of the storyboard. If
your music’s too long for your show, click and drag it to your last slide. To get your music to
fade in and out, go to the beginning of your show and navigate to Clip > Audio > Fade In and
then Clip > Audio > Fade Out.
To add a title for the first slide, click on Titles and Credits under Edit. In the next window, click
on Title on the selected clip. Choose your first image in the timeline and enter text for the title
(you’ll see a preview on a slide other than your own) and then click on Add Title.
180 ■ Working with Slidehows
Figure 12.2 Windows Movie Maker lets you make slideshow movies.