Microsoft SQL Server 2008 R2 Unleashed- P31 ppt
Bạn đang xem bản rút gọn của tài liệu. Xem và tải ngay bản đầy đủ của tài liệu tại đây (294.42 KB, 10 trang )
ptg
254
CHAPTER 9 Upgrading to SQL Server 2008
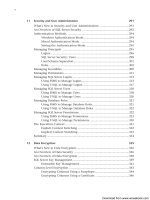
Click Next on the Welcome page, and the Specify Source and Destination screen appears
(see Figure 9.15). You need to enter the name of your SQL Server 2000 Analysis Services
server as the source. Then you have two options:
. Server—You can choose this radio button and enter the name of your new SSAS
instance to immediately migrate your OLAP databases.
. Script File—If you select this radio button and enter a filename, the wizard can gen-
erate an XML for Analysis (XMLA) script, which you can later run to perform the
same migration.
Click Next, and the Select Databases to Migrate screen appears; this screen is fairly self-
explanatory. Make your selections and then click Next. The Validating Databases screen
appears. At this point, the wizard performs the migration and reports on its progress,
noting any issues along the way.
When the wizard is done, click Next, and the Completing the Wizard screen appears,
showing a summary report.
NOTE
According to Microsoft, the Analysis Services Migration Wizard is unable to migrate
three OLAP constructs: linked cubes, drill-through options, and remote partitions. You
need to manually re-create these constructs.
When your migration is complete, you need to remember to reprocess your cubes; other-
wise, you are unable to query the new database. In addition, the migrated database
doesn’t yet exploit the features of SSAS’s Unified Dimensional Model (UDM) in your exist-
FIGURE 9.15 The Analysis Services Migration Wizard’s Specify Source and Destination screen.
Download from www.wowebook.com
ptg
255
Upgrading Other SQL Server Components
9
ing cubes. To fully explore that topic and learn more about other new features and func-
tionality in Analysis Services, check out Chapter 51, “SQL Server 2008 Analysis Services.”
Upgrading Reporting Services
SQL Server 2008 supports upgrading from the following earlier editions of Reporting
Services:
. SQL Server 2000 Reporting Services with Service Pack 2 (SP2)
. SQL Server 2005 Reporting Services
You can choose to perform an in-place upgrade or migrate a Reporting Services
Installation to SQL Server 2008. You can run the Upgrade Advisor tool on the Report
Server computer to determine any issues that might prevent a successful upgrade. Known
upgrade issues currently include the following:
. There is no upgrade support for a Report Server that uses a remote SQL Server 2000
Database Engine instance to host the Report Server database.
. There is no support for the SQL Server 2000 Report Server Web service in SQL Server
2008 because this endpoint is discontinued, and any custom features that point to
the ReportServer2000 endpoint no longer run.
. There is no support for earlier versions of the Reporting Services WMI provider because
the Reporting Services WMI provider is not backward compatible with previous ver-
sions. You cannot use the SQL Server 2008 Reporting Services WMI provider with earli-
er versions of Reporting Services.
Performing an In-Place Upgrade of Reporting Services
If you’ve run the Upgrade Advisor and it doesn’t report any issues that would prevent a
successful upgrade (or you’ve addressed any issues it raises), you can perform an in-place
upgrade of any instance of SQL Server 2000 Reporting Services SP2 or SQL Server 2005
Reporting Services.
Before upgrading Reporting Services, you should first back up the following:
. The symmetric key (by using the
RSKEYMGMT tool)
. Your Report Server databases
. Configuration files: Rsreportserver.config, Rswebapplication.config,
Rssvrpolicy.config, Rsmgrpolicy.config, Reportingservicesservice.exe.config,
Web.config (for both the Report Server and Report Manager ASP.NET applications),
and Machine.config (for ASP.NET if you modified it for Report Server operations)
. Any customizations to existing Reporting Services virtual directories in IIS
. Your reports
Before running the upgrade, you first need to stop IIS and the Report Services Windows
service on each machine on which you will be running the in-place upgrade. (For a Web
farm [now known as a scale-out implementation] the upgrade must be run on every node.)
Download from www.wowebook.com
ptg
256
CHAPTER 9 Upgrading to SQL Server 2008
Then run the Installation Center and select your existing instance for upgrade at the
appropriate screen. The Installation Center upgrades the instance in-place, including all its
components and any published reports and snapshots.
Upgrading Reporting Services also requires updates to your Report Server databases.
Because the Report Server database schema can change with each new release of Reporting
Services, it is required that the database version match the version of the Report Server
instance you are using. In most cases, a Report Server database can be upgraded automati-
cally with no specific action on your part. The following list identifies all the conditions
under which a Report Server database is upgraded:
. After a Reporting Services instance is upgraded, the database schema is automatically
upgraded after service startup and the Report Server determines that the database
schema version does not match the server version.
. At service startup, the Report Server checks the database schema version to verify
that it matches the server version. If the database schema version is an older version,
it is automatically upgraded to the schema version that is required by the Report
Server. Automatic upgrade is especially useful if you restored or attached an older
Report Server database. A message is entered in the Report Server trace log file indi-
cating that the database schema version was upgraded.
. The Reporting Services Configuration tool upgrades a local or remote Report Server
database when you select an older version to use with a newer Report Server
instance. In this case, you must confirm the upgrade action before it happens.
NOTE
The Reporting Services Configuration tool no longer provides a separate Upgrade but-
ton or upgrade script. Those features are obsolete in SQL Server 2008 due to the
automatic upgrade feature of the Report Server service.
After the database schema is updated, you cannot roll back the upgrade to an earlier
version. Always back up the Report Server database in case you need to re-create a previ-
ous installation.
SQL Server 2008 introduces changes to the Report Definition Language (RDL), the report
object model, and the rendering object model that affect reports created in earlier versions
of the software. When you upgrade a Reporting Services installation from a prior version
to a SQL Server 2008 Reporting Services installation, existing reports and snapshots that
have been uploaded to a Report Server are automatically upgraded to the new schema the
first time they are processed. If a report cannot be automatically upgraded, the report is
processed using the backward-compatibility mode. Also, if you open an
.rdl file in Report
Designer that was created for the SQL Server 2000 or SQL Server 2005 namespace, Report
Designer automatically upgrades the report to the current namespace. After you save the
report, you cannot open it in earlier versions of Report Designer.
Download from www.wowebook.com
ptg
257
Upgrading Other SQL Server Components
9
If you are unable to perform an in-place upgrade of your existing installation for any
reason, your other option is to install a new instance of SQL Server 2008 Reporting Services
and then migrate your Report Server database and configuration files to the new instance.
Migrating to Reporting Services 2008
The migration process for Reporting Services includes a combination of manual and auto-
mated steps. The following tasks are required to perform a Reporting Services migration:
. Back up your Report Server databases, applications, and configuration files.
. Back up the encryption key.
. If it is not installed already, install a new instance of SQL Server 2008 or 2008 R2.
. Move your Report Server database(s) from your SQL Server 2000 or 2005 installation
to your new installation using the detach/attach or backup/restore method.
. Move any custom report items, assemblies, or extensions to the new installation.
. Configure the Report Server.
. Edit the RSReportServer.config file to include any custom settings from your previ-
ous installation.
. Optionally, configure custom Access Control Lists (ACLs) for the new Reporting
Services Windows service group.
. Remove unused applications and tools after you have confirmed that the new
instance is fully operational.
When you are backing up the Report Server configuration files, the files to back up include
. Rsreportserver.config
. Rswebapplication.config
. Rssvrpolicy.config
. Rsmgrpolicy.config
. Reportingservicesservice.exe.config
. Web.config for both the Report Server and Report Manager ASP.NET applications
. Machine.config for ASP.NET if you modified it for Report Server operations
During the install of your new instance of Reporting Services, when you reach the
Reporting Services screen, you need to be sure to select the Install but Do Not Configure
option. After moving your Report Server databases, launch the new Reporting Services
Configuration tool and select the Report Server database that you’ve moved from the previ-
ous installation to automatically upgrade it. Then restore your backed-up encryption key.
Just as with an in-place upgrade, to upgrade the reports themselves, all you need to do is
open them in the Report Designer, which automatically converts them to the new Report
Definition Language format.
Download from www.wowebook.com
ptg
258
CHAPTER 9 Upgrading to SQL Server 2008
After you successfully migrate your Report Server to a SQL Server 2008 Reporting Services
instance, you might want to perform the following steps to remove programs and files
that are no longer necessary:
. Uninstall the previous version of Reporting Services if it’s no longer needed.
. Remove IIS if you no longer need it on the computer (it’s no longer needed by
Reporting Services 2008).
. Delete RSActivate.exe (if you migrated from SQL Server 2000 installations only).
Upgrading SSIS Packages
When you upgrade an instance of SQL Server 2005 to SQL Server 2008, your existing SQL
Server 2005 Integration Services packages are not automatically upgraded to the package
format that SQL Server 2008 Integration Services uses. You have to manually upgrade your
SQL Server 2005 packages.
There are multiple methods to upgrade SQL Server 2005 packages. Some of the methods
are only temporary. For others, the upgrade is permanent. Table 9.2 lists each of the
upgrade methods and whether the upgrade is temporary or permanent.
The SSIS Package Upgrade Wizard is the recommended approach for upgrading your SQL
Server 2005 SSIS packages. Because you can configure the wizard to back up your original
packages, you can continue to use the original packages if you experience upgrade difficul-
ties. You can run the SSIS Package Upgrade Wizard from SQL Server Management Studio,
from SQL Server Installation Center, or at the command prompt.
To run the wizard from SQL Server Management Studio, connect to Integration Services,
expand the
Stored Packages node, right-click the File System or MSDB node, and then
click Upgrade Packages. To run the wizard from SQL Server Installation Center, click
TABLE 9.2 SSIS Upgrade Methods
Upgrade Method Type of Upgrade
Using the dtexec utility installed with SQL
Server 2008
The package upgrade and script migration are
temporary.
The changes are not saved.
Adding a SQL Server 2005 package to an
existing project or opening a SQL Server
2005 package in SQL Server 2008
Integration Services
The package upgrade is permanent if you save
the package.
The script migration is permanent if you add the
package to an existing project or if you open the
package and save the conversion changes.
Using the SSIS Package Upgrade Wizard The package upgrade and script migration are
permanent.
Using the Upgrade method to upgrade one or
more Integration Services packages.
The package upgrade and script migration are
permanent.
Download from www.wowebook.com
ptg
259
Upgrading Other SQL Server Components
9
Tools and then click Upgrade Integration Services packages. At the command prompt,
run the SSISUpgrade.exe file from the C:\Program Files\Microsoft SQL
Server\100\DTS\Binn folder.
Migrating DTS Packages
SSIS is a complete rewrite of the DTS runtime, and this is why your DTS packages are not
automatically migrated to SQL Server 2008 when running an in-place upgrade. You essen-
tially have two options for how to handle your existing DTS packages:
. Install runtime support for DTS packages so you can continue to run your existing
DTS packages.
. Migrate your DTS packages to SSIS using the DTS Package Migration Wizard.
Full DTS support in SQL Server 2008 consists of multiple components. The first compo-
nent is the Client Tools Backward Compatibility option. During an installation or
upgrade, on the Feature Selection page, select Integration Services and choose to install
the Client Tools Backward Compatibility option. This option installs the Execute DTS
2000 Package task for SSIS.
The next component you need to install is DTS runtime support. To install runtime
support for Data Transformation Services packages, go to the Microsoft Download Center
and locate the Microsoft SQL Server 2008 Feature Pack page. From there, download the
Microsoft SQL Server 2005 Backward Compatibility Components (this component has not
been updated for SQL Server 2008). If you also want to use the SQL Server 2008 tools to
open and view DTS packages, you have to download and install the design-time support
as well. This support can also be found in the Microsoft Download Center on the Feature
Pack for Microsoft SQL Server 2005 page.
After you install the DTS runtime support, your DTS packages can run as before. You can
run your DTS packages one of the following ways:
. From the command prompt using the
dtsrun.exe utility
. Via SQL Server Agent Jobs by setting the job step to Operating system (CmdExec) and
use the dtsrun utility (dtsrun.exe) to run the package
. Via Integration Services Packages using the Execute DTS 2000 Package task
If you also installed the design-time support, you are able to continue to edit and manage
your DTS packages. You can manage your DTS packages from SQL Server Management
Studio under the Data Transformation Services node, which is available in the
Management/Legacy folder. Here, you can open existing DTS packages stored on the file
system or in the msdb database, or add additional packages to the server by clicking the
Import button. Although DTS packages can be modified and renamed, you cannot create
new DTS packages within SSMS.
The DTS runtime support is intended to be used only on a temporary basis until you have
the opportunity to migrate your DTS packages to SSIS. To migrate your DTS packages to
SSIS, you can use the DTS Package Migration Wizard.
Download from www.wowebook.com
ptg
260
CHAPTER 9 Upgrading to SQL Server 2008
To run the DTS Package Migration Wizard, you first need to make sure that the SSIS
service is in the running state. In SSMS, open the Object Explorer and navigate to the
Legacy node, under Management. Then right-click the Data Transformation Services
(DTS) node and select the Package Migration Wizard option to migrate one or more pack-
ages (those stored on a server or as files) to SSIS.
NOTE
The Package Migration Wizard is available only in the Developer, Standard, and
Enterprise Editions of SQL Server 2008.
When you run the Package Migration Wizard, you first need to select the source and desti-
nation servers (the source must be a SQL Server 7 or 2000 instance, and the destination
must be a 2008 instance with SSIS running) on the Choose Source Location and Choose
Destination Location screens.
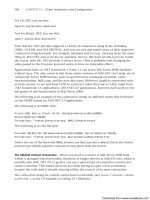
Then click Next to reach the List Packages screen (see Figure 9.16), where you check the
check boxes for the packages you want to bring over. The name for each imported package
is listed in the Destination Package column, and you can click there to edit it.
At the next screen, you can specify a log file for the process. You click Next again and
then click Finish to complete the migration.
As with all the other wizards provided with SQL Server 2008, the Package Migration
Wizard reports progress and any issues on a per-package basis, offering an exportable
report at the end.
FIGURE 9.16 The Package Migration Wizard’s List Packages screen.
Download from www.wowebook.com
ptg
261
Summary
9
After migration is complete, the original DTS package is still available on the SQL Server
7 or 2000 instance, in unmodified form. You can import packages into SQL Server in
SSMS by connecting to SSIS in the Object Explorer and then navigating to the Stored
Packages node and then the MSDB node. If you selected a file system folder as the destina-
tion, right-click the File System node and then select Import Package to display the
migrated packages.
Summary
Now that you’ve taken in a great deal of information to help your organization transition
to SQL Server 2008, it’s time to put that knowledge to work by actively taking the plunge.
If you need even more documentation, you can look to the many other chapters in this
book and even more resources on the Web that can assist you. Of course, there’s an abun-
dance of content on Microsoft’s website (after all, it’s in Microsoft’s interests that
customers upgrade to SQL Server 2008), including webcasts, TechNet, and online learning
courses available to MSDN subscribers.
When your new environment is ready to go, you can move on to Chapter 10, “Client
Installation and Configuration,” to learn how to get your clients up and running with
your new installation of SQL Server 2008.
Download from www.wowebook.com
ptg
This page intentionally left blank
Download from www.wowebook.com
ptg
CHAPTER 10
Client Installation and
Configuration
IN THIS CHAPTER
. What’s New in Client
Installation and Configuration
. Client/Server Networking
Considerations
. Client Installation
. Client Configuration
. Client Data Access
Technologies
SQL Server 2008 offers a robust client/server architecture
that provides speed and security, simple configuration and
maintenance, and enhanced management capabilities.
This chapter contains the latest information on how to
install, configure, and connect to SQL Server 2008 from the
client side, and it offers key server-side insights that will
help provide a complete understanding of what you need to
do establish a database connection.
What’s New in Client Installation
and Configuration
Client installation and configuration in SQL Server 2008 is
similar to SQL Server 2005 but does have its share of
changes. First and foremost is the introduction of a new
net-library named SQL Native Client 10.0 (SNAC10).
SNAC10 gives applications access to the new features and
data types available with SQL Server 2008. It builds on the
data access component distribution strategy introduced in
SQL Server 2005 that was simply called SQL Native Client
(SNAC or SNAC9).
The good news is that your applications can continue to
access SQL Server 2008 with the older SNAC components.
Both SNAC9 and SNAC10 can be used on the same client
system. SNAC9 is not able to reference new features in SQL
Server 2008, however, so you have to upgrade to SNAC10 to
gain access to them.
Another big change in SQL Server 2008 is the removal of
the Surface Area Configuration (SAC) tool. The SAC tool
Download from www.wowebook.com