Microsoft SQL Server 2008 R2 Unleashed- P113 doc
Bạn đang xem bản rút gọn của tài liệu. Xem và tải ngay bản đầy đủ của tài liệu tại đây (403.73 KB, 10 trang )
ptg
1064
CHAPTER 32 Database Snapshots
go
RESTORE DATABASE AdventureWorks FROM DATABASE_SNAPSHOT =
‘SNAP_AdventureWorks_6AM’
go
When this process is complete, the source database and snapshot are essentially the same
point-in-time database. But the source database quickly diverges, as updates begin to flow
in again.
Using Database Snapshots with Testing and QA
Reverting to a “golden” copy of a database via a database snapshot is going to be popular
going forward because of the simplicity that creating and reverting provides. Testing and
QA groups will thrive on this feature, and this will directly affect the velocity of testing
in your organization. With the increase in the frequency and stability of your testing and
QA environments, a direct improvement in the quality of your application should be
attainable. Essentially, these are the steps:
1. Create the golden database snapshot before you run your testing:
Use [master]
go
CREATE DATABASE SNAP_AdventureWorks_GOLDEN
ON ( NAME = AdventureWorks_Data, FILENAME= ‘C:\Program Files\
Microsoft SQL Server\ MSSQL10.SQL08DE01\MSSQL\DATA\
SNAP_AdventureWorks_data_GOLDEN.snap’)
AS SNAPSHOT OF AdventureWorks
Go
2. Run tests or QA to your heart’s content.
3. Revert to the golden copy when the testing is completed so that the process can be
repeated again, regression testing can be run, stress testing can be done, performance
testing can be started, or further application testing can be done:
USE [master]
go
RESTORE DATABASE AdventureWorks
FROM DATABASE_SNAPSHOT = ‘SNAP_AdventureWorks_GOLDEN’
go
Setting Up Snapshots Against a Database Mirror
If you are using database mirroring to improve your availability, you can also create a
database snapshot against this mirrored database and expose the snapshot to your report-
ing users. Doing so further enhances the overall database availability to all end users
Download from www.wowebook.com
ptg
1065
Setting Up Snapshots Against a Database Mirror
32
(transactional and reporting users). In addition, it serves to isolate the reporting users from
the transactional users. The reporting users are connected to the mirror server’s version of
the database (via a database snapshot of the mirrored database), and their reporting
queries do not impact the principal server in any way. Remember that the mirrored data-
base is not usable for any access whatsoever (it is in constant restore mode). SQL Server
allows a snapshot to be created against it (refer to Figure 32.10). As mentioned previously,
the only real issues arise when the principal server fails over to the mirror database. When
the mirror server takes over for the principal, the database snapshot terminates its report-
ing user connections. The reporting users only need to reconnect to pick up where they
left off. However, you now have both transactional and reporting users using the same
database server instance, and performance of all is affected.
A possible solution to this situation would be to automatically (or manually) drop the
database snapshot on the mirror server if it becomes the principal and create a new snap-
shot on the old principal server if it is available (it is now the mirror). You then just point
all your reporting users to this new database snapshot. This process can be handled fairly
easily in an application server layer. This is basically a reciprocal principal/mirror reporting
configuration approach that always tries to get the database snapshot that is used for
reporting to be on the server that is the mirror server. You would never really want to
have active database snapshots on both the principal server and mirror server at the same
time.
Reciprocal Principal/Mirror Reporting Configuration
The following steps outline the method to create the snapshot on the mirror, drop it
when the mirror becomes the principal, and create a new snapshot against the old princi-
pal (now the mirror):
1. Create the database snapshot on a mirrored database server for reporting on the
mirror server (REM12374333\SQL08DE02):
Use [master]
go
CREATE DATABASE SNAP_AdventureWorks_REPORTING
ON ( NAME = AdventureWorks_Data, FILENAME= ‘C:\Program Files\
Microsoft SQL Server\MSSQL10.SQL08DE02\MSSQL\DATA\
SNAP_AdventureWorks_data_REPORTING.snap’)
AS SNAPSHOT OF AdventureWorks
Go
As you can see in Figure 32.13, this would be the live configuration of the principal
server (REM12374333\SQL08DE01), the mirror server (REM12374333\SQL08DE02), and the
reporting database snapshot (SNAP_AdventureWorks_REPORTING), as shown from SQL
Server Management Studio.
Download from www.wowebook.com
ptg
1066
CHAPTER 32 Database Snapshots
FIGURE 32.13 SQL Server Management Studio, showing database mirroring with a database
snapshot for reporting configuration.
If the principal fails over to the mirror, you would drop the database snapshot that is
currently created off that database and create a new one on the old principal (now the
mirror), as shown in the following steps.
2. Drop the reporting database snapshot on the new principal server (the principal is
now REM12374333\SQL08DE02):
Use [master]
go
DROP DATABASE SNAP_AdventureWorks_REPORTING
go
3. Create the new reporting database snapshot on the new mirrored database server
(the mirror is now REM12374333\SQL08DE01):
Use [master]
go
CREATE DATABASE SNAP_AdventureWorks_REPORTING
ON ( NAME = AdventureWorks_Data, FILENAME= ‘C:\Program Files\
Microsoft SQL Server\ MSSQL10.SQL08DE01\MSSQL\DATA\
SNAP_AdventureWorks_data_REPORTING.snap’)
AS SNAPSHOT OF AdventureWorks
Go
That’s it. You now have your reporting users completely isolated away from your principal
server (and the transactional users) again. Life can return to normal very quickly.
Download from www.wowebook.com
ptg
1067
Database Snapshots Maintenance and Security Considerations
32
Database Snapshots Maintenance and Security
Considerations
With regard to database snapshots, several things need to be highly managed: snapshot
sparse file size management, data latency management that corresponds to your users’
needs, the location of the sparse files within your physical deployment, the sheer number
of database snapshots you are willing to support against a single database instance, and
the security and access needs of users of database snapshots.
Security for Database Snapshots
By default, you get the security roles and definitions that you have created in the source
database available to you within the database snapshot except for roles or individual
permissions that you have in the source database used for updating data or objects. This is
referred to as “inherited from the source database.” These updating rights are not available
to you in a database snapshot. A database snapshot is a read-only database! If you have
specialized roles or restrictions you want to be present in the database snapshot, you need
to define them in the source database, and you get them instantly. You manage from a
single place, and everyone is happy.
Snapshot Sparse File Size Management
Sparse file size is probably the most critical aspect to deal with when managing database
snapshots. It is imperative that you keep a close watch on the growing size of any (and all)
database snapshot sparse files you create. If your snapshot runs out of space because you
didn’t manage file size well, it becomes suspect and is not available to use. The only path
out of this scenario is to drop the snapshot and re-create it. Following are some issues to
consider for sparse files:
. Monitor sparse files regularly. Make use of stored procedures such as the
SNAP_SIZE_UNLEASHED2008 stored procedure to help with this situation.
. Pay close attention to the volatility of the source database. This rate of change
directly translates to the size of the sparse file and how fast it grows. The rule of
thumb is to match your drop and re-create of a database snapshot frequency to
when the sparse file is at around 30% of the size of the source database. Your data
latency user requirements may demand a faster rate of drop/re-create.
. Isolate sparse files away from the source database data files. You do not want to com-
pete with disk arm movement in any way. Always work to get disk I/O as parallel as
possible.
Number of Database Snapshots per Source Database
In general, you shouldn’t have too many database snapshots defined on a database
because of the copy-on-write overhead each snapshot requires. However, this all depends
on the volatility of the source database and a server’s capacity. If there is low volatility and
Download from www.wowebook.com
ptg
1068
CHAPTER 32 Database Snapshots
the server is not using much CPU, memory, and disk capacity, this database could more
readily support many separate database snapshots at once. If the volatility is high and
CPU, memory, and perhaps disk capacity are saturated, you should minimize drastically
the number of database snapshots.
Summary
Database snapshots can be thought of as an enabling capability with many purposes. They
are great for fulfilling point-in-time reporting requirements easily, reverting a database to a
point in time (recoverability and availability), insulating a database from issues that may
arise during mass updates, and potentially reducing the processing impact of querying
against the primary transactional databases (via database mirroring and database snap-
shots). You must remember that database snapshots are point in time and read-only. The
only way to update a snapshot is to drop it and re-create it. Data latency of this point-in-
time snapshot capability must always be made very clear to any of its users.
Database snapshots are snapshots of the entire database, not a subset. This clearly makes
data snapshots very different from alternative data access capabilities such as data replica-
tion and materialized views. This feature has been made possible via a major breakthrough
from Microsoft called copy-on-write technology. This is certainly an exciting extension to
SQL Server but is not to be used as a substitute for good old database backups and restores.
This is one capability that we recommend you consider using as soon as possible.
Chapter 33, “Database Maintenance,” provides a detailed explanation of the best practices
surrounding maintaining a database.
Download from www.wowebook.com
ptg
CHAPTER 33
Database Maintenance
IN THIS CHAPTER
. What’s New in Database
Maintenance
. The Maintenance Plan Wizard
. Managing Maintenance Plans
Without the Wizard
. Executing a Maintenance Plan
. Maintenance Without a
Maintenance Plan
. Database Maintenance Policies
Database maintenance is an essential part of database
administration needed to keep databases healthy. It includes
tasks performed after your database is created to ensure the
integrity of the data in the database, provide performance
improvements, and help keep your database safe.
This chapter examines some of the key tasks that should be
included in your database maintenance plan. It discusses
the means for creating these plans, including tools such as
the Maintenance Plan Wizard that is part of SQL Server
2008. These tools make the creation of a solid database
maintenance plan easier and provide a framework that
allows you to create the plan once and let automation do
the rest of the work.
What Needs to Be Maintained
The core tasks related to the maintenance of a SQL
Server database are backing up the database and log,
rebuilding indexes, updating statistics, and running
integrity checks against the database. These ongoing,
repetitive tasks are best run on a scheduled basis and
are the backbone of the maintenance plan. Other
tasks related to maintenance involve managing access
by the users, maintaining data files, and monitoring
performance. These tasks are more apt to be per-
formed on an ad hoc basis when the need arises.
Download from www.wowebook.com
ptg
1070
CHAPTER 33 Database Maintenance
What’s New in Database Maintenance
The required database maintenance tasks in SQL Server 2008 have remained the same as
in earlier versions, and the tools to perform that maintenance are generally the same as
they were in SQL Server 2005. Maintenance plans are still the core tool for performing
database maintenance. These plans and the tools to create the plans (such as the
Maintenance Plan Wizard) look and behave much like they did in SQL Server 2005.
Enhancements to the maintenance plans that were introduced in SQL Server 2005 service
packs have been carried on to SQL Server 2008.
One new feature related to database maintenance in SQL Server 2008 is the introduction
of Database Maintenance Policies (a subset of the Policy-Based Management feature intro-
duced in SQL Server 2008). Policy-Based Management is discussed in detail in Chapter 22,
“Administering Policy-Based Management.” In this chapter, we briefly cover the basics of
using policies for performing database maintenance.
The Maintenance Plan Wizard
The Maintenance Plan Wizard is a tool that is available in SSMS. It provides an automated
means for creating the basic tasks needed to maintain a database. It does not include all
the tasks available for use in a maintenance plan but is a great starting point that allows
you to quickly generate the basic elements of a good plan.
You launch the Maintenance Plan Wizard by expanding the Management node in SSMS and
then right-clicking Maintenance Plans and selecting Maintenance Plan Wizard. The
Maintenance Plan Wizard is like most other Microsoft wizards in that it presents sequen-
tial dialog boxes that allow you to incrementally provide the information needed to create
the wizard’s objective.
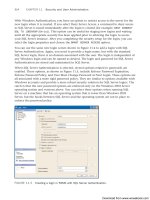
The Maintenance Plan Wizard first displays an introductory dialog box. When you click
Next, it displays a dialog box (like the one shown in Figure 33.1) that allows you to
specify the name and a description for your maintenance plan. You should choose a
naming convention that will allow you to easily identify a maintenance plan and the type
of maintenance it is performing. The name is displayed in the Object Explorer tree, and a
good naming convention will make it easier to locate the plan you want.
The Select Plan Properties screen also allows you to specify the schedule for the mainte-
nance plan. This schedule will be tied to the corresponding scheduled job that is created
when the Maintenance Plan Wizard completes. You will find that the scheduling dialog
that appears when you click on the Change button is very flexible and consistent with
other places in SQL Server where a schedule can be defined.
After you name the maintenance plan and specify the schedule, you can click Next. The
dialog box that appears next allows you to select the maintenance tasks you would like to
perform on the server. Figure 33.2 shows the Select Maintenance Tasks dialog, with the
tasks that are available from the wizard. You can select more than one task for a given
plan. As mentioned earlier, the tasks listed in the wizard are not all the tasks available in a
maintenance plan.
Download from www.wowebook.com
ptg
1071
The Maintenance Plan Wizard
FIGURE 33.1 Setting the Maintenance Plan Properties using the Maintenance Plan Wizard.
33
The dialog box that appears next, as shown in Figure 33.3, allows you to specify the order
in which the tasks are executed. Obviously, the order of the tasks can be a critical factor
and is dependent on the type of tasks you are running. You can click the Move Up and
Move Down buttons to change the order of the tasks.
FIGURE 33.2 Selecting maintenance tasks in the Maintenance Plan Wizard.
Download from www.wowebook.com
ptg
1072
FIGURE 33.3 Selecting the order of the maintenance tasks in the Maintenance Plan Wizard.
The dialog boxes discussed so far are consistent for all the maintenance plans. The dialog
boxes that follow are dependent on the tasks selected for the plan. Each task has a rele-
vant set of properties that are displayed for entry in a subsequent dialog box. The follow-
ing sections cover some of the common maintenance tasks and the wizard screens that
relate to them.
Backing Up Databases
Backing up databases is the most basic element of a maintenance plan—and probably the
most important part. The importance of backups and the role they play are discussed in
detail in Chapter 14, “Database Backup and Restore,” but basically, backups are needed to
help limit the amount of data loss. For example, in the event of a disk drive failure, data-
base backups can be used to restore the database data that was located on that drive.
The database backup options available via a maintenance plan include full, differential,
and transaction log backups. The type of backup you select for a plan is heavily dependent
on the type of environment you are maintaining and the type of database you are backing
up. Databases that have very few changes may only need a nightly full backup and do not
require transaction log or differential backups.
In most cases, it is a good idea to take a full backup of your system and user databases
each night. Figure 33.4 shows the backup options the wizard displays for a full backup.
To set the properties for a full backup, you need to first define the databases you want to
back up. You select the databases by using the Databases drop-down at the top of the
screen. This drop-down is unique in that it gives you a variety of radio button options
CHAPTER 33 Database Maintenance
Download from www.wowebook.com
ptg
1073
FIGURE 33.4 Full backup options in the Maintenance Plan Wizard.
The Maintenance Plan Wizard
33
rather than just a simple list. You can choose to back up all databases, all system data-
bases, or all user databases, or you can select specific databases.
After you select the database(s) you want to back up, you must select a destination for the
backup files. The destination includes the type of media (that is, tape or disk) and the file
or files on that medium. The option Back Up Databases Across One or More Files allows
you to specify one or more fixed files that the database backup will always be written to.
With this option, you can choose to append each backup to the file(s) or overwrite the
contents of the file(s) each time the backup is performed. If you choose to overwrite the
backup each time, you have only the latest backup available for restoration. If you choose
to append to the file, older backups are retained on this file, and the file continues to
grow with each subsequent backup.
The preferred option for creating full backups with the wizard is the option Create a
Backup File for Every Database. This option creates a separate file for each database in the
maintenance plan. The backup file that is created has the database name as the first part
of the filename, followed by
_backup_ and then a time stamp that indicates when the
backup was created. For example, a backup named
AdventureWorks2008_backup_200608231402.bak would be a backup file created using this
Download from www.wowebook.com