Windows Admin Scripting Little Black Book- P2 pot
Bạn đang xem bản rút gọn của tài liệu. Xem và tải ngay bản đầy đủ của tài liệu tại đây (378.96 KB, 10 trang )
Free FDISK provides the same functionality as Microsoft FDISK while adding more useful features. Tasks like
deleting, creating, and auto-sizing partitions are just as simple to perform as any other FDISK option.
Creating Auto-Sized Partitions
To create partitions to the maximum size, enter the following:
FDISK /AUTO
Tip
You can create individual partitions by following the above command with a partition number.
Deleting All Partitions
To delete all existing partitions (physical, extended, and logical), enter the following:
FDISK /CLEAR
Tip
You can delete individual partitions by following the above command with a partition number.
Other Free FDISK Options
Here are some of the most common options:
/ACTIVATE:partition# drive#—Sets the specified partition active
/C—Checks marked bad clusters
/DELETE—Deletes individual partitions
/FS:filesystem—Specifies the file system to format with
/ONCE—Formats a floppy disk without prompting
/REBOOT—Reboots the machine
Scripting Disk Formats
The main purpose of scripting is to streamline a process. Manual disk formats contain user prompts and pauses.
Scripting a disk format allows you to control how much, if any, prompting is allowed.
Scripting a Hard Disk Format
To perform a completely hands-free drive format and label, enter the following:
FORMAT drive /AUTOTEST /V:label
Here, drive is the drive you want to format, and label is the label you want to give the drive.
The /AUTOTEST switch causes the FORMAT command to run while suppressing any prompts. The /V switch is
used to assign a label to a disk. Disk labels can contain a maximum of eleven characters.
Tip
You can follow this command with a /S to format the drive as a system drive.
Scripting a Floppy Disk Format
Combining the /AUTOTEST switch with the /V switch does not create labels on floppy disks. Instead, you can use
two separate commands:
FORMAT drive /AUTOTEST
LABEL drive alabel
Here, drive is the drive you want to format, and alabel is the label you want to give the disk.
Scripting a Faster Disk Format
If the disk has already been formatted, you can run a quick disk format that simply erases the disk address tables
(not the disk data). To perform a faster disk format, start the command prompt and enter the following:
FORMAT drive /Q /U
Here, drive is the drive you want to format; /Q indicates a quick format; and /U indicates an unconditional format.
Other Format Options
The other commonly used options are:
/BACKUP—Identical to /AUTOTEST except prompts for disk label
/C—Checks for bad clusters
Suppressing Output When Shell Scripting
Although scripting does suppress most prompts, sometimes it does not suppress the command output. You can
suppress the output of a shell command by sending the output to a NUL device. To suppress the output of a drive
format, enter:
FORMAT drive /AUTOTEST > NUL
Creating Boot Disks
Any good administrator has a collection of boot disks ready and waiting in time of need. Boot disks are used when
you need to bypass or perform a task before system bootup. Not only can you use scripting to create boot disks, but
you can also use powerful scripts within them.
Creating a Hard Drive Setup Boot Disk
Follow these steps to create a boot disk that will automatically FDISK and format a hard disk:
1. Make a bootable DOS diskette. On Windows 9x, this can be done by formatting a floppy disk with the /S switch.
This switch copies boot files to the floppy.
2. Copy FREE FDISK to the diskette.
3. Copy FORMAT.COM to the diskette.
4. Copy the script below to a file and save it as A:\AUTOEXEC.BAT:
@ECHO OFF
IF EXIST "A:\FORMAT.TXT" GOTO FORMAT
IF NOT EXIST "A:\FORMAT.TXT" GOTO FDISK
:FDISK
ECHO This system will reboot when complete.
ECHO.
ECHO Deleting all current partitions …
FDISK /CLEAR > NUL
ECHO Creating new partitions …
FDISK /AUTO > NUL
ECHO. > A:\FORMAT.TXT
GOTO REBOOT
:REBOOT
FDISK /REBOOT
:FORMAT
ECHO Formatting drive …
FORMAT drive /AUTOTEST /V:label /S
DEL A:\FORMAT.TXT
GOTO END
:END
CLS
ECHO FINISHED FDISK AND FORMAT
Here, drive is the drive you want to format, and label is the label you want to give the disk.
Warning
This disk will automatically FDISK and format all partitions. You should clearly mark this disk and
store it in a secure area. TRUST ME, I KNOW!
Creating an NT Boot Disk
Nothing’s worse than coming in bright and early, booting up your machine, and dealing with NTFS boot errors. An NT
boot disk can be an invaluable troubleshooting asset when you are experiencing hard disk boot problems. To
automate the creation of an NT boot disk, copy the following script to a BAT file:
FORMAT floppy: /AUTOTEST
LABEL floppy: alabel
COPY drive:\ntldr floppy:
COPY drive:\ntdetect.com floppy:
COPY drive:\boot.ini floppy:
COPY drive:\bootsect.dos floppy:
COPY drive:\ntbootdd.sys floppy:
Note
A DOS or Windows 9x Startup disk will not work as an NT boot disk.
Creating an NT Removal Boot Disk
To automatically remove NT from a FAT partition, proceed as follows:
1. Make a bootable DOS diskette. This can usually be done by formatting a floppy disk with the /S switch.
2. Copy RMDIR.EXE to the diskette. You can obtain RMDIR.EXE from the NT Resource Kit.
3. Copy the script below to a file and save it as A:\AUTOEXEC.BAT:
RMDIR /S /Q ntpath
DEL drive:\ntldr
DEL drive:\ntdetect.com
DEL drive:\boot.ini
DEL drive:\bootsect.dos
DEL drive:\ntbootdd.sys
DEL drive:\pagefile.sys
Here, ntpath is the full path to the Windows directory (e.g., C:\WINNT), and drive is the drive letter on which
Windows was installed.
Tip
The best method of removing NT from an NTFS partition is to FDISK, format, and start over.
Scripting Drive Image Pro
Drive Image Pro provides a command interpreter to allow complete control from the command line. There are two
requirements to script Drive Image Pro: a script file and a command line to run the script. The script file is a basic text
file with the custom commands that control Drive Image Pro. The command line consists of various switches that
control how the script will be executed. Together, they provide a way to automate all the manual tasks of Drive Image
Pro.
Creating an Image
To store partition 1 on drive 1 to an image, enter the following:
SELECT DRIVE 1
SELECT PARTITION 1
STORE
To store all partitions on drives 1 and 2 to an image, enter the following:
SELECT DRIVE 1
SELECT PARTITION ALL
STORE
SELECT DRIVE 2
SELECT PARTITION ALL
STORE
Note
The SELECT command can select only one drive or one set of partitions from a drive at a time. It
cannot select two drives simultaneously, hence the need for two STORE commands.
Restoring an Image
To delete all partitions on drive 1 and restore the first image to drive 1’s maximum size, enter the following:
SELECT DRIVE 1
DELETE ALL
SELECT FREESPACE FIRST
SELECT IMAGE 1
RESIZE IMAGE MAX
RESTORE
To resize the second image to 500MB and restore it to the free space on drive 1, proceed as follows:
SELECT DRIVE 1
SELECT FREESPACE LAST
SELECT IMAGE 2
RESIZE IMAGE 500
RESTORE
Running a Script
To run a script, enter the following:
PQDI /CMD=scriptfile /IMG=imagefile /LOG=logfile ERR=errorfile
Here, scriptfile is the name of the script file, imagefile is the name of the image used for the STORE and RESTORE
commands, logfile is a file that records the results of the imaging process, and errorfile is a file that logs any errors
encountered while imaging.
Note
If the /IMG switch is omitted, the STORE and RESTORE commands will produce an error.
Scripting Norton Ghost
Norton Ghost performs all its scripting from the command line. Although it does support the use of script files, these
files are nothing more than a list of switches that can be performed at the command line.
Creating an Image
To create an image of drive 1 called image.gho on a remote drive Z, enter the following:
GHOST.EXE -CLONE,MODE=DUMP,SRC=1,DST=Z:\IMAGE.GHO
To create an image of the second partition of drive 1 called image.gho on a remote drive Z, enter the following:
GHOST.EXE -CLONE,MODE=PDUMP,SRC=1:2,DST=Z:\IMAGE.GHO
Restoring an Image
To restore an image called image.gho on a remote drive Z to drive 1, enter the following:
GHOST.EXE -CLONE, MODE=LOAD, SRC= Z:\IMAGE.GHO, DST=1
To restore an image called image.gho on a remote drive Z to the second partition on drive 1, enter the following:
GHOST.EXE -CLONE,MODE=PLOAD,SRC= Z:\IMAGE.GHO,DST=1:2
Performing a Drive Copy
To copy drive 1 to drive 2, enter the following:
GHOST.EXE -CLONE,MODE=COPY,SRC=1,DST=2
Performing a Partition Copy
To copy the first partition on drive 2 to the second partition on drive 1, enter the following:
GHOST.EXE -CLONE,MODE=PCOPY,SRC= 2:1,DST=1:2
Logging Errors
Norton Ghost records all errors in a log file called ghost.err. This file is normally stored in the program’s root
directory, but you can change the name and location of the file per use by using the -AFILE switch. Here is an
example of how to use the -AFILE switch:
GHOST.EXE -CLONE,MODE=PCOPY,SRC= 2:1,DST=1:2 -AFILE=filename
Using a Script File
Norton Ghost can also read a text file that contains all or additional command-line switches. This file must be in text
format, and each command-line switch must be on a different line. Here is an example of a script file:
-AFILE=z:\errorlog.txt
-CLONE,MODE=PCOPY,SRC= 2:1,DST=1:2
To run the script file, enter the following
GHOST.EXE @filename
Here, filename is the name of the script file.
More Switches
Different versions of Norton Ghost support different switches. To see a brief description of the available switches,
type “GHOST -H” at the command prompt.
Chapter 2: Scripting Installations and Updates
In Brief
In the previous chapter, you learned how to automate hard disk setups and images. Throughout this chapter, you will
use various scripting methods to create unique scripting solutions to common administrative installations and
updates. You will start by learning how to script installations from the command line. You will then learn how to use
send keys to install windows and wizards using Microsoft ScriptIt.
Scripting Methods
Not all of us have the luxury of working with a centralized management system such as Systems Management
Server (SMS) or WinINSTALL. With new programs, program updates, service pack updates, and hot-fixes constantly
coming out, installing all of these manually can consume most of an administrator’s day. Scripting provides a way to
automate these tasks with little or no user intervention.
Shell Scripting
Shell scripting is running a series of commands from within a command shell. Although these commands can be run
from the command line individually, they are more often stored within a script or batch file. Shell scripting has been
around since the inception of MS-DOS (Microsoft Disk Operating System) and is the easiest scripting method to
learn.
Microsoft Command-Line Switches
Microsoft installation and update executables support many different switches to allow for shell scripting and
installation customization. Switches are not case-sensitive and, more often than not, they are not standardized. To
make matters worse, Microsoft tends not to document some of the most useful switches (as you saw in
Chapter 1).
Here are some of the most common, and possibly undocumented, switches for Microsoft installation and update
executables:
/?—Displays unhidden switches and usage
/C—Extracts files to folder specified with /T switch
/C ID—Used to enter a 20-digit product ID
/F—Forces applications to close at shutdown
/K ID—Used to enter an 11-digit CD key
/N—Does not back up files for uninstall
/N name—Used to enter a username for registration
/N:V—Installs without version checking
/O—Overwrites OEM files without prompting
/O organization—Used to enter an organization name for registration
/Q—Runs in quiet mode, skips all prompts
/Q:U—Runs in user quiet mode, shows some dialog boxes
/Q:A—Runs in admin quiet mode, shows no dialog boxes
/R—Reinstalls the application
/R:A—Always reboots
/R:I—Reboots if necessary
/R:N—Does not reboot, even if necessary
/R:S—Reboots without prompting
/T:path—Specifies or extracts files to a temporary working folder
/U—Runs in unattended mode or uninstalls an application, prompts for shared file removal
/UA—Uninstalls an application and shared files, without prompting
/Z—Does not reboot when installation is complete
Windows and Wizards
Many of the tasks of an administrator involve navigating through interactive windows and wizards. Whether installing
a new program or adding a new piece of hardware, these wizards guide the user through a complicated setup
process. This process involves scrolling through selections, clicking check boxes, selecting tabs, browsing, entering
text, and more. Although these wizards are helpful, they frequently do not support scripting.
In the past, administrators used macro recorders to deal with these unscriptable windows and wizards. The main
problem with basic macro utilities is that they are great for performing linear tasks, but they choke when dealing with
complex routines that require decisions. The solution is to use a send-keys utility, such as Microsoft ScriptIt.
Microsoft ScriptIt
Microsoft ScriptIt is an advanced macro utility used to send key commands to Windows objects. ScriptIt detects
window titles and text and sends commands to specific windows based on that information. ScriptIt reads commands
stored in a text-based script file and performs the commands on a line-per-line basis. Although you can use other
scripting send-keys methods, such as Windows Script Host (WSH) or KiXtart, Microsoft ScriptIt provides the easiest
way to detect windows and send keys.
Detecting Windows and Text
Sometimes multiple windows can have the same title. Luckily, Microsoft ScriptIt allows you to specify a combination
of window title and window text to specify the exact window you want. Microsoft ScriptIt has two built-in functions to
determine window titles and text: /REVEAL and /REVEAL2.
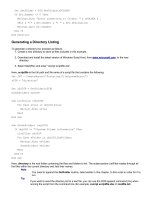
/REVEAL detects the currently active window in real time. To run this command, enter:
SCRIPTIT /REVEAL
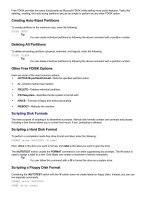
For example, suppose you wanted to script the Add New Hardware Wizard window (see Figure 2.1
).The /REVEAL
switch would show the window title and text (see Figure 2.2
).
Figure 2.1: The Add New Hardware Wizard window.
Figure 2.2: Detecting window title and text with /REVEAL.
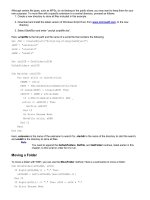
Although this command is helpful, it does present problems when windows are hidden or forcibly maximized. To work
around this, you can use the /REVEAL2 switch:
SCRIPTIT /REVEAL2
The /REVEAL2 switch creates a list of all window titles and text, and then refreshes the list when you click OK (see
Figure 2.3
).
Figure 2.3: Detecting window title and text with /REVEAL2.
By double-clicking on each entry in the list, you can see all the text that /REVEAL2 detected.
Microsoft ScriptIt [SCRIPT] Section
A ScriptIt script file must contain a section called [SCRIPT]. Any commands found under this section will be executed
in order. Any text found above this section will be ignored, so you can comment your script by adding text above this
section.
Microsoft ScriptIt [ADLIB] Section
One of the advantages that ScriptIt has over using other send-key methods, such as KiXtart or WSH, is the ability to
immediately intercept windows that may occur unexpectedly. This is accomplished through an optional section called
[ADLIB]. When the [ADLIB] section detects an unexpected window, the script breaks out of the [SCRIPT] section,
executes the [ADLIB] command, and then returns to the [SCRIPT] section.
Microsoft ScriptIt Core Commands
Microsoft ScriptIt has five core commands: RUN, RUNWAIT, MKFILE, REM, and TITLE+TEXT. The RUN command
executes the program specified:
RUN=program
The RUNWAIT command executes the program specified and pauses the script until the specified program closes:
RUNWAIT=program
For example, to start notepad, pause the script, and then start the script when notepad closes, you could enter:
RUNWAIT=notepad
The MKFILE (Make File) command appends a line to an existing text file or adds a line to a new text file:
MKFILE file=line to add
For example, if you wanted to add a line to the autoexec.bat file that removes your C:\TEMP directory, you could
enter:
MKFILE c:\autoexec.bat=DELTREE C:\TEMP
The REM (Remark) command allows you to add comments within your script:
REM comments
The title+text command allows you to send key commands to the specified window:
title+text=commands
Here, title is the window title, text is any text within the window, and commands are the key commands being sent
to the window.
The title and text are case-sensitive. In addition, both the window title and text are optional and neither needs to be
typed in its entirety. For example, if you wanted to start and work with Notepad, you could enter:
[SCRIPT]
RUN=NOTEPAD
Untitled - Notepad=This is the full title
Untitled=This is part of the title
Notice that both the full and partial titles will work.
Microsoft ScriptIt Tilde Commands
Microsoft ScriptIt has nine commands that begin with a tilde (~):
~EXIT—Immediately exits the script
~WAIT—Pauses the script for 5 seconds
~WINWAITACTIVE—Pauses the script until the specified window receives focus
~WINWAITCLOSE—Pauses the script until the specified window closes
~WINWAITACTIVE—Closes the currently active window and its associated application
~WINHIDE—Hides the currently active window
~WINHIDE—Displays the currently active hidden window
~WINMIN—Minimizes the currently active window
~WINMAX—Maximizes the currently active window
Microsoft Windows Installer
Before Windows 2000, installing and managing applications was a complete mess. Software companies created their
own installation interfaces, each with its own set of rules, command-line options, and uninstall functions. This
provided headaches for administrators who attempted to create common scripting solutions for application
installations. To help reduce total cost of ownership (TCO) and provide a standardized set of installation rules,
Microsoft created the Windows Installer.
The Windows Installer is a new installation and configuration service for 32-bit Windows platforms that standardizes
the way programs install and uninstall. The Windows Installer is a Zero Administration Windows initiative and is
required to conform to the “Designed for Microsoft Windows” logo standards. Some of the advanced features of the
Windows Installer are self-repair, rollback, and install on demand. The Windows Installer comes packaged with
Windows 2000, and is available as a separate download for Windows 9x and Windows NT.