Tự học HTML và CSS trong 1 giờ - part 9 doc
Bạn đang xem bản rút gọn của tài liệu. Xem và tải ngay bản đầy đủ của tài liệu tại đây (580.26 KB, 10 trang )
ptg
be just about any editor—more about this subject in “Programs to Help You Write
HTML” section, later) can read them. HTML files contain the following:
n
The text of the page itself
n
HTML tags that indicate page elements, structure, formatting, and hypertext links
to other pages or to included media
Most HTML tags look something like the following:
<thetagname>affected text</thetagname>
The tag name itself (here, thetagname) is enclosed in brackets (< >). HTML tags gener-
ally have a beginning and an ending tag surrounding the text they affect. The beginning
tag “turns on” a feature (such as headings, bold, and so on), and the ending tag turns it
off. Closing tags have the tag name preceded by a slash (/). The opening tag (for exam-
ple, <p> for paragraphs) and closing tag (for example, </p> for paragraphs) compose
what is officially called an HTML element.
56
LESSON 3: Introducing HTML and XHTML
Be aware of the difference between the forward slash (/) men-
tioned with relation to tags, and backslashes (\), which are used
by DOS and Windows in directory references on hard drives (as in
C:\window or other directory paths). If you accidentally use the
backslash in place of a forward slash in HTML, the browser won’t
recognize the ending tags.
Not all HTML tags have both an opening and closing tag. Some tags are only one-sided,
and still other tags are containers that hold extra information and text inside the brackets.
XHTML 1.1, however, requires that all tags be closed. You’ll learn the proper way to
open and close the tags as the book progresses.
Another difference between HTML 4.0 and XHTML 1.1 relates to usage of lowercase
tags and attributes. HTML tags are not case-sensitive; that is, you can specify them in
uppercase, lowercase, or in any mixture. So, <HTML> is the same as <html>, which is the
same as <HtMl>. This isn’t the case for XHTML 1.1, where all tag and attribute names
must be written in lowercase. To get you thinking in this mindset, the examples in this
book display tag and attribute names in bold lowercase text.
CAUTION
Download from www.wowebook.com
ptg
▼
Task: Exercise 3.1: Creating Your First HTML Page
Now that you’ve seen what HTML looks like, it’s your turn to create your own web
page. Start with a simple example so that you can get a basic feel for HTML.
To start writing HTML, you don’t need a web server, a web host, or even a connection to
the Web itself. All you need is an application in which you can create your HTML files
and at least one browser to view them. You can write, link, and test whole suites of web
pages without even touching a network. In fact, that’s what you’re going to do for the
majority of this book. Later, I discuss publishing everything on the Web so that other
people can see your work.
To start, you need a text editor. A text editor is a program that saves files in ASCII for-
mat. ASCII format is just plain text, with no font formatting or special characters. For
Windows, Notepad and Microsoft WordPad are good basic text editors (and are installed
by default). Shareware text editors are also available for various operating systems,
including, Windows, Mac OS X, and Linux. If you point your web browser to
and enter Text Editors as a search term, you’ll find many
applications available to download. If you’re a Windows user, you might want to check
out HTML-Kit in particular. It’s a free text editor specifically built for editing HTML
files. You can download it from By the same token,
Mac users might want to look at TextWrangler, available from .
If you prefer to work in a word processor such as Microsoft Word, don’t panic. You can
still write pages in word processors just as you would in text editors, although doing so
is more complicated. When you use the Save or Save As command, you’ll see a menu of
formats you can use to save the file. One of them should be Text Only, Text Only with
Line Breaks, or DOS Text. All these options will save your file as plain ASCII text, just
as if you were using a text editor. For HTML files, if you have a choice between DOS
Text and just Text, use DOS Text, and use the Line Breaks option if you have it.
What HTML Files Look Like
57
3
Many word processors are including HTML modes or mechanisms
for creating HTML or XML code. This feature can produce unusual
results or files that simply don’t behave as you expect. Using a
word processor to generate HTML is not a good idea if you plan
on editing the web pages later. When you work on the examples in
this book, you should use a regular text editor.
CAUTION
,
Download from www.wowebook.com
ptg
What about the plethora of free and commercial HTML editors that offer to help you
write HTML more easily? Some are text editors that simplify common tasks associated
with HTML coding. If you have one of these editors, go ahead and use it. If you have a
fancier editor that claims to hide all the HTML for you, put it aside for the next couple
of lessons and try using a plain text editor just for a little while. Appendix A, “Sources of
Further Information,” lists many URLs where you can download free and commercial
HTML editors available for different platforms. They appear in the section titled “HTML
Editors and Converters.”
Open your text editor and type the following code. You don’t have to understand what
any of it means at this point. You learn more about much of this in this lesson and the
following lesson. This simple example is just to get you started:
<!DOCTYPE html><html>
<head>
<title>My Sample HTML Page</title>
</head>
<body>
<h1>This is an HTML Page</h1>
</body>
</html>
58
LESSON 3: Introducing HTML and XHTML
,
Note that the <!DOCTYPE> tag in the previous example doesn’t
appear in lowercase like the rest of the tags. This tag is an excep-
tion to the XHTML rule and should appear in uppercase. The pur-
pose of the
DOCTYPE is to tell validators and browsers which
specification your page was written to, in this case, HTML5. In
Lesson 19, “Designing for the Real World,” I talk about other
DOCTYPEs you’ll see, and how to choose which one to use for
your pages.
After you create your HTML file, save it to your hard disk. Remember that if you’re
using a word processor like Microsoft Word, choose Save As and make sure that you’re
saving it as Text Only. When you choose a name for the file, follow these two rules:
n
The filename should have an extension of .html (.htm is OK, but not preferred)—
for example, myfile.html, text.html, or index.htm. Most web software requires
your files to have these extensions, so get into the habit of doing it now. (If you use
Windows, make sure that your computer is configured to show file extensions. If it
isn’t, you’ll find yourself creating files named things like myfile.html.txt, which
your browser will not think are HTML files.)
NOTE
,
Download from www.wowebook.com
ptg
▼
n
Use small, simple names. Don’t include spaces or special characters (bullets,
accented characters)—just letters and numbers are fine. Be sure to choose descrip-
tive, readable names for your files. They’ll help you keep track of what they’re
used for, and they can help make your site friendlier to search engines.
Task: Exercise 3.2: Viewing the Result
Now that you have an HTML file, start your web browser. You don’t have to be con-
nected to the Internet because you’re not going to be opening pages at any other site.
Your browser or network connection software might complain about the lack of a net-
work connection, but you can work offline.
After your browser is running, look for a menu item or button labeled Open, Open File,
or maybe Open Page. Choosing it enables you to browse your local disk. The Open com-
mand (or its equivalent) opens a document from your local disk, parses it, and displays it.
By using your browser and the Open command, you can write and test your HTML files
on your computer in the privacy of your own home. (On most operating systems, you can
just drag the icon from your HTML file into an open browser window if you prefer.)
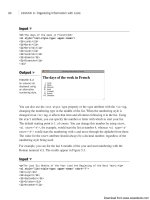
If you don’t see something similar to what’s shown in Figure 3.2 (for example, if parts
are missing or if everything looks like a heading), go back into your text editor and com-
pare your file to the example. Make sure that all your tags have closing tags and that all
your < characters are matched by > characters. You don’t have to quit your browser to do
so; just fix the file and save it again under the same name.
What HTML Files Look Like
59
3
▲
,
FIGURE 3.2
The sample HTML
file.
Next, go back to your browser. Locate and choose a menu item or button called Refresh
or Reload. The browser will read the new version of your file, and voilà! You can edit
and preview and edit and preview until you get the file right.
,
Download from www.wowebook.com
ptg
If you’re getting the actual HTML text repeated in your browser rather than what’s
shown in Figure 3.2, make sure that your HTML file has an .html or .htm extension.
This file extension tells your browser that it’s an HTML file. The extension is important.
If things are going wrong—if you’re getting a blank screen or you’re getting some
strange characters—something is wrong with your original file. If you’ve been using a
word processor to edit your files, try opening your saved HTML file in a plain text edi-
tor. (Again, Notepad will work just fine.) If the text editor can’t read the file or if the
result is garbled, you haven’t saved the original file in the right format. Go back into
your original editor, and try saving the file as text only again. Then try viewing the file
again in your browser until you get it right.
Text Formatting and HTML
When an HTML page is parsed by a browser, any formatting you might have done by
hand—that is, any extra spaces, tabs, returns, and so on—is ignored. The only thing that
specifies formatting in an HTML page is an HTML tag. If you spend hours carefully
editing a plain text file to have nicely formatted paragraphs and columns of numbers but
don’t include any tags, when a web browser loads the page, all the text will flow into one
paragraph. All your work will have been in vain.
60
LESSON 3: Introducing HTML and XHTML
,
▲
There are two exceptions to this rule, a tag called <pre> and a
CSS property. You’ll learn about both of them in Lesson 7,
“Formatting Text with HTML and CSS.”
The advantage of having all whitespace (spaces, tabs, returns) ignored is that you can put
your tags wherever you want. The following examples all produce the same output. Try
them!
<h1>If music be the food of love, play on.</h1>
<h1>
If music be the food of love, play on.
</h1>
<h1>
If music be the food of love, play on. </h1>
<h1> If music be the food of love,
play on. </h1 >
NOTE
Download from www.wowebook.com
ptg
Using Cascading Style Sheets
Earlier in this lesson, I mentioned Cascading Style Sheets as a way you could control the
look and feel of your pages. Styles are a way to control how the browser renders HTML
tags (or elements, as they’re called in standards documents). For example, in this lesson,
I’ve used the <h1> tag a number of times. Most browsers print text enclosed inside an
<h1> tag in a large, boldface font and leave some whitespace after the heading before
printing something else. Using CSS, you can tell the browser to render the <h1> tag dif-
ferently than it normally would. CSS provides a lot of flexibility in how you can alter the
appearance of any type of element, and the styles can be applied in a number of different
ways.
The advantage of CSS is that it can be used at varying levels of specificity. For example,
you can put all your styles into a separate file and link to that file from your web page.
That way, if you want to change the appearance of your site, you can simply edit your
CSS file and make changes that span every page that links to your style sheet. Or if you
prefer, you can include styles at the top of your page so that they apply only to that page.
You can also include styles inside the tags themselves using the style attribute.
You can also control the specificity of the styles you create based on how you define
them. For example, you can write rules that apply to all tags of a specific type, such as
all <h1> elements. Or you can specify classes for your elements and then write rules that
apply only to members of that class. Classes are categories or labels that are assigned to
tags using the class attribute. For example, you could create a class called headline and
then make all <h1> elements in the headline class red. You can also write rules that
apply to single elements by assigning them a particular identifier using the id attribute
and writing rules that apply to that identifier. Here’s an example of an <h1> tag that
includes both a class and an ID:
<h1 class=”headline” id=”leadstoryheadline”>Lead Story Headline</h1>
One thing you’ll find as you progress through the book is that CSS can serve as a
replacement for many common tags. As I describe various tags, I explain how you can
achieve the same effects using CSS instead. Generally, the flexibility of CSS means you
should use HTML to describe the structure of pages and CSS to define their appearance.
The coverage of CSS in this book culminates with Lesson 13, “Advanced CSS
Techniques,” which explains how to use CSS to manage the entire layout of the page, or
even the entire layout of a site.
Using Cascading Style Sheets
61
3
Download from www.wowebook.com
ptg
Including Styles in Tags
You’ve already seen how HTML pages are created using tags. I want to stop briefly and
discuss attributes, as well. An attribute is an additional bit of information that somehow
affects the behavior of a tag. Attributes are included inside the opening tag in a pair.
Here’s an example:
<tag attribute=”value”>
Some attributes can be used with nearly any tag; others are highly specific. One attribute
that can be used with nearly any tag is style. By including the style attribute in a tag,
you can include one or more style rules within a tag itself. Here’s an example using the
<h1> tag, which I introduced earlier:
<h1 style=”font-family: Verdana, sans-serif;”>Heading</h1>
The style attribute of the <h1> tag contains a style declaration. All style declarations
follow this same basic pattern, with the property on the left and the value associated with
that property on the right. The rule ends with a semicolon, and you can include more
than one in a style attribute by placing commas between them. If you’re only including
one rule in the style attribute, the semicolon is optional, but it’s a good idea to include
it. In the preceding example, the property is font-family, and the value is Verdana,
sans-serif. This attribute modifies the standard <h1> tag by changing the font to
Verdana, and if the user doesn’t have that font installed on his system, whichever sans-
serif font the browser selects. (Sans-serif fonts are those that do not include serifs, the
small lines at the ends of characters.)
Many, many properties can be used in style declarations. As previously mentioned,
putting a declaration into a style attribute is just one of several ways that you can apply
styles to your document.
Programs to Help You Write HTML
You might be thinking that all this tag stuff is a real pain, especially if you didn’t get that
small example right the first time. (Don’t fret about it; I didn’t get that example right the
first time, and I created it.) You have to remember all the tags, and you have to type them
in right and close each one. What a hassle!
Many freeware and shareware programs are available for editing HTML files. Most of
these programs are essentially text editors with extra menu items or buttons that insert
the appropriate HTML tags into your text. HTML-based text editors are particularly nice
for two reasons: You don’t have to remember all the tags, and you don’t have to take the
time to type them all. I’ve already mentioned HTML-Kit, but there are plenty of others.
62
LESSON 3: Introducing HTML and XHTML
Download from www.wowebook.com
ptg
Many general-purpose text editors also include special features to make it easier to deal
with HTML files these days.
Many editors on the market purport to be WYSIWYG. These editors exchange ease of
use (you don’t have to remember the tags you use yourself) for control over your
markup. To produce exactly the results you desire, editing the code yourself using a text
editor is the best approach.
With that said, as long as you’re aware that the result of working in those editors can
vary, using WYSIWYG editors can be a quick way to create simple HTML pages. For
professional web development and for using many of the advanced features, however,
WYSIWYG editors can fall short, and you need to go under the hood to play with the
HTML code anyhow. Even if you intend to use a WYSIWYG editor for the bulk of your
HTML work, bear with me for the next couple of lessons and try these examples in text
editors so that you get a feel for what HTML is before you decide to move on to an edi-
tor that hides the tags.
Programs to Help You Write HTML
63
3
WYSIWYG editors tend to work best with files they’ve created
themselves. If you have some existing HTML files that you need to
edit, opening them in a WYSIWYG editor can do more harm than
good, particularly if the files were created in a different WYSIWYG
editor.
In addition to HTML and WYSIWYG editors, you can use converters, which take files
from many popular word processing programs and convert them to HTML. With a sim-
ple set of templates, you can write your pages entirely in your favorite word processing
program and then convert the result when you’re done.
In many cases, converters can be extremely useful, particularly for putting existing docu-
ments on the Web as quickly as possible. However, converters suffer from many of the
same problems as WYSIWYG editors. The results can vary from browser to browser,
and many newer or advanced features aren’t available in the converters. Also, most con-
verter programs are fairly limited, not necessarily by their own features, but mostly by
the limitations in HTML itself. No amount of fancy converting will make HTML do
things that it can’t do already. If a particular capability doesn’t exist in HTML, the con-
verter can’t do anything to solve that problem. In fact, the converter might end up doing
strange things to your HTML files, causing you more work than if you just did all the
formatting yourself.
CAUTION
Download from www.wowebook.com
ptg
As previously mentioned, Appendix A lists many of the web page editors that are cur-
rently available. For now, if you have a simple HTML editor, feel free to use it for the
examples in this book. If all you have is a text editor, no problem; you’ll just have to do
a little more typing.
Summary
In this lesson, you learned some basic points about what HTML is and how you define a
text document as a web page. You learned a bit about the history of HTML and the rea-
sons why the HTML specification has changed several times since the beginning. You
also learned how CSS can be used to augment your HTML. You created your first web
page with some basic tags. It wasn’t so bad, was it? You also learned a bit about the cur-
rent standard version of HTML and XHTML, and how to apply styles using CSS. In the
following lesson, you expand on this and learn more about adding headings, text, and
lists to your pages.
Workshop
Now that you’ve had an introduction to HTML and a taste of creating your first (simple)
web page, here’s a workshop that will guide you toward more of what you’ll learn. A
couple of questions and answers that relate to HTML formatting are followed by a brief
quiz and answers about HTML. The exercises prompt you to examine the code of a more
advanced page in your browser.
Q&A
Q Can I do any formatting of text in HTML?
A You can do some formatting to strings of characters. CSS has superseded most
of the tags for formatting text, and nearly all of them have been removed from
HTML5; however, browsers still support the older text formatting elements,
and a few formatting tags do still remain. You’ll learn some formatting tricks
in Lesson 7.
Q I’m using Windows. My word processor won’t let me save a text file with an
extension that’s anything except .txt. If I type in index.html, my word
processor saves the file as index.html.txt. What can I do?
A You can rename your files after you’ve saved them so that they have an .html or
.htm extension, but having to do so can be annoying if you have a large number of
files. Consider using a text editor or HTML editor for your web pages.
64
LESSON 3: Introducing HTML and XHTML
Download from www.wowebook.com
ptg
Quiz
1. What does HTML stand for? How about XHTML?
2. What’s the primary function of HTML?
3. Why doesn’t HTML control the layout of a page?
4. What’s the basic structure of an HTML tag?
Quiz Answers
1. HTML stands for Hypertext Markup Language. XHTML stands for Extensible
Hypertext Markup Language.
2. HTML enables you to describe the structure of a document so that it can be styled,
either using HTML tags or using CSS.
3. HTML doesn’t control the layout of a page, because it’s designed to be cross-
platform. It takes the differences of many platforms into account and allows all
browsers and all computer systems to be on equal ground.
4. Most HTML elements consist of opening and closing tags, and they surround the
text that they affect. The tags are enclosed in brackets (<>). The beginning tag turns
on a feature, and the ending tag, which is preceded by a forward slash (/), turns
it off.
Exercises
1. Before you actually start writing a meatier HTML page, getting a feel for what an
HTML page looks like certainly helps. Luckily, you can find plenty of source
material to look at. Every page that comes over the wire to your browser is in
HTML (or perhaps XHTML) format. (You almost never see the codes in your
browser; all you see is the final result.)
Most web browsers have a way of letting you see the HTML source of a web page.
If you’re using Internet Explorer, for example, navigate to the web page that you
want to look at. Choose View, Source to display the source code in a text window.
In Firefox, choose View, Page Source.
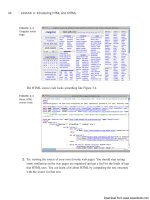
Try going to a typical home page and then viewing its source. For example, Figure
3.3 shows the home page for Craigslist, a free online classified ads service search
page at />Workshop
65
3
Download from www.wowebook.com