Tự học HTML và CSS trong 1 giờ - part 13 doc
Bạn đang xem bản rút gọn của tài liệu. Xem và tải ngay bản đầy đủ của tài liệu tại đây (705.17 KB, 10 trang )
ptg
TABLE 5.2 Continued
Tag Attribute Use
value Resets the numbering in the middle of an
ordered (
<ol>) list. This attribute is depre-
cated in HTML 4.01.
<dl> </dl> A glossary or definition list. Items in the list
consist of pairs of elements: a term and its
definition.
<dt> </dt> The term part of an item in a glossary list.
Closing tag is optional in HTML but required
in XHTML 1.0.
<dd> </dd> The definition part of an item in a glossary
list. Closing tag is optional in HTML but
required in XHTML 1.0.
TABLE 5.3 CSS Properties from Lesson 5
Property Use/Values
list-style-type Used to specify the bullet style or numbering style for the
list. Valid values are
disc, circle, square, decimal,
lower-roman, upper-roman, lower-alpha, upper-alpha,
and
none.
list-style-image The image to use in place of the bullets for a list. The value
should be the URL of the image.
list-style-position Defines the alignment of lines of text in list items after the
first. Values are
inside and outside.
list-style Enables you to set multiple list properties at once: list style
type, list style position, and the URL of the bullet style.
Workshop
You’ve learned how to create and customize lists in HTML. In this section, you see the
answers to some common questions about lists, and some exercises that should help you
remember the things you’ve learned.
Q&A
Q My glossaries came out formatted really strangely! The terms are indented
farther in than the definitions!
A Did you mix up the <dd> and <dt> tags? The <dt> tag is always used first (the def-
inition term), and the <dd> follows (the definition). I mix them up all the time.
There are too many d tags in glossary lists.
96
LESSON 5: Organizing Information with Lists
Download from www.wowebook.com
ptg
Q Is it possible to change the amount that list items are indented or remove the
indentation entirely?
A Yes, the properties used to control list indentation are margin-left and padding-
left. Some browsers use one and some use the other, so you need to set both of
them to change the indentation for your lists. If you set them both to zero, the text
in the list will be aligned with the left side of the container, and the bullets or num-
bers will actually be outside the container.
Q I’ve seen HTML files that use <li> outside a list structure, alone on the page,
like this:
<li>And then the duck said, “put it on my bill”</li>
A Most browsers at least accept this tag outside a list tag and format it either as a
simple paragraph or as a nonindented bulleted item. According to the true HTML
specification, however, using an <li> outside a list tag is illegal, so good HTML
pages shouldn’t do this. Enclosing list items within list tags is also required by the
XHTML recommendation. Always put your list items inside lists where they
belong.
Quiz
1. Ordered and unordered lists use the <li> tag for list items; what tags are used by
definition lists?
2. Is it possible to nest an ordered list within an unordered list or vice versa?
3. Which attribute is used to set the starting number for an ordered list? What about
to change the value of an element within a list?
4. What are the three types of bullets that can be specified for unordered lists using
the list-style-type CSS property?
Quiz Answers
1. Definition lists use the <dt> and <dd> tags for list items.
2. Yes, you can nest ordered lists within unordered lists or vice versa. You can also
nest lists of the same type, too.
3. With the <ol> tag, the start attribute is used to specify the starting value for the list.
To change the numbering within a list, the value attribute is used. Subsequent
items are numbered from the most recent value that’s specified.
4. The bullet types supported by the list-style-type property are disc, circle, and
square. The default is disc.
Workshop
97
5
Download from www.wowebook.com
ptg
Exercises
1. Use nested lists to create an outline of the topics covered in this book so far.
2. Use nested lists and the list-style-type CSS property to create a traditional out-
line of the topics you plan to cover on your own website.
98
LESSON 5: Organizing Information with Lists
Download from www.wowebook.com
ptg
LESSON 6
Adding Links to Your
Web Pages
After finishing the preceding lesson, you now have a couple of pages that
have some headings, text, and lists in them. These pages are all well and
good but rather boring. The real fun starts when you learn how to create
hypertext links and link your pages to the Web. In this lesson, you learn
just that. Specifically, you learn about the following:
n
All about the HTML link tag (<a>) and its various parts
n
How to link to other pages on your local disk by using relative and
absolute pathnames
n
How to link to other pages on the Web by using URLs
n
How to use links and anchors to link to specific places inside
pages
n
All about URLs: the various parts of the URL and the kinds of
URLs you can use
Download from www.wowebook.com
ptg
Creating Links
To create a link in HTML, you need two things:
n
The name of the file (or the URL of the file) to which you want to link
n
The text that will serve as the clickable link
Only the text included within the link tag is actually visible on your page. When your
readers click on the link, the browser loads the URL associated with the link.
The Link Tag: <a>
To create a link in an HTML page, you use the HTML link tag <a> </a>. The <a> tag
often is called an anchor tag because it also can be used to create anchors for links.
(You’ll learn more about creating anchors later in this lesson.) The most common use of
the link tag, however, is to create links to other pages.
Unlike the simple tags you learned about in the preceding lesson, the <a> tag has some
extra features: The opening tag, <a>, includes both the name of the tag (a) and extra
information about the link itself. The extra features are called attributes of the tag. (You
first discovered attributes in Lesson 5, “Organizing Information with Lists.”) So, rather
than the opening <a> tag having just a name inside brackets, it looks something like the
following:
<a name=”Up” href=”menu.html” title=”The Twelve Caesars”>
The extra attributes (in this example, name, href, and title) describe the link itself. The
attribute you’ll probably use most often is the href attribute, which is short for hypertext
reference. You use the href attribute to specify the name or URL of the file to which this
link points.
Like most HTML tags, the link tag also has a closing tag, </a>. All the text between the
opening and closing tags will become the actual link on the screen and be highlighted,
underlined, or colored blue or red when the web page is displays. That’s the text you or
your readers will click to follow the link to the URL in the href attribute.
Figure 6.1 shows the parts of a typical link using the <a> tag, including the href, the text
of the link, and the closing tag.
100
LESSON 6: Adding Links to Your Web Pages
Download from www.wowebook.com
ptg
The following example shows a simple link and what it looks like (see Figure 6.2):
Input ▼
Go back to <a href=”menu.html”>Main Menu</a>
Creating Links
101
6
FIGURE 6.1
A link on a web
page.
<A HREF=" /menu.html">Go back to Main Menu</A>
Text that will be highlighted
File to load
when link is selected
Closing tagOpening tag
FIGURE 6.2
How a browser dis-
plays a link.
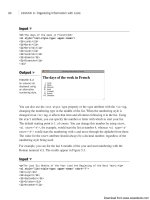
Output .
▼
Task: Exercise 6.1: Linking Two Pages
Now you can try a simple example with two HTML pages on your local disk. You need
your text editor and your web browser for this exercise. Because both the pages you work
with are on your local disk, you don’t need to connect to the Internet. (Be patient; you’ll
get to do network stuff in the next section.)
Create two HTML pages and save them in separate files. Here’s the code for the two
HTML files for this section, called
menu.html and claudius.html. What your two pages
look like or what they’re called doesn’t matter. However, make sure that you insert your
own filenames if you follow along with this example.
The following is the first file, called menu.html:
<!DOCTYPE html><html>
<head>
,
Download from www.wowebook.com
ptg
<title>The Twelve Caesars</title>
</head>
<body>
<h1>”The Twelve Caesars” by Suetonius</h1>
<p>Seutonius (or Gaius Suetonius Tranquillus) was born circa A.D. 70
and died sometime after A.D. 130. He composed a history of the twelve
Caesars from Julius to Domitian (died A.D. 96). His work was a
significant contribution to the best-selling novel and television
series “I, Claudius.” Suetonius’ work includes biographies of the
following Roman emperors:</p>
<ul>
<li>Julius Caesar</li>
<li>Augustus</li>
<li>Tiberius</li>
<li>Gaius (Caligula)</li>
<li>Claudius</li>
<li>Nero</li>
<li>Galba</li>
<li>Otho</li>
<li>Vitellius</li>
<li>Vespasian</li>
<li>Titus</li>
<li>Domitian</li>
</ul>
</body>
</html>
The list of menu items (Julius Caesar, Augustus, and so on) will be links to other pages.
For now, just type them as regular text; you turn them into links later.
The following is the second file, claudius.html:
<!DOCTYPE html><html>
<head>
<title>The Twelve Caesars: Claudius</title>
</head>
<body>
<h2>Claudius Becomes Emperor</h2>
<p>Claudius became Emperor at the age of 50. Fearing the attack of
Caligula’s assassins, Claudius hid behind some curtains. After a guardsman
discovered him, Claudius dropped to the floor, and then found himself
declared Emperor.</p>
<h2>Claudius is Poisoned</h2>
<p>Most people think that Claudius was poisoned. Some think his wife
Agrippina poisoned a dish of mushrooms (his favorite food). His death
was revealed after arrangements had been made for her son, Nero, to
succeed as Emperor.</p>
<p>Go back to Main Menu</p>
</body>
</html>
102
LESSON 6: Adding Links to Your Web Pages
, ,
Download from www.wowebook.com
ptg
Create a link from the menu file to the feeding file. Edit the menu.html file, and put the
cursor at the following line:
<li>Claudius</li>
Link tags don’t define the format of the text itself, so leave in the list item tags and just
add the link inside the item. First, put in the link tags (the <a> and </a> tags) around the
text that you want to use as the link:
<li><a>Claudius</a></li>
Now add the name of the file that you want to link to as the href part of the opening link
tag. Enclose the name of the file in quotation marks (straight quotes [“], not curly or
typesetter’s quotes [“]), with an equal sign between href and the name. Filenames in
links are case-sensitive, so make sure that the filename in the link is identical to the name
of the file you created. (Claudius.html is not the same file as claudius.html; it has to
be exactly the same case.) Here I’ve used claudius.html; if you used different files, use
those filenames.
<li><a href=”claudius.html”>Claudius</a></li>
Now, start your browser, select Open File (or its equivalent in your browser), and open
the menu.html file. The paragraph you used as your link should now show up as a link
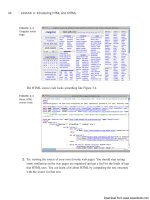
that is in a different color, underlined, or otherwise highlighted. Figure 6.3 shows how it
looked when I opened it.
Now, when you click the link, your browser should load and display the claudius.html
page, as shown in Figure 6.4.
Creating Links
103
6
, ,
Make sure that both of your files are in the same directory or
folder. If you haven’t called them
menu.html and claudius.html,
make sure that you take note of the names because you’ll need
them later.
CAUTION
Download from www.wowebook.com
ptg
104
LESSON 6: Adding Links to Your Web Pages
FIGURE 6.4
The
claudius.html
page.
If your browser can’t find the file when you click on the link, make sure that the name of
the file in the href part of the link tag is the same as the name of the file on the disk,
uppercase and lowercase match, and both files are in the same directory. Remember to
close your link, using the </a> tag, at the end of the text that serves as the link. Also,
make sure that you have quotation marks at the end of the filename (sometimes you
can easily forget) and that both quotation marks are ordinary straight quotes. All these
things can confuse the browser and prevent it from finding the file or displaying the link
properly.
Now you can create a link from the feeding page back to the menu page. A paragraph at
the end of the claudius.html page is intended for just this purpose:
<p>Go back to Main Menu</p>
Add the link tag with the appropriate href to that line, such as the following in which
menu.html is the original menu file:
<p><a href=”menu.html”>Go back to Main Menu</a></p>
FIGURE 6.3
The menu.html file
with link.
, ,
Download from www.wowebook.com
ptg
When you specify just the filename of a linked file within quotation marks, as you did
earlier, the browser looks for that file in the same directory as the current file. This is
true even if both the current file and the file being linked to are on a server somewhere
else on the Internet; both files are contained in the same directory on that server. It is the
simplest form of a relative pathname.
Relative pathnames point to files based on their locations relative to the current file.
They can include directory names, or they can point to the path you would take to navi-
gate to that file if you started at the current directory or folder. A pathname might, for
Linking Local Pages Using Relative and Absolute Pathnames
105
6
Nesting Tags Properly
When you include tags inside other tags, make sure that the closing tag closes the
tag that you most recently opened. That is, enter
<p> <a> </a> </p>
rather than
<p> <a> </p> </a>
Improper nesting of tags is invalid and could prevent your page from displayinf prop-
erly, so always make sure that you close the most recently opened tag first.
Now when you reload the Claudius file, the link will be active, and you can jump
between the menu and the detail page by clicking on those links.
Linking Local Pages Using Relative and
Absolute Pathnames
The example in the preceding section shows how to link together pages that are con-
tained in the same folder or directory on your local disk (local pages). This section con-
tinues that thread, linking pages that are still on the local disk but might be contained in
different directories or folders on that disk.
▲
Folders and directories are the same thing, but they’re called dif-
ferent names depending on whether you’re on Macintosh,
Windows, or UNIX. I’ll simply call them
directories
from now on to
make your life easier.
NOTE
,
Download from www.wowebook.com