Tự học HTML và CSS trong 1 giờ - part 20 docx
Bạn đang xem bản rút gọn của tài liệu. Xem và tải ngay bản đầy đủ của tài liệu tại đây (575.17 KB, 10 trang )
ptg
tags, and all the other strange bugs that always seem to creep into an HTML file the first
time you create it. These problems always seem to happen no matter how good you are
at creating web pages. If you use an HTML editor or some other help tool, your job will
be easier, but you’ll always seem to find mistakes. That’s what previewing is for—so you
can catch the problems before you actually make the document available to other people.
Getting Fancy Everything included on the page up to this point has been plain-
vanilla HTML 2.0, so it’s readable and will look pretty much the same in all browsers.
After you get the page to this point, however, you can add additional formatting tags and
attributes that won’t change the page for many readers but might make it look a little
fancier in browsers that do support these attributes.
So, what attributes do you want to use? Here are two:
n
Centering the title of the page, the quote, and the bookstore’s address
n
Making a slight font size change to the address
To center the topmost part of the page, you can use the <div> tag around the heading, the
quote, and the bookshop’s address, as in the following:
Input ▼
<div style=”text-align: center”>
<a name=”top”><h1 style=”font-variant: small-caps”>The Bookworm: A Better Book
Store</h1></a>
<blockquote>
“Old books are best—-how tale and rhyme<br />
Float with us down the stream of time!”<br />
- Clarence Urmy, <cite>Old Songs are Best</cite>
</blockquote>
<p>The Bookworm Bookshop<br />
1345 Applewood Dr<br />
Springfield, CA 94325<br />
(415) 555-0034
</p>
</div>
I’ve also used the style attribute to change the text in the <h1> tag to small caps. To
change the font size of the address, add a style attribute to the paragraph containing the
address:
166
LESSON 7: Formatting Text with HTML and CSS
,
,
Download from www.wowebook.com
ptg
Input ▼
<p style=”font-size: 150%”>The Bookworm Bookshop<br />
1345 Applewood Dr<br />
Springfield, CA 94325<br />
(415) 555-0034
</p>
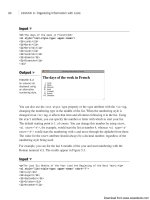
Figure 7.19 shows the final result, including styles.
Summary
167
7
,
Output .
FIGURE 7.19
The final
Bookworm home
page, with addi-
tional attributes.
You’ll learn more about formatting tags, and styles, and how to design well with them, in
Lesson 8.
Summary
Tags, tags, and more tags! In this lesson, you learned about most of the remaining tags in
the HTML language for presenting text, and quite a few of the tags for additional text
formatting and presentation. You also put together a real-life HTML home page. You
could stop now and create quite presentable web pages, but more cool stuff is to come.
So, don’t put down the book yet.
Table 7.2 presents a quick summary of all the tags and attributes you’ve learned about
in this lesson. Table 7.3 summarizes the CSS properties that have been described in this
lesson.
▲
Download from www.wowebook.com
ptg
TABLE 7.2 HTML Tags from Lesson 7
Tag Attribute Use
<address> </address> A signature for each web page;
typically occurs near the bottom
of each document and contains
contact or copyright information.
<b> </b> Bold text.
<big> </big> Text in a larger font than the text
around it. (Removed from
HTML5.)
<blockquote> </blockquote> A quotation longer than a few
words.
<cite> </cite> A citation.
<code> </code> A code sample.
<dfn> </dfn> A definition, or a term about to be
defined.
<em> </em> Emphasized text.
<i> </i> Italic text.
<kbd> </kbd> Text to be typed in by the user.
<pre> </pre> Preformatted text; all spaces,
tabs, and returns are retained.
Text is printed in a monospaced
font.
<s> </s> Strikethrough text. (Removed
from HTML5)
<samp> </samp> Sample text.
<small> </small> Text in a smaller font than the
text around it.
<strong> </strong> Strongly emphasized text.
<sub> </sub> Subscript text.
<sup> </sup> Superscript text.
<tt> </tt> Text in typewriter font (a mono-
spaced font such as Courier).
(Removed from HTML5.)
<u> </u> Underlined text. (Removed from
HTML5.)
<var> </var> A variable name.
<span> </span> A generic tag used to apply styles
to a particular bit of text.
168
LESSON 7: Formatting Text with HTML and CSS
Download from www.wowebook.com
ptg
TABLE 7.2 Continued
Tag Attribute Use
<hr> A horizontal rule line at the given
position in the text. There’s no
closing tag in HTML for
<hr>; for
XHTML, add a space and forward
slash (
/) at the end of the tag
and its attributes (for example,
<hr size=”2” width=”75%” />).
size The thickness of the rule, in pix-
els. (Removed from HTML5.)
width The width of the rule, either in
exact pixels or as a percentage of
page width (for example, 50%).
(Removed from HTML5.)
align The alignment of the rule on the
page. Possible values are
left,
right, and center. (Removed
from HTML5.)
noshade Displays the rule without three-
dimensional shading. (Removed
from HTML5.
<br> A line break; starts the next char-
acter on the next line but doesn’t
create a new paragraph or list
item. There’s no closing tag in
HTML for
<br>; for XHTML, add a
space and forward slash (
/) at
the end of the tag and its attrib-
utes (for example,
<br
clear=”left” />).
<nobr> </nobr> Doesn’t wrap the enclosed text
(nonstandard; supported by
Netscape and Internet Explorer).
<wbr> Wraps the text at this point only
if necessary (nonstandard; sup-
ported by Netscape and Internet
Explorer). Adds a space and for-
ward slash at the end of the tag
for XHTML 1.0.
<p> </p>, <h1-6> </h1-6> align=”left” Left-justifies the text within that
paragraph or heading. (Removed
from HTML5.)
Summary
169
7
Download from www.wowebook.com
ptg
TABLE 7.2 Continued
Tag Attribute Use
align=”right” Right-justifies the text within that
paragraph or heading. (Removed
from HTML5.)
align=”center” Centers the text within that para-
graph or heading. (Removed from
HTML5.)
<div> </div> align=”left” Left-justifies all the content
between the opening and closing
tags. (DeprecatRemoved from
HTML5.)
align=”right” Right-justifies all the content
between the opening and closing
tags. (Removed from HTML5.)
align=”center” Centers all the content between
the opening and closing tags.
(Removed from HTML5.)
<center> </center> Centers all the content between
the opening and closing tags.
(Removed from HTML5.)
TABLE 7.3 CSS Properties from Lesson 7
Property Use/Values
text-decoration Specifies which sort of decoration should be applied
to the text. The values are
underline, overline,
line-through, blink, and none.
font-style Specifies whether text should be italicized. The three
values are
normal, italic, and oblique.
font-weight Specifies the degree to which text should be embold-
ened. Options are
normal, bold, bolder, lighter,
and
100 to 900.
font-family Enables you to specify the font used for text. You can
choose families such as serif, sans serif, and mono-
space, or specific font names. You can also specify
more than one font or font family.
font-variant Sets the font variant to normal or small-caps.
text-align Specifies how text is aligned: left, right, center,or
justify.
font-size Enables you to specify the font size in any unit sup-
ported by CSS.
170
LESSON 7: Formatting Text with HTML and CSS
Download from www.wowebook.com
ptg
Workshop
Here you are at the close of this lesson (a long one!) and facing yet another workshop.
This lesson covered a lot of ground, so I’ll try to keep the questions easy. There are a
couple exercises that focus on building some additional pages for your website. Ready?
Q&A
Q If line breaks appear in HTML, can I also do page breaks?
A HTML doesn’t have a page break tag. Consider what the term page means in a
web document. If each document on the web is a single page, the only way to pro-
duce a page break is to split your HTML document into separate files and link
them.
Even within a single document, browsers have no concept of a page; each HTML
document simply scrolls by continuously. If you consider a single screen a page,
you still can’t have what results in a page break in HTML. The screen size in each
browser is different. It’s based on not only the browser itself, but also the size of
the monitor on which it runs, the number of lines defined, the font currently being
used, and other factors that you cannot control from HTML.
When you design your web pages, don’t get too hung up on the concept of a page
the way it exists in paper documents. Remember, HTML’s strength is its flexibility
for multiple kinds of systems and formats. Instead, think in terms of creating small
chunks of information and how they link together to form a complete presentation.
If page breaks are essential to your document, you might consider saving it in the
PDF format and making it available for download.
Q How can I include em dashes or curly quotes (typesetter’s quotes) in my
HTML files?
A There are entities for all these characters, but they might not be supported by all
browsers or on all platforms. Most people still don’t use them. To add an em dash,
use —. The curly quote entities are “ for the left quote and ”
for the right quote. Similarly, you can create curly single quotes using ‘ and
’.
Workshop
171
7
Download from www.wowebook.com
ptg
Quiz
1. What are the differences between logical character styles and physical character
styles?
2. What are some things that the <pre> (preformatted text) tag can be used for?
3. What’s the most common use of the <address> tag?
4. Older versions of HTML provided ways to align and center text on a web page.
What’s the recommended way to accomplish these tasks in HTML 4.01?
5. Without looking at Table 7.2, list all eight logical style tags and what they’re used
for. Explain why you should use the logical tags rather than the physical tags.
Quiz Answers
1. Logical styles indicate how the highlighted text is used (citation, definition, code,
and so on). Physical styles indicate how the highlighted text is displayed (bold,
italic, or monospaced, for example).
2. Preformatted text can be used for text-based tables, code examples, ASCII art, and
any other web page content that requires extra spaces to align characters.
3. The <address> tag is most commonly used for signature-like entities on a web
page. These include the name of the author of the web page, contact information,
dates, copyright notices, or warnings. Address information usually appears at the
bottom of a web page.
4. Alignment and centering of text can be accomplished with style sheets, which is
the recommended approach in HTML 4.01.
5. The eight logical styles are <em> (for emphasized text), <strong> (for bold text),
<code> (for programming code), <samp> (similar to <code>), <kbd> (to indicate
user keyboard input), <var> (for variable names), <dfn> (for definitions), and
<cite> (for short quotes or citations). Logical tags rely on the browser to format
their appearance.
Exercises
1. Now that you’ve had a taste of building your first thorough web page, take a stab at
your own home page. What can you include that would entice people to dig deeper
into your pages? Don’t forget to include links to other pages on your site.
2. Try out your home page in several browsers and even on multiple platforms if you
have access to them. Web developers have to get used to the fact that their designs
are at the mercy of their users, and it’s best to see right away how different
browsers and platforms treat pages.
172
LESSON 7: Formatting Text with HTML and CSS
Download from www.wowebook.com
ptg
LESSON 8
Using CSS to Style
a Site
The past few lessons Idiscussed how to lay out web pages using
Hypertext Markup Language (HTML) tags. This lesson describes how you
can create complex pages using Cascading Style Sheets (CSS). You’ve
already learned about the advantages CSS can provide for formatting
smaller snippets of text. In this lesson, you learn how to use CSS to
control the appearance of an entire page.
The following topics are covered:
n
Creating style sheets and including them in a page
n
Linking to external style sheets
n
Using selectors to apply styles to elements on a page
n
Units of measure supported by CSS
n
The CSS box model
n
Positioning elements using CSS
n
Applying styles to tables and the <body> tag
n
Using CSS to create multicolumn layouts
Download from www.wowebook.com
ptg
Including Style Sheets in a Page
Thus far, when I’ve discussed style sheets, I’ve applied them using the style attribute of
tags. For example, I’ve shown how you can modify the font for some text using tags such
as
<div> and <span>, or how you can modify the appearance of a list item by applying a
style within an
<li> tag. If you rely on the style attribute of tags to apply CSS, if you
want to embolden every paragraph on a page, you need to put
style=“font-weight:
bold” in every <p> tag. This is no improvement over just using <p><b> and </b></p>
instead. Fortunately, CSS provides ways to apply styles generally to a page, or even to an
entire website.
Creating Page-Level Styles
First, let’s look at how we can apply styles to our page at the page level. Thus far, you’ve
seen how styles are applied, but you haven’t seen any style sheets. Here’s what one looks
like:
<style type=“text/css”>
h1 { font-size: x-large; font-weight: bold }
h2 { font-size: large; font-weight: bold }
</style>
The <style> tag should be included within the <head> tag on your page. The type
attribute indicates the MIME type of the style sheet. text/css is the only value you’ll
use. The body of the style sheet consists of a series of rules. All rules follow the same
structure:
selector { property1: value1; property2: value2; }
Each rule consists of a selector followed by a list of properties and values associated
with those properties. All the properties being set for a selector are enclosed in curly
braces, as shown in the example. You can include any number of properties for each
selector, and they must be separated from one another using semicolons. You can also
include a semicolon following the last property/value pair in the rule, or not—it’s up to
you.
You should already be quite familiar with CSS properties and values because that’s what
you use in the style attribute of tags. Selectors are something new. I discuss them in
detail in a bit. The ones I’ve used thus far have the same names as tags. If you use h1 as
a selector, the rule will apply to any <h1> tags on the page. By the same token, if you use
p as your selector, it will apply to <p> tags.
174
LESSON 8: Using CSS to Style a Site
Download from www.wowebook.com
ptg
Creating Sitewide Style Sheets
You can’t capture the real efficiency of style sheets until you start creating sitewide style
sheets. You can store all of your style information in a file and include it without resort-
ing to any server trickery (which I discuss in Lesson 21, “Taking Advantage of the
Server”). A CSS file contains the body of a <style> tag. To turn the style sheet from the
previous section into a separate file, you could just save the following to a file called
style.css:
h1 { font-size: x-large; font-weight: bold }
h2 { font-size: large; font-weight: bold }
In truth, the extension of the file is irrelevant, but the extension .css is the de facto stan-
dard for style sheets, so you should probably use it. After you’ve created the style sheet
file, you can include it in your page using the <link> tag, like this:
<link rel=“stylesheet” href=“style.css” type=“text/css” />
The type attribute is the same as that of the <style> tag. The href tag is the same as
that of the <a> tag. It can be a relative URL, an absolute URL, or even a fully qualified
URL that points to a different server. As long as the browser can fetch the file, any URL
will work. This means that you can just as easily use other people’s style sheets as your
own, but you probably shouldn’t.
There’s another attribute of the link tag, too: media. This enables you to specify different
style sheets for different display mediums. For example, you can specify one for print,
another for screen display, and others for things like aural browsers for use with screen
readers. Not all browsers support the different media types, but if your style sheet is spe-
cific to a particular medium, you should include it. The options are screen, print, pro-
jection, aural, braille, tty, tv, embossed, handheld, and all.
You can also specify titles for your style sheets using the title attribute, as well as alter-
native style sheets by setting the rel attribute to alternative style sheet.
Theoretically, this means that you could specify multiple style sheets for your page (with
the one set to rel=“stylesheet” as the preferred style sheet). The browser would then
enable the user to select from among them based on the title you provide. Unfortunately,
none of the major browsers support this behavior.
As it is, you can include links to multiple style sheets in your pages, and all the rules will
be applied. This means that you can create one general style sheet for your entire site and
then another specific to a page or to a section of the site, too.
Including Style Sheets in a Page
175
8
Download from www.wowebook.com