Tự học HTML và CSS trong 1 giờ - part 21 potx
Bạn đang xem bản rút gọn của tài liệu. Xem và tải ngay bản đầy đủ của tài liệu tại đây (651.89 KB, 10 trang )
ptg
As you can see, the capability to link to external style sheets provides you with a power-
ful means for managing the look and feel of your site. After you’ve set up a sitewide
style sheet that defines the styles for your pages, changing things such as the headline
font and background color for your pages all at once is trivial. Before CSS, making these
kinds of changes required a lot of manual labor or a facility with tools that had search
and replace functionality for multiple files. Now it requires quick edits to a single-linked
style sheet.
Selectors
You’ve already seen one type of selector for CSS: element names. Any tag can serve as a
CSS selector, and the rules associated with that selector will be applied to all instances of
that tag on the page. You can add a rule to the <b> tag that sets the font weight to normal
if you choose to do so, or italicize every paragraph on your page by applying a style to
the <p> tag. Applying styles to the <body> tag using the body selector enables you to
apply pagewide settings. However, you can apply styles on a more granular basis in a
number of ways and to apply them across multiple types of elements using a single
selector.
First, there’s a way to apply styles to more than one selector at the same time. Suppose,
for instance that you want all unordered lists, ordered lists, and paragraphs on a page
displayed using blue text. Instead of writing individual rules for each of these elements,
you can write a single rule that applies to all of them. Here’s the syntax:
p, ol, ul { color: blue }
A comma-separated list indicates that the style rule should apply to all the tags listed.
The preceding rule is just an easier way to write the following:
p { color: blue }
ol { color: blue }
ul { color: blue }
Contextual Selectors
Contextual selectors are also available. These are used to apply styles to elements only
when they’re nested within other specified elements. Take a look at this rule:
ol em { color: blue }
The fact that I left out the comma indicates that this rule applies only to em elements that
are nested within ordered lists. Let’s look at two slightly different rules:
p cite { font-style: italic; font-weight: normal }
li cite { font-style: normal; font-weight: bold }
176
LESSON 8: Using CSS to Style a Site
Download from www.wowebook.com
ptg
In this case, <cite> tags that appear within <p> tags will be italicized. If a <cite> tag
appears inside a list item, the contents will be rendered in boldface. Let’s add in one
more rule:
cite { color: green }
p cite { font-style: italic; font-weight: normal }
li cite { font-style: normal; font-weight: bold }
In this case, we have one rule that applies to all <cite> tags, and the two others that
you’ve already seen. In this case, the contents of all <cite> tags will be green, and the
appropriately nested <cite> tags will take on those styles, too. Here’s one final example:
cite { color: green }
p cite { font-style: italic; font-weight: normal; color: red }
li cite { font-style: normal; font-weight: bold; color: blue }
In this case, the nested styles override the default style for the <cite> tag. The contents
of <cite> tags that don’t meet the criteria of the nested rules will appear in green. The
nested rules will override the color specified in the less-specific rule, so for <cite> tags
that are inside <p> tags, the contents will be red. Inside list items, the contents will be
blue.
The ability to override property settings by using more specific selectors is what provides
the ability to set styles with the precision of the style attribute from a style sheet.
Classes and IDs
Sometimes selecting by tag (even using contextual selectors) isn’t specific enough for
your needs, and you must create your own classifications for use with CSS. There are
two attributes supported by all HTML tags: class and id. The class attribute is used to
classify elements, and the id attribute is for assigning identifiers to specific elements.
To apply a selector to a class, use a leading . in the class name in your style sheet. So, if
you have a tag like this
<div class=“important”>Some text.</div>
then you write the rule like this
.important { color: red; font-weight: bold; }
Any element with the class important will appear in bold red text. If you want to give
this treatment to only important <div>s, you can include the element name along with
the class name in your rule.
div.important { color: red; font-weight: bold; }
p.important { color: blue; font-weight: bold; }
Selectors
177
8
Download from www.wowebook.com
ptg
In this case, if a <p> tag is has the class important, the text inside will be blue. If a
<div> has the important class, its text will be red. You could also rewrite the preceding
two rules as follows:
.important { font-weight: bold; }
div.important { color: red; }
p.important { color: blue; }
All members of the important class will be bold and important <div>s will be red,
whereas important paragraphs will be blue. If you assigned the important class to
another tag, like <li>, the default color would be applied to it.
Whenever you want to specify styles for a single element, assign it an ID. As you’ll learn
later in the book, assigning IDs to elements is also very useful when using JavaScript
because doing so lets you write scripts that reference individual items specifically. For
now, however, let’s look at how IDs are used with CSS. Generally, a page will have only
one footer. To identify it, use the id attribute:
<div id=“footer”>
Copyright 2010, Example Industries.
</div>
You can then write CSS rules that apply to that element by referencing the ID. Here’s an
example:
#footer { font-size: small; }
As you can see, when you refer to IDs in your style sheets, you need to prepend a # on
the front to distinguish them from class names and element names. Note that there’s no
additional facility for referring to IDs that are associated with particular elements. IDs
are supposed to be unique, so there’s no need for qualifying them further. Finally, there’s
nothing to say that you can’t mix up all these selectors in one rule, like so:
h1, #headline, .heading, div.important { font-size: large; color: green; }
As you can see, I’ve included several types of selectors in one rule. This is perfectly legal
if you want to set the same properties for a number of different selectors. Classes also
work with contextual selectors:
ul li.important { color: red }
In this case, list items in the important class will be red if they occur in an unordered
list. If they’re in an ordered list, the rule will not be applied.
178
LESSON 8: Using CSS to Style a Site
Download from www.wowebook.com
ptg
Selectors
179
8
One common mistake is to include the . when assigning classes
or the
# when assigning IDs. The punctuation should only be used
in the style sheet. In the attributes, leave them off. So
id=”pri-
mary”
is correct, id=”#primary” is not.
What Cascading Means
You may be wondering where the cascading in Cascading Style Sheets comes from.
They are so named because styles cascade from parent elements to their children. To
override a style that has been applied via cascading, you just need to set the same prop-
erty using a more specific selector.
Here’s an example style sheet that will illustrate how cascading works:
body { font-size: 200% }
div { font-size: 80% }
p { font-size: 80% }
span.smaller { font-size: 80%; font-weight: bold; }
#smallest { font-size: 80%; font-weight: normal; }
Figure 8.1 shows what the page looks like when that style sheet is applied to the follow-
ing HTML:
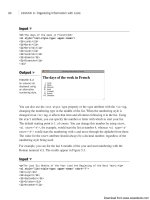
Input ▼
<div>
This text is in a div but not in a paragraph.
<p>This test is in a paragraph.</p>
<p><span class=”smaller”>This is in a span with the class “smaller”
inside a paragraph.</span></p>
<p><span class=”smaller”><span id=”smallest”>This text is in a
span with the ID “smallest”.</span></span></p>
</div>
CAUTION
Download from www.wowebook.com
ptg
Output .
FIGURE 8.1
How cascading
styles work.
180
LESSON 8: Using CSS to Style a Site
When percentage units are used in style sheets, the percentage is applied to the value
that’s inherited as the styles cascade down. To start, all the text on the page is set to a
font size of 200% using the selector for the <body> tag. Then I use a variety of selectors
to make the text progressively smaller as the styles cascade down through the style sheet.
With CSS, the styles that are applied to a given element are calculated from all the selec-
tors that match that style in the style sheet.
It’s also possible to override styles. This style sheet sets the font weight for spans with
the class smaller to bold. The element with the ID smallest has its font weight set to
normal. In Figure 8.1, you’ll see that the last line is not bold. It inherits the font weight
from the span.smaller selector, but the #smallest selector overrides it.
There are a number of other selectors that enable you to apply styles very specifically
without requiring you to add your own classes or IDs to elements. Lesson 13, “Advanced
CSS Techniques,” discusses those.
Units of Measure
One of the most confusing aspects of CSS is the units of measure it provides. Four types
of units can be specified in CSS: length units, percentage units, color units, and URLs.
There are two kinds of length units: absolute and relative. Absolute units theoretically
correspond to a unit of measure in the real world, such as an inch, a centimeter, or a
point. Relative units are based on some more arbitrary unit of measure. Table 8.1 con-
tains a full list of length units.
TABLE 8.1 Length Units in CSS
Unit Measurement
em Relative; height of the element’s font
ex Relative; height of x character in the element’s font
Download from www.wowebook.com
ptg
TABLE 8.1 Continued
Unit Measurement
px Relative; pixels
in Absolute; inches
cm Absolute; centimeters
mm Absolute; millimeters
pt Absolute; points
pc Absolute; picas
The absolute measurements seem great, except that an inch isn’t really an inch when it
comes to measuring things on a screen. Given the variety of browser sizes and resolu-
tions supported, the browser doesn’t really know how to figure out what an inch is. For
example, you might have a laptop with a 14.1" display running at 1024 by 768. I might
have a 20" CRT running at that same resolution. If the browser thinks that one inch is 96
pixels, a headline set to 1in may appear as less than an inch on your monitor or more
than an inch on mine. Dealing with relative units is safer.
In this lesson, I use one length unit: px. It’s my favorite for sizing most things. However,
other relative units can also be useful. For example, if you want paragraphs on your page
to appear as double spaced, you can specify them like this:
p { line-height: 2em; }
Percentage units are also extremely common. They’re written as you’d expect: 200%
(with no spaces). The thing to remember with percentages is that they’re always relative
to something. If you set a font size to 200%, it will be double the size of the font it
inherited through CSS, or 200% of the browser’s default font size if a font size that has
been applied to that element. If you set a <div>’s width to 50%, it will be half as wide as
the enclosing element (or the browser window, if there’s no enclosing element). When
you use percentages, always keep in mind what you’re talking about a percent of.
Units of Measure
181
8
Using Percentage Units
When you use percentages as units, bear in mind that the percentage applies not
to the size of the page, but rather to the size of the box that encloses the box to
which the style applies. For example, if you have a <div> with its width set to 50%
inside a
<div> with its width set to 500px, the inner <div> will be 250 pixels wide.
On the other hand, if the outer
<div> were also set to 50%, it would be half as wide
as the browser window, and the inner
<div> would be 25% of the width of the
browser window.
Download from www.wowebook.com
ptg
Colors can be specified in a variety of ways, all of which are discussed in Lesson 9,
“Adding Images, Color, and Backgrounds.” Some colors can be specified by name, and
that’s the method I’ve used so far in this lesson. Most of the time, when you use URLs,
they’re used in the <a> tag or <img> tag. In CSS, they’re usually included to specify the
location of a background image or a bullet image for a list. Generally, URLs are speci-
fied like this:
url( />The Box Model
When working with CSS, it helps to think of every element on a page as being contained
within a box. This is true of inline elements like <a> or block-level elements like <p>.
Each of these boxes is contained within three larger boxes, and the entire set of four is
referred to as the CSS box model. Figure 8.2 shows a diagram of the box model.
182
LESSON 8: Using CSS to Style a Site
FIGURE 8.2
The CSS box
model.
ContentLPLB
Margin Edge
Border Edge
Padding Edge
Content Edge
LM RP
TP
TB
TM
BP
BB
BM
Bottom
Top
RB RM RightLeft
Border
Margin (Transparent)
Padding
The innermost box contains the content of the element. Surrounding that is the padding,
then the border, and finally, the outermost layer (the margin). In addition to properties
that you can use to change how the content is displayed, CSS provides properties that
can be used to change the padding, border, and margins around each box. In this section,
you learn how to modify all the layers in the box model. If you get confused about how
the layers are ordered, just refer back to Figure 8.2.
Download from www.wowebook.com
ptg
Borders
Before I talk about padding or margins, I want to talk about borders. CSS provides sev-
eral properties for adding borders around elements and changing how they are displayed.
Using CSS, you can apply a border to any box.
The border-style property specifies the type of border that will be displayed. Valid
options for the border-style are none, dotted, dashed, solid, double, groove, ridge,
inset, outset, and inherit. Most of the styles alter the border appearance, but none and
inherit are special. Setting the border-style to none disables borders, and inherit
uses the border-style inherited from a less-specific selector.
The border-width property specifies how wide the border around a box should be.
Borders are usually specified in pixels, but any CSS unit of measurement can be used. To
create a 1-pixel, dashed border around all the anchors on a page, you use the following
CSS:
a { border-width: 1px; border-style: solid; }
The final border style, border-color, is used to set the color for a border. To set the bor-
der color for links to red, you use the following style declaration:
a { border-color: red; }
You can also set border properties for an element using what’s called a shortcut property.
Instead of using the three separate border properties, you can apply them all simultane-
ously as long as you put the values in the right order, using the border property. It’s used
as follows:
selector { border: style width color; }
So, to add a three pixel dashed red border to the links on a page, you use the following
style decoration:
a { border: dashed 3px red; }
You can use different values for each side of a box when you’re using any of the box
properties. There are two ways to do so. The first is to add directions to the property
names, as follows:
a {
border-width-left: 3px;
border-style-left: dotted;
border-color-left: green;
}
The Box Model
183
8
Download from www.wowebook.com
ptg
The directions are top, bottom, left, and right. Alternatively, you can set the values for
each side. If you specify four values, they will be applied to the top, right, bottom, and
left, in that order. If you specify two values, they will be applied to the top and bottom
and left and right. To set different border widths for all four sides of a box, you use the
following style:
p.box { border-width: 1px 2px 3px 4px; }
That’s equivalent to the following:
p.box {
border-width-top: 1px;
border-width-right: 2px;
border-width-bottom: 3px;
border-width-left: 4px;
}
To apply different values for the border shortcut property to different sides of a box, it’s
necessary to use the directional property names. You can’t supply multiple values for the
components of the shortcut property. However, the directional properties are treated as
being more specific than the general border property, so you can use styles like this:
Input ▼
p {
border: solid 2px red ;
border-bottom: dashed 4px green;
}
The results are in Figure 8.3.
184
LESSON 8: Using CSS to Style a Site
Output .
FIGURE 8.3
Border styles.
Download from www.wowebook.com
ptg
Margins and Padding
In the box model, there are two ways to control whitespace around a box. Padding is the
whitespace inside the border, and the margin is the whitespace outside the border, sepa-
rating the box from surrounding elements. Let’s look at an example that illustrates how
padding and margins work. The web page that follows has one <div> nested within
another. The outer <div> has a solid black border; the inner <div> has a dotted black
border. The page appears in Figure 8.4.
Input ▼
<html>
<head>
<title>Nested Elements</title>
<style type=“text/css”>
.outer { border: 2px solid black; }
.inner { border: 2px dotted black;
padding: 0;
margin: 0; }
</style>
</head>
<body>
<div class=“outer”>
Outer.
<div class=“inner”>
Friends, Romans, countrymen, lend me your ears;<br />
I come to bury Caesar, not to praise him.<br />
The evil that men do lives after them;<br />
The good is oft interred with their bones;<br />
So let it be with Caesar. The noble Brutus<br />
</div>
</div>
</body>
</html>
The Box Model
185
8
Output .
FIGURE 8.4
Nested <div>s
with no margins or
padding.
Download from www.wowebook.com