Tự học HTML và CSS trong 1 giờ - part 31 potx
Bạn đang xem bản rút gọn của tài liệu. Xem và tải ngay bản đầy đủ của tài liệu tại đây (875.74 KB, 10 trang )
ptg
percentage of the full table width). As with table widths, using percentages rather than
specific pixel widths is a better idea because it allows your table to be displayed regard-
less of the window size.
Column widths are useful when you want to have multiple columns of identical widths,
regardless of their contents (for example, for some forms of page layout).
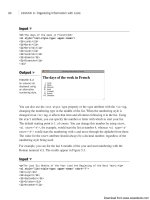
Figure 10.13 shows your original table from Figure 10.1. This time, however, the table
spans 100% of the screen’s width. The first column is 40% of the table width, and the
remaining three columns are 20% each.
To accomplish this, the column widths are applied to the heading cells as follows:
Input ▼
<table border=“1” width=“100%”>
<caption>Vital Statistics</caption>
<tr>
<th width=“40%”>Name</th>
<th width=“20%”>Height</th>
<th width=“20%”>Weight</th>
<th width=“20%”>Eye Color</th>
</tr>
</table>
276
LESSON 10: Building Tables
Output .
FIGURE 10.13
A table with manu-
ally set column
widths.
What happens if you have a table that spans 80% of the screen, and it includes the same
header cells (40%, 20%, 20%, and 20%) as in the preceding example? Revise the code
slightly, changing the width of the entire table to 80%, as shown in Figure 10.14. When
you open the new table in your browser, you’ll see that the table now spans 80% of the
width of your screen. The four columns still span 40%, 20%, 20%, and 20% of the table.
To be more specific, the columns span 32%, 16%, 16%, and 16% of the entire screen
width:
Download from www.wowebook.com
ptg
Input ▼
<table border=“1” width=“80%”>
<caption>Vital Statistics</caption>
<tr>
<th width=“40%”>Name</th>
<th width=“20%”>Height</th>
<th width=“20%”>Weight</th>
<th width=“20%”>Eye Color</th>
</tr>
</table>
Sizing Tables, Borders, and Cells
277
10
Output .
FIGURE 10.14
A modified table
with manually set
column widths.
If you are going to specify cell widths, make sure to either specify the widths for cells
only on one row or to the same values for every row. If you specify more than one value
for the width of a column (by specifying different values on multiple rows of a table),
there’s no good way to predict which one the browser will use.
You can also specify widths using CSS, using the width property. Here’s how you create
the preceding table using CSS for the cell widths:
<table border=“1” style=”width: 80%”>
<caption>Vital Statistics</caption>
<tr>
<th style=”width: 40%”>Name</th>
<th style=”width: 20%”>Height</th>
<th style=”width: 20%”>Weight</th>
<th style=”width: 20%”>Eye Color</th>
</tr>
</table>
One advantage of using CSS approach is that you can use any units you like to specify
the width, rather than just pixels or percentages.
Download from www.wowebook.com
ptg
Setting Breaks in Text
Often, the easiest way to make small changes to how a table is laid out is by using line
breaks (
<br /> elements). Line breaks are particularly useful if you have a table in
which most of the cells are small and only one or two cells have longer data. As long as
the screen width can handle it, generally the browser just creates really long rows. This
looks rather funny in some tables. For example, the last row in the table shown in Fig-
ure 10.15 is coded as follows:
Input ▼
<tr>
<td>TC</td>
<td>7</td>
<td>Suspicious except when hungry, then friendly</td>
</tr>
278
LESSON 10: Building Tables
Output .
FIGURE 10.15
A table with one
long row.
By putting in line breaks, you can wrap that row in a shorter column so that it looks
more like the table shown in Figure 10.16. The following shows how the revised code
looks for the last row:
Input ▼
<tr>
<td>TC</td>
<td>7</td>
<td>Suspicious except<br />
when hungry, <br />
then friendly</td>
</tr>
Download from www.wowebook.com
ptg
On the other hand, you might have a table in which a cell is being wrapped and you want
all the data on one line. (This can be particularly important for things such as form ele-
ments within table cells, where you want the label and the input field to stay together.) In
this instance, you can add the nowrap attribute to the <th> or <td> elements, and the
browser keeps all the data in that cell on one line. Note that you can always add <br />
elements to that same cell by hand and get line breaks exactly where you want them.
Let’s suppose you have a table where the column headings are wider than the data in the
columns. If you want to keep them all online, use nowrap as follows:
<table width=“50%” summary=“Best Hitters of All Time”>
<tr>
<th>Player Name</th>
<th nowrap=“nowrap”>Batting Average</th>
<th nowrap=“nowrap”>Home Runs</th>
<th>RBI</th>
</tr>
<tr>
<td>Babe Ruth</td>
<td>.342</td>
<td>714</td>
<td>2217</td>
</tr>
<tr>
<td>Ted Williams</td>
<td>.344</td>
<td>521</td>
<td>1839</td>
</tr>
</table>
Regardless of the width of the table, the Batting Average and the Home Runs column
headings will not wrap.
Sizing Tables, Borders, and Cells
279
10
Output .
FIGURE 10.16
The long row fixed
with <br/>.
Download from www.wowebook.com
ptg
280
LESSON 10: Building Tables
The nowrap attribute has been deprecated in HTML 4.01 in favor
of using style sheet properties.
To achieve the same results in CSS, use the white-space property. The default value is
“normal”. To disable word wrapping, use the value “nowrap”. Here’s how one of the
headings in the previous example would be written using CSS:
<th style=”white-space: normal”>Batting Average</th>
Be careful when you hard-code table cells with line breaks and nowrap attributes.
Remember, your table might be viewed by users with many different screen widths. Try
resizing the browser window to make sure your table still looks correct. For the most
part, try to let the browser format your table and make minor adjustments only when
necessary.
Table and Cell Color
After you have your basic table layout with rows, headings, and data, you can start refin-
ing how that table looks. You can refine tables in a couple of ways. One way is to add
color to borders and cells.
There are two ways to change the background color of a table, a row, or a cell inside a
row. In the pre-CSS world, you would use the bgcolor attribute of the <table>, <tr>,
<th>, or <td> elements. Just as in the <body> tag, the value of bgcolor is a color speci-
fied as a hexadecimal triplet or one of the 16 color names: Black, White, Green, Maroon,
Olive, Navy, Purple, Gray, Red, Yellow, Blue, Teal, Lime, Aqua, Fuchsia, or Silver. In
the style sheet world, you use the background-color property or the background prop-
erty. You can use the style attribute in the <table>, <tr>, <th>, and <td> elements, just
as you can in most other elements. Each background color overrides the background
color of its enclosing element. For example, a table background overrides the page back-
ground, a row background overrides the table’s, and any cell colors override all other col-
ors. If you nest tables inside cells, that nested table has the background color of the cell
that encloses it.
Also, if you change the color of a cell, don’t forget to change the color of the text inside
it so that you can still read it.
NOTE
Download from www.wowebook.com
ptg
Table and Cell Color
281
10
For table cells to show up with background colors, they must not be
empty. Simply putting a
<br /> element in empty cells works fine.
Here’s an example of changing the background and cell colors in a table. I’ve created a
checkerboard using an HTML table. The table itself is white, with alternating cells in
black. The checkers (here, red and black circles) are images. In the source code, I’ve used
both bgcolor and the background-color property to set background colors for some of
the cells. As you’ll see in the screenshot, the appearance of both is the same when ren-
dered in the browser:
Input ▼
<!DOCTYPE html>
<html>
<head>
<title>Checkerboard</title>
</head>
<body>
<table bgcolor=“#FFFFFF” width=“50%” summary=“checkerboard”>
<tr align=“center”>
<td bgcolor=“#000000” width=“33%”><img src=“redcircle.png” /></td>
<td width=“33%”><img src=“redcircle.png” alt=““ /></td>
<td bgcolor=“#000000” width=“33%”><img src=“redcircle.png” /></td>
</tr>
<tr align=“center”>
<td><img src=“blackcircle.png” alt=““ /></td>
<td style=“background-color: #000000”><br /></td>
<td><img src=“blackcircle.png” alt=““ /></td>
</tr>
<tr align=“center”>
<td bgcolor=“#000000”><br /></td>
<td><img src=“blackcircle.png” alt=““ /></td>
<td bgcolor=“#000000”><br /></td>
</tr>
</table>
</body>
</html>
Figure 10.17 shows the result.
NOTE
Download from www.wowebook.com
ptg
Aligning Your Table Content
Another enhancement that you can make to your tables is to adjust the alignment of their
content. The align attribute aligns content horizontally, whereas the valign attribute
aligns content vertically, and of course, you can use CSS properties to accomplish the
same things, too. The following sections describe how to use these attributes in tables.
Table Alignment
By default, tables are displayed on a line by themselves along the left side of the page,
with any text above or below the table. However, you can use the align attribute to align
tables along the left or right margins and wrap text alongside them the same way you can
with images.
align=“left” aligns the table along the left margin, and all text following that table is
wrapped in the space between that table and the right side of the page. align=“right”
does the same thing, with the table aligned to the right side of the page.
In the example shown in Figure 10.18, a table that spans 70% of the width of the page is
aligned to the left with the following code:
<table border=“1” align=“left” width=“70%”>
282
LESSON 10: Building Tables
Output .
FIGURE 10.17
Table cell colors.
DO test your tables with various sizes
of browser windows to make sure they
look okay.
DO increase the
cellpadding in your
tables to make them more readable.
DON’T use tables just to put borders
around elements on a page; use CSS.
DON’T use tables just to apply a back-
ground color to an element; use CSS
instead.
DON’T use tables format nontabular
data if you can help it.
DO DON’T
Download from www.wowebook.com
ptg
As you can see from the screenshot, one problem with wrapping text around tables is
that HTML has no provision for creating margins that keep the text and the image from
jamming right up next to each other. That problem can be addressed by applying a mar-
gin to the table using CSS.
As with images, you can use the line break element with the clear attribute to stop
wrapping text alongside a table. Centering tables is slightly more difficult. Most browsers
support the align=“center” attribute in table tags.
Aligning Your Table Content
283
10
FIGURE 10.18
A table with text
alongside it.
The CSS approach to flowing content around a table is to use the
float property, as described in Lesson 7, “Formatting Text with
HTML and CSS.” So to align a table to the right and float content
around it, you could use a style declaration like this:
.sidetable { width: 300xp; float: right; margin: 15px; }
That makes the table 300 pixels wide, aligns it to the right, and
applies a 15 pixel margin to all four sides. To center a table on
the page, you can use a margin value of
auto, as follows:
.centered { margin-left: auto; margin-right: auto; }
Cell Alignment
After you have your rows and cells in place inside your table and the table is properly
aligned on the page, you can align the data within each cell for the best effect, based on
what your table contains. Several options enable you to align the data within your cells
TIP
Download from www.wowebook.com
ptg
Horizontal alignment (the align attribute) defines whether the data within a cell is
aligned with the left cell margin (left), the right cell margin (right), or centered within
the two (center). The one place where the align attribute wasn’t deprecated in XHTML
1.0 is the <td> and <th> tags. It’s perfectly okay to use it within your tables. That said, it
is more efficient to align the contents of cells using CSS if you want to apply the align-
ment to many cells at once.
Vertical alignment (the valign attribute) defines the vertical alignment of the data within
the cell: flush with the top of the cell (top), flush with the bottom of the cell (bottom), or
vertically centered within the cell (middle). Newer browsers also implement
valign=“baseline”, which is similar to valign=“top” except that it aligns the baseline
of the first line of text in each cell. (Depending on the contents of the cell, this might or
might not produce a different result than valign=“top”.)
By default, heading cells are centered both horizontally and vertically, and data cells are
centered vertically but aligned flush left.
You can override the defaults for an entire row by adding the align or valign attributes
to the <tr> element, as in the following:
<tr align=“center” valign=“top”>
284
LESSON 10: Building Tables
FIGURE 10.19
Aligned content
within cells.
both horizontally and vertically. Figure 10.19 shows a table (a real HTML one!) of the
various alignment options.
Download from www.wowebook.com
ptg
You can override the row alignment for individual cells by adding align to the <td> or
<th> elements:
<tr align=“center” valign=“top”>
<td>14</td>
<td>16</td>
<td align=left>No Data</td>
<td>15</td>
</tr>
The following input and output example shows the various cell alignments and how they
look (see Figure 10.20). I’ve added a style sheet that sets the cell heights to 100 pixels to
make the vertical alignments easier to see:
Input ▼
<!DOCTYPE html>
<html>
<head>
<title>Cell Alignments</title>
<style type=”text/css”>
td { height: 100px; }
</style>
</head>
<body>
<table border=”1” cellpadding=”8” width=”100%”>
<tr>
<th><br /></th>
<th>Left</th>
<th>Centered</th>
<th>Right</th>
</tr>
<tr>
<th>Top</th>
<td align=”left” valign=”top”><img src=”star.png” alt=”” /></td>
<td align=”center” valign=”top”><img src=”star.png” alt=”” /></td>
<td align=”top” valign=”top”><img src=”star.png” alt=”” /></td>
</tr>
<tr>
<th>Centered</th>
<td align=”left” valign=”middle”><img src=”star.png” alt=”” /></td>
<td align=”center” valign=”middle”><img src=”star.png” alt=”” /></td>
<td align=”right” valign=”middle”><img src=”star.png” alt=”” /></td>
</tr>
Aligning Your Table Content
285
10
Download from www.wowebook.com