Tự học HTML và CSS trong 1 giờ - part 42 pdf
Bạn đang xem bản rút gọn của tài liệu. Xem và tải ngay bản đầy đủ của tài liệu tại đây (1.11 MB, 10 trang )
ptg
alternative sites, such as Vimeo, that provide video hosting, too. Then you learned about
the file formats associated with video on the Web and how to convert videos to those for-
mats. You learned a lot about the limitations of the various browsers in terms of the tags
and formats they support and how to work around those limitations to deliver your video
and audio content to as many users as possible.
Next, I discussed the option of hosting your own videos. You learned how to embed
video in web pages using the <video> tag and the <object> tag and how to combine
them to support the largest number of browsers. You also learned about SWFObject, a
tool that makes it easier to embed Flash movies in your pages in a standards-compliant
way. The lesson also covered two Flash movies that can used to embed video or audio
files in your web pages. Finally, I discussed audio embedding and the <audio> tag.
Table 12.5 shows a summary of the tags you learned about in this lesson.
Table 12.5 Tags for Embedding Video and Audio
Tag Attribute Use
<audio> Embeds audio files into web pages
for native playback by the browser
<embed> Embeds objects into web pages
<object> <object> Embeds objects into web pages
<param> </param> Specifies parameters to be passed
to the embedded object. Used in the
object element
<source> Points to a source audio or video file
to be played by an
<audio> or
<video> tag
<video> Embeds an audio file into a web page
for native playback
Workshop
The following workshop includes questions you might ask about embedding video and
audio in your web pages, questions to test your knowledge, and three exercises.
Q&A
Q What’s the quickest way to get started adding video to my site?
A The quickest way is to use a site like YouTube of Vimeo that makes it easy to
upload your video files and then embed them using the code provided. For most
publishers, using sites such as these is all that’s needed to provide video to users.
386
LESSON 12:Integrating Multimedia: Sound, Video, and More
Download from www.wowebook.com
ptg
Going the extra mile to host your own video is probably not worth it for the vast
majority of applications, especially when you can subscribe to a site such as Vimeo
for a nominal fee and publish videos hosted there without linking back to them.
Q Should I be worried about web browser compatibility and standards compli-
ance when it comes to audio and video?
A Unfortunately, yes. When it comes to video and audio, it’s easy to wind up writing
markup that isn’t standards-compliant or to leave out part of your audience by
using markup that won’t work with their browser. Fortunately, as long as you use
the techniques listed in this lesson, you can embed video or audio in your pages in
a standards-compliant way that supports all the browsers that are currently in use.
Q What is the difference between H.264 and Ogg Theora?
A H.264 and Ogg Theora are both video codecs. They are slightly different in terms
of performance, but the main difference is in how they are licensed. Ogg Theora is
an open technology that can be implemented by anyone without restraint. H.264 is
covered by patents that must be licensed. For this reason, some browsers, like
Firefox, do not support H.264 decoding. To use the <video> tag and reach the
widest number of users, you should make your videos available in both formats.
Quiz
1. How do you accommodate users whose browsers do not support the <video> tag
and do not have Flash installed?
2. Why is SWFObject a more robust approach to embedding Flash than just using the
<object> tag?
3. Why are two <object> tags required to embed Flash movies in pages that work in
most browsers?
4. Which video format is supported by all web browsers that support the <video>
tag?
Quiz Answers
1. The key to accommodating users who cannot view your video because of the
browser they’re using or because they don’t have the proper plug-in installed is to
use alternative content. Content placed inside the <video> tag or <object> tag will
be ignored by browsers that understand those tags and displayed by those that
don’t. You can include a link to the proper plug-in, a new browser, or even a direct
link to the video itself so that the user can download it and play it with an applica-
tion on their computer.
Workshop
387
12
Download from www.wowebook.com
ptg
2. The two main advantages of SWFObject are that it enables you to create valid
markup that still supports a wide variety of browsers and that it gracefully handles
cases where the user is missing the Flash plug-in or the version of the Flash plug-
in they have installed is out of date.
3. Two <object> tags are required because one set of attributes works with Internet
Explorer and another set of attributes work with other browsers, like Firefox and
Safari.
4. This is a trick question. No one container format or codec is supported by all
browsers. To reach your entire audience, you must encode your video in multiple
formats and use Flash for browsers without native support for the s tag.
Exercises
1. Upload a video to YouTube or Vimeo, and then create a web page with that video
embedded in it.
2. Use one of the two video players listed in this chapter, JW Player or Flowplayer, to
embed a video in a web page. Look into the configuration options and try changing
the appearance of the player.
3. Try rewriting the YouTube embed code for a video on the site in a standards-
compliant fashion. There’s no reason why you must use YouTube’s nonstandards-
compliant code to embed their movies in your pages.
388
LESSON 12:Integrating Multimedia: Sound, Video, and More
Download from www.wowebook.com
ptg
LESSON 13
Advanced CSS: Page
Layout in CSS
One of the major draws of modern CSS is the freedom to replace clunky
HTML with structured HTML markup, styled by CSS rules. In Lesson 8,
“Using CSS to Style a Site,” you learned how to place individual portions
of your web page in specific locations using absolute positioning or float-
ing content. You can use the same types of style rules to build the visual
structure of the page.
In this lesson, you’ll learn about the following:
n
The different strategies for laying out a page in CSS
n
Why it’s a bad idea to use <table> for page layout
n
The steps to replacing a table-based layout with a CSS-based
structure
n
How to write HTML code for CSS-based layouts
n
How to use positioned content to lay out a page
n
How to use floating columns to lay out a page
n
Which questions you need to ask yourself before starting on a
style sheet
n
How to organize your style sheets to make them easier to use
and edit
Download from www.wowebook.com
ptg
Laying Out the Page
This lesson brings together many of the techniques you’ve learned in previous lessons for
using Cascading Style Sheets (CSS) properties to lay out an entire page or even an entire
website. You won’t need to misuse HTML
<table> elements for page layout now that
you have reliable CSS techniques for layout in your repertoire.
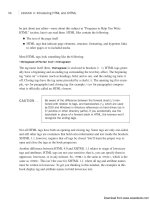
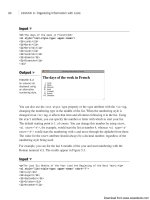
The examples this lesson use a redesigned version of the website for the Dunbar Project
in Tucson, Arizona. The site as it appeared before the makeover is shown in Figure 13.1.
It is mostly a dark teal color, and although it’s not bad, it could be improved through the
use of CSS, as you’ll see.
390
LESSON 13: Advanced CSS: Page Layout in CSS
FIGURE 13.1
The Dunbar
Project’s original
website.
The Problems with Layout Tables
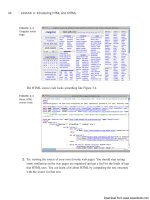
Figure 13.2 shows the source view for the original version of the Dunbar Project website,
which was not designed with CSS. Instead, multiple nested <table> tags provide the
page layout, and <font> is used extensively.
Download from www.wowebook.com
ptg
FIGURE 13.2
Table-based
layout can be
very convoluted.
Laying Out the Page
391
13
Tables for layout are problematic for a number of reasons. HTML purists argue against
tables on principle: The <table> tag is meant to identify data in rows and columns of
information and is not intended for page layout. Accessibility mavens will tell you that
screen readers employed by visually impaired users struggle with table layout.
Table-based layouts are often harder to maintain than CSS-based layouts, requiring
extensive rewriting of HTML tags to make simple changes. Later this lesson, you’ll see
how a few CSS rules can easily move entire sections around without touching the HTML
document at all.
CSS-based layouts make it easier to maintain your HTML pages without cluttering them
up with <tr> and <td> tags and make for simpler transitions to new layouts by just
swapping in a new style sheet. Your web pages laid out with CSS will be smaller (and
thus load more quickly) than table-based pages. You can write web pages with the main
content first in the HTML source and the navigation and footer information after, making
your page more friendly to screen readers and search engines.
Writing HTML with Structure
The first step to laying out a page is to start with well-written HTML that is divided into
sections for styling. This is commonly done with <div> tags that have id attributes set on
them, corresponding to the different sections of the page.
Download from www.wowebook.com
ptg
In Listing 13.1, you can see a redesign of the Dunbar Project home page, which uses
simple markup to store the site navigation, the content, the side navigation links, and the
page footer.
LISTING 13.1 Using <div> Tags to Create Sections for Positioning
<! dunbar-13.1.html >
<html>
<head>
<title>The Dunbar Project</title>
</head>
<body>
<div id=”header”>
<h1>The Dunbar Project</h1>
<h2>In the Shadow of Downtown Tucson</h2>
<div id=”sitenav”>
<ol><li><a href=”index.html”>Home</a></li>
<li><a href=”about/”>About the Dunbar Project</a></li>
<li><a href=”gallery/”>Photo Galleries</a></li>
<li><a href=”donate/”>Donate</a></li>
<li><a href=”contact/”>Contact</a></li></ol>
</div> <! sitenav >
</div> <! header >
<div id=”main”>
<div id=”content”>
<h3>Welcome to The Dunbar Project Website</h3>
<img src=”DunbarTop.jpg” alt=”[Dunbar School]”>
<p>Dunbar School was completed in January 1918, for the
purpose of educating Tucson’s African-American students.
The school was named after <a href=”poet.html”>Paul
Laurence Dunbar</a>, a renowned African-American poet.
African-American children in first through ninth grades
attended Dunbar until 1951, when de jure segregation was
eliminated from the school systems of Arizona. When
segregation in Arizona was eliminated, Dunbar School
became the non-segregated John Spring Junior High School,
and continued as such until 1978 when the school was
closed permanently.</p>
<! more content omitted >
</div> <! content >
<div id=”sidebar”>
<h3>Dunbar Project</h3>
<ol><li><a href=”plan/”>The Dunbar Site Plan</a></li>
<li><a href=”auditorium/”>Dunbar Auditorium</a></li>
<li><a href=”history/”>School History</a></li>
<li><a href=”proposal/”>Project Proposal</a></li>
<li><a href=”donors/”>Dunbar Donors</a></li>
<li><a href=”poet.html”>About Paul Laurence Dunbar,
Poet</a></li>
392
LESSON 13: Advanced CSS: Page Layout in CSS
Download from www.wowebook.com
ptg
<li><a href=”links/”>Related Links</a></li></ol>
<h3>Coalition Partners</h3>
<ol><li>The Tucson Urban League</li>
<li>The Dunbar Alumni Association</li>
<li>The Dunbar/Spring Neighborhood Association</li>
<li>The Juneteenth Festival Committee</li></ol>
<h3>Individual Members</h3>
<ol> <! list of donors omitted —> </ol>
</div> <! sidebar >
<div id=”footer”>
<p id=”note501c3”>The Dunbar Project is a 501c(3) organization,
and your contributions are tax deductible.</p>
<p id=”copyright”>Copyright © 2006 by the Dunbar
Project. Questions?
<a href=”mailto:”>
Mail the Webmaster.</a></p>
</div> <! footer >
</div> <! main >
</body>
</html>
The structure of this page is defined by the <div> tags with id attributes. The general
skeleton (with content omitted) consists of the following:
<div id=”header”>
<div id=”sitenav”></div>
</div> <! header >
<div id=”main”>
<div id=”content”></div>
<div id=”sidebar”></div>
<div id=”footer”></div>
</div> <! main >
Comments are used with the closing </div> tags as reminders about which <div> is
being closed; it makes the page easier to edit later.
The page is constructed of two sections: a header and a main body. Each of these has one
or more subsections. This structure provides what’s needed to redesign and lay out the
page.
Why this particular structure? There are actually many ways you could structure such the
page, inserting <div> tags appropriately. This skeleton is simply the method chosen for
this example, to get the specific styles used later on. During the web development
process, you might go back to your HTML and add or remove <div> tags while styling
to give more flexibility when creating page layouts.
Laying Out the Page
393
13
Download from www.wowebook.com
ptg
The number of <div> tags you use will vary from layout to layout. Some web designers
believe strongly in using only a minimum number of <div> tags, whereas others add
them freely whenever needed. The approach for this example is down the middle
between those extremes: There are enough to make it easy to illustrate how CSS-based
layout works but not so many that we’re adding extraneous <div> tags just because we
can.
Figure 13.3 shows the new HTML page without any styles applied.
394
LESSON 13: Advanced CSS: Page Layout in CSS
FIGURE 13.3
An unstyled page,
ready for layout.
Writing a Layout Style Sheet
With an HTML page ready for styling, the next step is to write the style sheet. There are
several questions to consider regarding how to lay out the page.
The first is a technical question: Will you use absolute positioning for layout, or will you
use floated columns? You can get the same general layout effects from both techniques.
Positioning is a little bit easier to grasp, at first, so this example uses absolute position-
ing. Later this lesson, however, you’ll learn how to lay out the same HTML page with
the float property.
You need to figure out how many columns you want. There’s a slight increase in com-
plexity when you have more columns, but the specific techniques remain the same
whether you’re using two columns, three columns, or more. In this redesign, two
columns are used to avoid making the example overly complex.
Download from www.wowebook.com
ptg
Finally, you need to determine whether you are using a fixed layout or a liquid layout. A
fixed layout is one that defines a specific width for an entire page; for example, it may be
always 700 pixels across, and excess space in the browser simply becomes wider mar-
gins. A liquid layout is one that grows larger (or smaller) based on the user’s screen reso-
lution and browser window size.
There are advantages and disadvantages to both fixed and liquid layouts. A fixed layout
may be easier to create and easier to read on larger monitors; a liquid layout is more
adaptable but could result in overly long lines, which are harder to read. In this example,
the Dunbar Project site will use a liquid design with margin size based on em units.
Listing 13.2 is a style sheet that starts to set up the layout choices.
LISTING 13.2 A Style Sheet for Page Layout
/* dunbar-layout-13.2.css */
body { margin: 0; padding: 0;
background-color: silver; }
#header { background-color: black; color: white; }
#sitenav ol { padding: 0; margin: 0;
display: inline; }
#sitenav li { display: inline; padding-left: 1em;
margin-left: 1em; border-left: 1px
solid black; }
#sitenav li:first-child
{ padding-left: 0; border-left: none;
margin-left: 0; }
#sitenav li a { color: white; }
#main { padding: 0 12em 2em 2em;
position: relative;
background-color: gray; }
#content { background-color: white; }
#sidebar { position: absolute; width: 10em;
right: 1em; top: 1em; }
#sidebar h3 { color: white;
background-color: black; }
#sidebar ol { margin: 0 0 1em 0;
background-color: white;
border: 2px solid black; }
#footer { background-color: white; }
This style sheet is deliberately plain and simple, with colors of black, gray, silver, and
white to make it easier for you to identify the various sections of the page.
Laying Out the Page
395
13
Download from www.wowebook.com