Tự học HTML và CSS trong 1 giờ - part 52 pdf
Bạn đang xem bản rút gọn của tài liệu. Xem và tải ngay bản đầy đủ của tài liệu tại đây (760.08 KB, 10 trang )
ptg
Quiz
1. What’s the basic function of a web server?
2. How can you obtain an Internet connection?
3. What are default index files, and what’s the advantage of using them in all
directories?
4. What are some things that you should check immediately after you upload your
web pages?
5. Name some of the ways that you can promote your website.
6. What’s a hit?
7. What are the advantages of using an all-in-one submission page to promote your
site?
Quiz Answers
1. A web server is a program that sits on a machine on the Internet (or an intranet). It
determines where to find files on a website and keeps track of where those files are
going.
2. You can obtain an Internet connection through school, work, or commercial
Internet or web services, or you can set up your own web server.
3. The default index file is loaded when a URL ends with a directory name rather
than a filename. Typical examples of default index files are index.html,
index.htm, and default.htm. If you use default filenames, you can use a URL
such as rather than to
get to the home page in the directory.
4. Make sure that your browser can reach your web pages on the server, that you can
access the files on your website, and that your links and images work as expected.
After you’ve determined that everything appears the way you think it should, have
your friends and family test your pages in other browsers.
5. Some ways you can promote your site include major web directories and search
engines, listings on business cards and other promotional materials, and web rings.
6. A hit is a request for any file from your website.
7. An all-in-one submission page enables you to submit your URL to several different
site promotion areas and web robots simultaneously. Some provide a small number
of submissions for free and a larger number of submissions for an additional fee.
486
LESSON 16:Using JavaScript Libraries
Download from www.wowebook.com
ptg
Exercises
1. Download jQuery and use the <script> tag to load it in a web page.
2. Use jQuery to disable all the links on a web page.
3. Use jQuery to cause a border to appear around all the links on a web page when
the user mouses over them. Make sure to remove the borders when the user moves
the pointer away from the link.
4. Try to add a link to a web page that uses AJAX to retrieve the local temperature
from a weather site for your city. You’ll need to find the URL for a page with your
city’s weather on it, and then create the correct selector to extract only the informa-
tion you want from that page. After you find the weather page, view the source on
it to figure out how to extract the information using a jQuery selector.
Workshop
487
16
Download from www.wowebook.com
ptg
This page intentionally left blank
Download from www.wowebook.com
ptg
LESSON 17
Working with Frames
and Linked Windows
In the early days of the Web, two significant limitations of web browsers
were that they could only display one document in a browser window at
a time and that sites couldn’t open more browser windows if needed.
Frames enable you to divide the browser window into sections, each con-
taining a different document, and linked windows enable you to create
links that open pages in new browser windows. Used properly, these two
techniques can make your website easier to navigate. Unfortunately, they
can also be misused to make your site confusing, difficult to use, and
annoying to your users. In this lesson, you’ll learn how to apply these
techniques to make your site more usable.
You’ll learn all about the following topics:
n
What frames are, how they can affect your layout, and who sup-
ports them
n
How to work with linked windows
n
How to work with frames
n
How to create complex framesets
n
Inline frames
Download from www.wowebook.com
ptg
What Are Frames?
In this lesson, you’ll learn about the tags that you can use to create frames. There are two
ways to use frames. The first is to divide the page into sections using a frameset and then
to load documents into each of the frames, and the second is to embed a second docu-
ment into an existing page using an inline frame. Inline frames are like images or Flash
movies, they can be included anywhere within a page. Over time, inline frames have
become more commonly used, and frames created using framesets have become less
commonly used. HTML5 does not include support for frames created using framesets,
leaving only inline frames. Browser support for framesets is still all but universal, but for
new projects, you should probably avoid using framesets whenever possible.
Frames give you an entirely different level of layout control than you’ve had so far in this
book. For example, take a look at the example in Figure 17.1.
490
LESSON 17: Working with Frames and Linked Windows
FIGURE 17.1
A sample web
page with frames.
On this screen, you see four frames displayed within one browser window. The left
frame contains graphical navigation elements, the lower-right frame contains text naviga-
tional links, the upper-right frame contains the page header, and the middle-right frame
contains the main content of the site. This screenshot also illustrates one of the disadvan-
tages of using frames. The frame that contains the actual page content actually uses a
fairly small section of the browser window; the rest of the window is consumed by the
other frames. When you separate your layout using frames, you can detract from the
important content on your site.
Download from www.wowebook.com
ptg
▼
Because the information displayed on the page is separated into individual frames, the
contents of a single frame can be updated without affecting the contents of any other
frame. If you click one of the linked images in the left frame, for example, the contents
of the large frame on the right are automatically updated to display the details about the
subject you’ve selected. When this update occurs, the contents of the left frame and the
bottom frame aren’t affected.
Working with Linked Windows
Before you learn how to use frames, you need to learn about the target attribute of the
<a> tag. It enables you to direct a link to open a page in a different frame or window, and
learning how to use it is necessary to build sites with frames that work. This attribute
takes the following form:
target=“window_name”
Usually, when you click a hyperlink, the page to which you’re linking replaces the cur-
rent page in the browser window. When you use the target attribute, you can open links
in new windows, or in existing windows other than the one that the link is in. With
frames, you can use the target attribute to display the linked page in a different frame.
The target attribute tells the web browser to display the information pointed to by a
hyperlink in a window called window_name. Basically, you can call the new window
anything you want, except that you can’t use names that start with an underscore (_).
These names are reserved for a set of special target values that you’ll learn about later
in the “Magic target Names” section.
When you use the target attribute inside an <a> tag, the browser first checks whether a
window with the name window_name exists. If it does, the document pointed to by the
hyperlink replaces the current contents of window_name. On the other hand, if no win-
dow called window_name currently exists, a new browser window opens with that name
assigned to it. Then the document pointed to by the hyperlink is loaded into the newly
created window.
Task: Exercise 17.1: Working with Windows
Framesets rely on the target attribute to load pages into specific frames in a frameset.
Each of the hyperlinks in the following exercise uses the target attribute to open a web
page in a different browser window. The concepts you’ll learn here will help you under-
stand later how targeted hyperlinks work in a frameset.
Working with Linked Windows
491
17
,
Download from www.wowebook.com
ptg
In this exercise, you create four separate HTML documents that use hyperlinks, includ-
ing the target attribute. You use these hyperlinks to open two new windows called
yellow_page and blue_page, as shown in Figure 17.2. The top window is the original
web browser window (the red page), yellow_page is at the bottom left, and blue_page is
at the bottom right.
492
LESSON 17: Working with Frames and Linked Windows
,
FIGURE 17.2
Using the
target attribute
indicates that
links should open
new windows.
First, create the document to be displayed by the main web browser window, shown in
Figure 17.3, by opening your text editor of choice and entering the following lines of
code:
Input ▼
<!DOCTYPE html>
<html>
<head>
<title>Parent Window - Red</title>
<style type=”text/css” media=”screen”>
body {
background-color: #ff9999;
}
</style>
</head>
<body>
<h1>Parent Window - Red</h1>
<p><a href=”yellow.html” target=”yellow_page”>Open</a> the Yellow Page in a
new window.</p>
,
Download from www.wowebook.com
ptg
<p><a href=”blue.html” target=”blue_page”>Open</a> the Blue Page in a new
window.</p>
<p><a href=”green.html” target=”yellow_page”>Replace</a> the yellow page
with the Green Page.</p>
</body>
</html>
Working with Linked Windows
493
17
,
Output .
FIGURE 17.3
The parent window
(the red page).
This creates a light-red page that links to the other three pages. Save this HTML source
as parent.html.
Next, create a document called yellow.html (see Figure 17.4) by entering the following
code:
Input ▼
<!DOCTYPE html>
<html>
<head>
<title>Yellow Page</title>
<style type=”text/css” media=”screen”>
body {
background-color: #FFFF33;
}
</style>
</head>
<body>
<h1>Yellow Page</h1>
<p>This is the first target page. Its target is <b>yellow_page</b>.</p>
</body>
</html>
,
Download from www.wowebook.com
ptg
Output .
FIGURE 17.4
yellow.html web
browser window
named
yellow_page.
494
LESSON 17: Working with Frames and Linked Windows
,
After saving yellow.html, create another document called blue.html (see Figure 17.5)
by entering the following code:
Input ▼
<!DOCTYPE html>
<html>
<head>
<title>Blue Page</title>
<style type=”text/css” media=”screen”>
body {
background-color: #99ccff;
}
</style>
</head>
<body>
<h1>Blue Page</h1>
<p>This is the second target page. Its target is <b>blue_page</b>.</p>
</body>
</html>
,
Download from www.wowebook.com
ptg
Next, create a fourth document called green.html, which looks like the following:
<!DOCTYPE html>
<html>
<head>
<title>Green Page</title>
<style type=”text/css” media=”screen”>
body {
background-color: #ccffcc;
}
</style>
</head>
<body>
<h1>Green Page</h1>
<p>This is the third target page. Its target is <b>yellow_page</b>. It
should
replace the yellow page in the browser.</p>
</body>
</html>
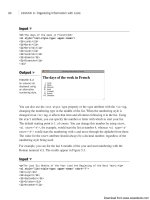
To complete the exercise, load parent.html (the red page) into your web browser. Click
the first hyperlink to open the yellow page in a second browser window. This happens
because the first hyperlink contains the attribute target=“yellow_page”, as the follow-
ing code from parent.html demonstrates:
<p><a href=“yellow.html” target=“yellow_page”>Open</a> the Yellow Page in a
new window.<br />
Working with Linked Windows
495
17
Output .
FIGURE 17.5
blue.html
displayed in
the web browser
window named
blue_window.
, ,
Download from www.wowebook.com