Exxhange SQL And IIS- P55 pptx
Bạn đang xem bản rút gọn của tài liệu. Xem và tải ngay bản đầy đủ của tài liệu tại đây (275.27 KB, 5 trang )
Managing the Client Access Server • Chapter 5 247
If you still have Exchange 2000 or 2003 back-end servers in your organization and these are
accessed via the CAS, you also need to create the legacy OWA virtual directories. You do so using
the following commands:
New-OwaVirtualDirectory –OwaVersion: “Exchange2003or2000” –Name “Exchange” –WebSite
“Clients” –VirtualDirectoryType: Mailboxes
New-OwaVirtualDirectory –OwaVersion: “Exchange2003or2000” –Name “Public” –WebSite
“Clients” –VirtualDirectoryType: PublicFolders
New-OwaVirtualDirectory –OwaVersion: “Exchange2003or2000” –Name “Exadmin” –WebSite
“Clients” –VirtualDirectoryType: Exadmin
New-OwaVirtualDirectory –OwaVersion: “Exchange2003or2000” –Name “ExchWeb” –WebSite
“Clients” –VirtualDirectoryType: ExchWeb
The last virtual directory we must create is the /Rpc and /RpcWithCerts virtual directories
used by Outlook Anywhere. These directories cannot be created using the Exchange Management
Shell, thus we must create them from a fi le. To do so, we fi rst save both of the directories to a fi le.
This is done by right-clicking the directory name and choosing All Tasks | Save Confi guration
to a File in the context menu. Type a name for the fi le and click OK to save it as an XML fi le.
Now, right-click the new Clients Web site, select New | Virtual Directory (from fi le). Next,
specify the location to the XML fi le storing the virtual directory confi guration settings, open it,
click Read File, highlight the location name, and click OK to create the new virtual directory
as shown in Figure 5.7.
Figure 5.7 Importing the Virtual Directory from the XML File
248 Chapter 5 • Managing the Client Access Server
When all Web sites and virtual directories have been created, your IIS Manager should look
similar to Figure 5.8.
NOTE
The Rpc and RpcWithCerts virtual directories are created under the Default Web Site
when you add the RPC over HTTP Proxy component. Instructions on how this is done
are included in the next section.
Figure 5.8 Web Sites in IIS Manager
Now you just need to assign an SSL certifi cate to each Web site. You should leave the self-signed
SSL certifi cate assigned to the Default Web Site and assign a traditional third-party SSL certifi cate
to the Clients and AutoDiscover Web sites, respectively. The name specifi ed in the common
name fi eld of the SSL certifi cate, which will be assigned to the AutoDiscover Web site, should
Managing the Client Access Server • Chapter 5 249
be autodiscover.domain.com. The common name for the Clients Web site can be anything you like
(such as mobile.domain.com)
Instructions on how you request and then assign an SSL certifi cate to a Web site is covered in
the following section.
Managing Outlook Anywhere
Outlook Anywhere makes it possible for your end users to remotely access their mailbox from the
Internet using their full Outlook client. Those of you with Exchange 2003 experience most likely
know the technology behind the Outlook Anywhere feature already since Outlook Anywhere is just
an improved version of RPC over HTTP.
The technology behind Outlook Anywhere is basically the same as in Exchange 2003. It still
works by encapsulating the RPC-based MAPI traffi c inside an HTTPS session, which is then
ultimately directed toward the server running the RPC over HTTP proxy component on your
internal network, giving you the same functionality when using the Outlook client from a machine
on your internal network. When the HTTPS packets reach the RPC over HTTP proxy server, all of
the RPC MAPI traffi c protocols are removed from the HTTPS packets and forwarded to the
respective Mailbox server. This means that by using RPC over HTTP, your end-users no longer have
to use a virtual private network (VPN) connection to connect to their respective Exchange mailboxes
using their favoritte, fatter, Outlook client.
The fi rst necessary step when deploying Outlook Anywhere is the valid installation of a Secure
Sockets Layer (SSL) certifi cate from a trusted Certifi cate Authority (CA), one your clients trust by
default.
SOME INDEPENDENT ADVICE
Security best practice is to publish Outlook Anywhere using a reverse proxy such as
an ISA 2006 Server in your perimeter network (aka DMZ or screened subnet). By
using ISA Server 2006 in the perimeter network to route RPC over HTTP requests and
positioning the Client Access Server on the internal network, you only need to open
port 443 on the intranet fi rewall in order for you Outlook clients to communicate
with the Mailbox server.
Installing a Third-Party SSL Certifi cate
To issue a request for an SSL certifi cate, you can use the IIS Manager, a method most of us are
already familiar with. I have included the required steps for those who need a refresher.
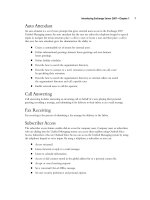
1. Log on to the Exchange 2007 Server on which the Client Access Server role
is installed.
250 Chapter 5 • Managing the Client Access Server
2. Click Start | All Programs | Administrative Tools and select Internet Information
Services (IIS) Manager.
3. Expand <Server name> (local computer) | Web Sites, and then open the Property page
for the Default Web Site.
4. Click the Directory Security tab, as shown in Figure 5.9.
Figure 5.9 The Directory Security Tab of the Default Web Site in the IIS Manager
5. Click Server Certifi cate, and then click Next.
6. Select Create a new certifi cate, as shown in Figure 5.10, and then click Next.
Managing the Client Access Server • Chapter 5 251
7. Since we’re preparing a certifi cate request for a third-party SSL certifi cate, select Prepare
the request now, but send it later and click Next.
8. Type a name (such as SSL Client Access to Exchange) for the new certifi cate, one that’s
easy to refer to and remember. Leave the bit length at 1024 and click Next.
9. Enter the organization and organizational unit name, and then click Next.
NOTE
As mentioned earlier in this chapter, during setup Exchange 2007 installs an SSL
certifi cate on the default Web site by default. If you haven’t removed this certifi cate
yet, do so now before you proceed with the next steps.
Figure 5.10 Selecting to Create a New Certifi cate